background image

Satellite set-up

S

atellite or cable receiver

14

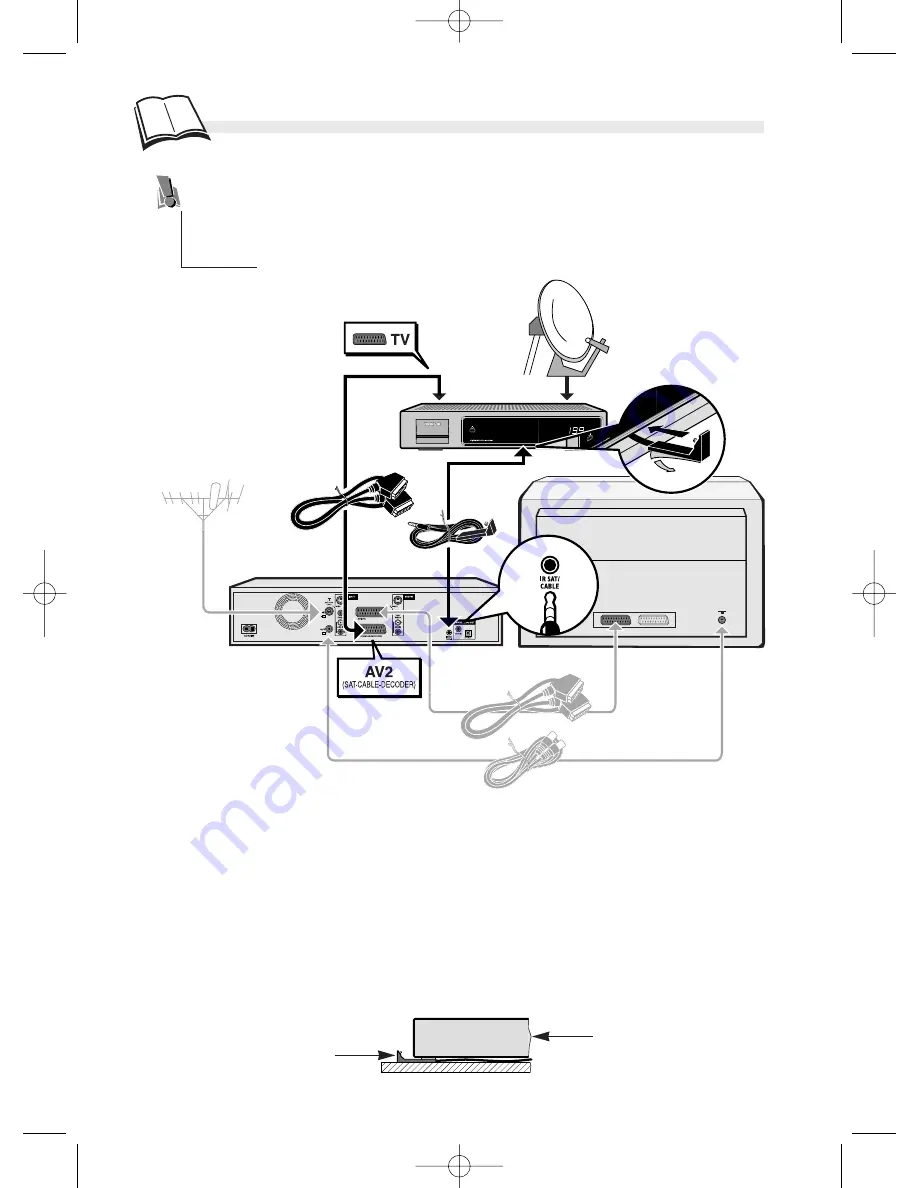
Your DMR is designed to control a satellite receiver. For this purpose, the satellite

receiver must be connected to the AV2 and IR SAT/CABL sockets of the DMR. Before
you connect your satellite receiver to your DMR, you need to set up all the channels on
the satellite receiver (receiver directly connected to the TV set) and check that you can
view them on your TV set. Then connect the devices as described below.

Adjusting your DMR’s IR (infrared) controller cell 

You need to find the correct positioning of the IR controller cell in relation to the front of the
satellite or cable receiver so that your DMR can transmit the commands as you would do with
the satellite receiver’s remote control. The IR (infrared) controller cell must face the receiver
cell of the satellite receiver. You can locate the receiver cell of the satellite receiver by
bringing its remote control as close as possible to the front of the device and trying to change
channels. Move the remote control one centimetre and try again. When the channel of the
satellite receiver changes, locate the position on the front of the unit. Then install the IR
controller cell as shown on the diagram below, facing the cell of the satellite receiver (1 or 2
cm away). If need be, use the adhesive supplied to stick the cell in place.

DTH 7000 E

Satellite receiver

TV set

Satellite receiver

IR controller cell

IR controller cell

DTH7000-EN  23/08/02 10:24  Page 14

Summary of Contents for DTH 7000 E

Page 1: ...or your safety Never open the player or any of its components It can be dangerous for you or for certain fragile components You could receive an electric shock or touch the laser beam Do not place your eyes close to the opening of the disc tray or any other opening to look inside the player Discs Always handle your discs with care Hold a disc with fingers on the border or hole Always place disc wi...

Page 2: ...ng in real time to answer the phone then resume watching where you had left off Delayed viewing fast forward and rewind functions enable you to play and replay the most interesting sequences without having to worry about the rest of the program which is still being recorded These features could make you loose track of time Fortunately the LIVE key keeps you in contact with real time by immediately...

Page 3: ...eo CD VCD Video Compact Disc CD on which you can record up to 74 min of VHS quality video associated with still images audio tracks and interactive menus MP 3 files CD Rs and CD RWs containing SOUND files in MP3 format JPEG files CD Rs and CD RWs containing PICTURES in JPEG format max image size 2 1 million pixels CD R CD RW Most CD R one recording only and CD RW discs rewritable Depending on the ...

Page 4: ... a TV recording 42 TV guide NAVICLICK 43 VIDEO menu 44 Managing your recordings 45 Important 1 Your DTH 7000 E 2 Discs you can play 3 Contents 4 Functions index 5 Unpack your equipment 6 Inserting the batteries 7 Basic connections 8 Initial installation 9 Automatic channel search 10 13 Satellite or cable receiver 14 17 Rear connectors 18 Other connections 19 20 Front connectors 21 Remote control 2...

Page 5: ...formats on your TV set 35 Time 13 Naviclick guide downloading time 54 Automatic channel search 10 Manual set up 12 Manual channel search 12 Channel set up 10 Display language and country of residence 10 15 Preferred language 9 Time set 13 Channel update 13 Naviclick update 54 NexTView Link 10 Black level 51 Channel numbers 12 Station numbers 11 New channel 11 Country of residence 12 IR controller ...

Page 6: ...0 E Remote control and batteries non rechargeable batteries AA type IR Controller R F lead Mains lead Scart peritel cable 21 cabled pins This manual will enable you to install your DMR by connecting it correctly and setting up the channels To do this follow each step of the instructions given in this document Set up and user manuals DTH7000 EN 23 08 02 10 24 Page 6 ...

Page 7: ...o avoid any risk of explosion observe polarities indicated inside the battery compartment Replace only with the type of batteries specified above Do not throw them into fire do not recharge them If you are not using the remote control for a long period of time remove the batteries 1 2 3 Please respect the environment and prevailing regulations Before you dispose of batteries ask your dealer whethe...

Page 8: ...labelled AV 1 EXT 1 AUX 1 depending on the make Use the electric cable to connect your DMR to a mains socket by first connecting the cable to the back of the DMR Your DMR has many connection possibilities to allow it to fit into a setup comprising several devices We recommend that you follow the connection setup on this page and then carry out the adjustments shown on the following pages You will ...

Page 9: ...n keys 1 then confirm by pressing ok Installation Initial installation 9 EN EN In the following pages the Navigation keys will be described by the symbols ˆ Also refer to pages 22 to 26 1 To take full advantage of your DMR s TV functions you must carry out initial installation settings These settings are explained on pages 9 to 13 Prior reading of that section will make this easier Follow each sta...

Page 10: ...me When all the channels that you can receive in your area have been stored 100 is indicated The number of channels found is indicated by xx channels found Press ok Your DMR is equipped with the AV Link function This function simplifies channel set up by downloading them from an AV Link or similar television set Easy Link Smart Link Megalogic etc which is already set up The channels downloaded in ...

Page 11: ...lock setting as follows If you want to redo the automatic channel set up you will have to select Interactive setup in the Installation menu in the Setup menu Clock setting 1 The year is highlighted Enter the year s 4 digits press 2 0 0 2 for 2002 2 Then enter the 4 digits of the date press 1 6 0 5 for 16th May 3 Enter the 4 digits of the time press 1 5 5 9 for 15 59 3 59 PM 4 Then press twice on o...

Page 12: ...e type of antenna Reception through external antenna select Antenna Ch Cable reception select Cable Ca 8 Select the Channel line using the or ˆ keys 9 Press pr to start the Manual search ð The search starts When a channel is found the picture appears in the background The channel number is indicated e g Ch 06 If the channel is encoded press av to display the pictogram next to the channel number If...

Page 13: ...tions below 1 If the main menu is not displayed press the menu key 2 Select the Setup line using the or ˆ keys and press ok to validate 3 Select the Installation line using the or ˆ keys and press ok to validate 4 Select the Manual Clock line using the or ˆ keys and press ok to validate Sorting the channels 1 If the main menu is not displayed press the menu key 2 Select the Setup line using the or...

Page 14: ...eiver so that your DMR can transmit the commands as you would do with the satellite receiver s remote control The IR infrared controller cell must face the receiver cell of the satellite receiver You can locate the receiver cell of the satellite receiver by bringing its remote control as close as possible to the front of the device and trying to change channels Move the remote control one centimet...

Page 15: ...tic line is already highlighted press ok ð The screen which appears is a set up screen for the allocation of input terminals 8 If you connected your devices as indicated on page 14 check that Satellite Receiver has been allocated to AV2 SAT CABL otherwise change the allocation using the key 9 Then select the line Done and press ok ð An installation window will appear A blue cursor shows the progre...

Page 16: ... itself on channel 12 check that channel number 12 appears on the display panel of the satellite receiver sometimes fleetingly and even if no picture is visible on the TV screen If the satellite receiver is not on channel 12 select No with the or keys and press ok ð Your DMR sends a new command to the satellite receiver Several tests are possible depending on the make of your satellite receiver If...

Page 17: ... HITACHI 19 JOHANSSON 25 JVC 19 08 KATHREIN 26 MANHATTAN 25 MASPRO 27 MATSUI 21 MIMTECH 28 MINERVA 21 MITSUBISHI 19 MORGAN 06 NAGAI 29 NEC 30 NETWORK 31 NIKKO 32 NOKIA 23 NORDMENDE 19 33 OXFORD 08 ORBITECH 47 PACE 19 PALADIUM 21 PALCOM 35 PALSAT 29 PANASONIC 19 36 PHILIPS 20 PROSAT 19 QUADRAL 38 REDIFFUSION 39 RFT 20 21 26 SABA 02 05 40 49 SABRE 58 SAKURA 41 SALORA 23 SAMSUNG JUPITER 42 SEEMANS 43...

Page 18: ...ontrol a satellite or cable receiver 12 13 Digital Audio Outputs to amplifier or TV Audio connections sound Video connections picture Connections The table below lists the connectors and quality of your DMR s output signals Select one of the connection setups described for video connection and one of the setups described for audio connection Sound quality Type of connector used OPTICAL socket 13 T...

Page 19: ... VCR the SCART sockets must transmit RGB signals Video recorder Sat Cable decoder TV TV Your DTH 7000 E Your DTH 7000 E Sat Cable decoder For the interconnection of the devices if is preferable to use Scart cables with 21 pins connected the cable between the sockets is bigger DTH7000 EN 23 08 02 10 24 Page 19 ...

Page 20: ...ns through the S Video picture and RCA sound sockets Plasma Screen Video Projector Your DMR DTH 7000 E Audio Video amplifier Sat Cable decoder Camcorder TV VHS or S VHS video cassette recorder DTH7000 EN 23 08 02 10 24 Page 20 ...

Page 21: ...rough a digital camera or MP3 recorder k page 38 PHONES To connect headphones and listen to the channel displayed an audio CD a DVD or MP3 files Volume setting k page 24 AV Select the audiovisual sources channels or sockets by displaying P Pr r A AV V1 1 A AV V2 2 A AV V3 3 A AV V4 4 on the front panel The AUDIO VIDEO sockets make it easy to view or copy video clips Recognised players USB 1 1 MASS...

Page 22: ...played k page 26 Back to previous menu To choose the dialogue language and audio format k pages 29 47 To choose the subtitle language k pages 29 47 To access the information banner k pages 28 29 Operation with information banners and menus To access the NAVICLICK TV guide or DVD contents k page 43 To select chapters titles and tracks from a banner enter a time for counter access choose a channel e...

Page 23: ...pages 30 31 To skip forward about 30 seconds with each press To blow up the picture during playback slow motion or pause mode k page 33 To play the last scene again Each press steps back 10 seconds during playback of a DVD or recorded program Main functions To view the program being broadcast in real time k page 40 To remove the information banners To select the devices connected on the Audio Vide...

Page 24: ...4 Disc tray 5 OPEN CLOSE To open and close the disc tray 6 PLAY To play a disc inserted in the DMR s disc tray 4 or resume viewing a program after a television pause 7 PAUSE To pause on a still frame DVD for an audio pause audio CD or MP3 or a television pause TV PAUSE 8 STOP To stop playback 9 RECORD To start recording a TV program 10 IG PR PR FI Fast forward or reverse k pages 30 31 To change ch...

Page 25: ... AV 2 or SAT after installation of a satellite receiver k page 14 and following pages AV 3 Rear AV sockets S VIDEO or AUDIO VIDEO AV 4 Front AUDIO VIDEO sockets Real time viewing k TV mode activated channel 1 being watched Delayed viewing of the selected channel k After a pause you resume viewing where you left off while the end of the program continues to be recorded the time difference between d...

Page 26: ...e the DMR languages of the menus and disc audio outputs display modes to choose the play mode and lock the player The appearance and contents of the menus vary according to the DVDs follow on screen instructions 1 2 ou 1 Display the menu by pressing the menu key disc loaded Disc Menu or STOP key Main menu of the DMR 2 Select a menu or function by pressing the Navigation key 3 Validate your selecti...

Page 27: ...nnected to the DMR s USB socket k page 21 Main menu of the DMR Video Music Pictures These menus give you access to the files music and images and video recordings stored on your DMR s hard disc k pages 39 44 Recording To program recordings and configure the corresponding settings k page 45 Setup To set up the TV channels on your DMR to access the child lock and configure your player menu and disc ...

Page 28: ...atched Recording the channel being watched here channel 11 Current time Time set k page 13 Naviclick Information k page 43 Indications concerning the channel sound and the selection of audio channels No and name of the channel selected on the DMR k page 40 LIVE function real time or delayed viewing k page 40 Playback of a video program recorded on the DMR Time elapsed since the beginning of playba...

Page 29: ... chapter track scene or entire disc k page 32 To repeat the playback of a disc or music track k page 32 To select the play mode Standard Playlist Random k page 34 Chapter 2 currently being played k page 31 Title 1 currently being played k page 31 INTROSCAN To play the first 20 seconds of each track Track 1 currently being played k page 31 Play mode 1 k pages 30 31 Time elapsed k page 31 With a VCD...

Page 30: ...e disc menu appears Press ok to start playback or select another option 4 in the disc menu using the Navigation keys To validate your selection press ok With an audio CD or video CD playback starts To access a specific CD track DVD title or chapter press the info key to display the Info banner k page 29 or press pr To stop playback momentarily 2 press STOP once Press twice to stop it completely 3 ...

Page 31: ...oaded an audio CD Slow motion DVD and Video CD Press PAUSE then FWD or REV 1 to view one frame at a time either forward or backwards 1 1 With certain discs direct access to a scene is not possible even if the time elapsed is shown on the banner This symbol is sometimes displayed It indicates that the function is not available or that the key used is incorrect A question mark in the counter zone in...

Page 32: ...ctive as long as the disk is in the DMR or as long as the DMR remains switched on Repeat play only works with discs that show the elapsed time on the display This may not work correctly with certain discs Video CDs in PBC mode If during a fast forward or backward reading the B point is reached the DMR will proceed at normal speed from the A point If during a fast search the A point is reached the ...

Page 33: ...u Depending on the disc the menu may extend over more than one screen To see the other screens use the ÃÃ skip keys Some discs displaying a menu at start up will automatically go in to play mode if nothing is changed on the menu after a certain period of time Press PLAY to start playback To return from playback to the menu press return Press STOP to stop playback and remove the menu Complete stop ...

Page 34: ...han one title and each title has a separate menu for that film or program Select DVD Title and press ok to access the disc menu Screen Format DVD Video CD Depending on the format of the DVD being played use the Screen Format function to choose the picture format which best suits the format of your TV screen 1 letterbox format 16 x 9 or standard format 4 x 3 Also refer to the table on page 35 With ...

Page 35: ...box Screen horizontally enlarged with black bands at top and bottom Full screen TV set connected to the DMR FULL mode ZOOM mode AUTO mode 16 9 4 3 Right and left edges are cut off Full screen Full screen with black bands at left and right Top and bottom edges are cut off Full enlarged screen with few deformations Letterbox with black bands at top and bottom The images which appear on the TV screen...

Page 36: ...orward or backward press pr pr To stop the image display press the STOP key To exit the disc contents press the menu key During the slide show press the yellow info key to display an information banner If the image appears upside down or sideways press PAUSE then use the keys to display the image the right way up If JPEG or MP3 files are recorded on the disc or the disc is a Video CD containing JP...

Page 37: ... manual If it does not appear press the PLAY button Use the remote control Navigation keys to select your album song and play mode 1 Press the PLAY key to start playback Use the pr pr keys to skip from one song to another Press the PAUSE key to interrupt playback To stop playback press the STOP key To exit the disc contents press the menu key A disc may contain several albums folders and each albu...

Page 38: ...ns Recording can take a certain amount of time depending on the number of files to be copied Recording from a memory card Refer to page 21 for the connection of a compatible card reader on the USB socket at the front of your DMR Insert the memory card to be copied In the MAIN MENU select the Memory Card 1 line and press ok to validate Select Start to read the contents of the card or Copy to copy i...

Page 39: ...ecordings are stored Use the remote control Navigation Navigation keys to select a folder or song Choose a play mode 1 or an action such as Resume to customise the names of the folders and recordings kpage 45 Delete to delete a folder or recording kpage 45 Press ok to start playback In the Main Menu select the Pictures line and press ok to confirm In the Main Menu select the Music line and press o...

Page 40: ...ll be erased to make room for the subsequent minutes To resume watching the program where you had left off press PLAY ð From that moment the program is watched in delayed viewing To watch the program in real time press LIVE Real time TV Program Example Once you have activated the PAUSE LIVE TV mode you cannot change channels since the recording of a TV program onto the hard disk does not allow the...

Page 41: ...ur program recordings refer to the VIDEO menu on page 44 Recording the current program To record the program you are watching press RECORD Recording is confirmed by the message RECORD which appears for a few seconds on the DMR s display panel An information banner is also displayed along with the picture for a few seconds To display it again press the yellow info key Time elapsed since the beginni...

Page 42: ...encoded program Day s Enter the date if the recording is planned for another day Time Enter the program starting and finishing time Recording Quality 1 Select High 1 Normal 2 or Basic 3 VPS PDC Select On to start the recording at the actual time of the start of the program if the channel broadcasts VPS PDC signals Select Keep and press ok to save the programming To exit the menus press return When...

Page 43: ...ce yourself on the program you want to record To go from one channel to another use the pr pr keys or keys 4 Press ok to confirm your selection ð The programming contents appears It tells you which recordings have already been programmed For more details on each programmed recording use the Navigation Navigation keys to select the one which interests you and press ok to validate The Timer menu app...

Page 44: ... keys then press ok The function line is selected Choose a play mode using the keys Standard Play to start playback of the title Resume to resume playback of the title after a pause Repeat Title to repeat playback of the title Delete Title to delete the title from the hard disc Rename Title to customise the names of the video titles k page 45 Press ok to confirm your selection If you have selected...

Page 45: ... or video sequences from a connected device This capacity depends on the quality setting chosen in the Recording Quality menu In the Main Menu select the Recording line and press ok to validate Select Recording Quality and press ok to validate With the Navigation keys Enter the name by selecting the letters one by one Press ok to validate To erase a letter press DEL Press ok to validate To add a s...

Page 46: ...e default language is the one you selected during installation k page 5 or the one you set according to the instructions on the previous page provided this language is available on the disc being played To change the language of the dialogues your player offers you two possibilities 1 From the DMR menu Using the Navigation keys select Audio to access the list of languages available 2 From the bann...

Page 47: ...nstallation k page 5 If the DVD you are watching doesn t offer that language the default language chosen by the publisher will be proposed to you Subtitles Language of DVD subtitles Some discs offer a selection of subtitle languages The default language is the one you selected during installation k page 5 or the one you set according to the instructions on the previous page provided this language ...

Page 48: ... secret code To change the secret code select the Password line and press ok to validate Enter your new 4 digit code Enter it once more to confirm Choose a four digit number that you will be able to remember easily or note it down If you ve forgotten your secret code consult the Troubleshooting guide at the end of this manual k page 57 1 The padlock tells you whether or not the DMR is locked Locke...

Page 49: ...s now enabled the padlock is closed and the accompanying number corresponds to the rating chosen Unrated titles Unrated titles without a rating limit may all be freely accessible or require a secret code select Unrated titles and press ok to validate Select Free Access or Password required then press ok to validate This function is only available on DVDs for which the publisher has set a rating li...

Page 50: ...m onto the two channels of your TV or stereo amplifier The sound effects of a 5 1 system are then simulated Dolby Digital is a sound compression technique elaborated by Dolby Laboratories for digital audio multichannel signals The Dolby Digital system enables any audio channel configuration from a stereo sound 2 channels up to the digital surround sound 5 1 Dolby Digital and the double D symbol ar...

Page 51: ...our DMR has an Eco Standby to reduce its power consumption when on stand by Select On to enable this function Stand by mode PAL is the name of the colour coding system used in most European countries NTCS is the name of the colour coding system used in the United States and some other countries 1 The Eco function does not allow the display of programming warning messages on the display panel Only ...

Page 52: ...remote control perform the remote control set up again The hifi sat position enables you to control either a hifi system or a satellite receiver 3 While holding down the menu enter the 3 digit code with the number keys Other codes at the end of the manual Examples BRANDT 000 001 010 020 FERGUSON 001 003 004 000 010 020 NORDMENDE 001 010 020 000 SABA 000 001 005 010 019 020 TELEFUNKEN 000 001 002 0...

Page 53: ...i system or amplifier Set the switch to tv Set the switch to hifi sat Standby On To display the menu Direct access to the programmes or enter the numeric values To select a radio station using its number To change channels Select the AV input To change stations To switch the sound off and back again To set the volume level Audio cassette functions Exit the menus Horizontal and vertical scrolling t...

Page 54: ...ess and hold the key for a rapid selection Refer to the list of channels on the next page Naviclick update Some channels may modify the layout of their Teletext broadcast In such a case and unless the structure is totally changed you will have to update the number of the first Teletext page allocated to the TV guide for the Naviclick function to start working again The list of pages is usually inc...

Page 55: ...d3 NED3 Network2 NET2 Nickelodeon NICK Nova TV NOVA NRK1 NRK1 NRK2 NRK2 ORB3 ORB ORF1 ORF1 ORF2 ORF2 Phönix PHOE Polsat POLS Polsat2 POL2 Premiere PREM Prima PRIM Pro7 PRO7 QVC QVC QVC UK QVC Racing Ch RACE RAI 1 RAI1 RAI2 RAI2 RAI3 RAI3 Rete4 RTE4 RTBF1 BF1 RTBF2 BF2 RTE1 RTE1 RTL RTL RTL2 RTL2 RTL4 RTL4 RTL5 RTL5 RTL7 RTL7 RTP1 RTP1 RTP2 RTP2 RTPI RTPI Sat1 SAT1 SCI FI channel SCI Scottish TV SC...

Page 56: ...ockets of the various devices The image format doesn t match the screen format of your TV set The image format is adjustable Refer to pages 34 and 35 With certain discs the format is pre set and cannot be changed Sound problems No sound Check that the DTS and Dolby Digital settings are suited to the specifications of the device connected to the digital audio sockets coaxial or optical k page 50 Th...

Page 57: ...ng down your player s STANDBY ON key press and hold down the remote control s STOP key for at least 3 seconds of your DMR Release the STANDBY ON button Turn off your DMR then turn it back on by pressing the STANDBY ON button at the front of your DMR The menu displayed on screen is the menu which enables you to choose your DMR s display language It confirms that all settings made since initial inst...

Page 58: ... and code protected to prevent illegal copying These files are of the following types Windows Media registered trade mark of Microsoft Inc and SDMI registered trade mark of The SDMI Foundation You must not copy such files About CD R discs About MP3 files copied onto CD Rs This unit can play most CD R discs However depending on the condition of the CD recorder computer and the disc used you may fin...

Page 59: ...position 2 Press and hold the menu key 3 With the number keys press 2 0 0 4 Release the menu key DMR setting on code B 1 Switch on your DMR 2 Check that there is no disc in the disc tray 3 Simultaneously press the STOP PLAY AV buttons at the front of your DMR and release them when your DMR displays D DV VD D B B 4 Try to control your DMR with the remote control Code No to key in On display panel A...

Page 60: ...o signal to noise ratio DVD 110 dB A wtd Wow and flutter below measurable limits Total harmonic distortion less than 0 004 Tuner PLL VPS PDC Type Reception norms LL BG I DKK Number of storable channels 99 Hard disc 40 Gb Up to 36 hours on Low quality Remote control Infrared 33 Khz Batteries 2 x 1 5 V AA Menu language French English German Spanish Italian Swedish Nominal Specification THOMSON Multi...

Reviews: