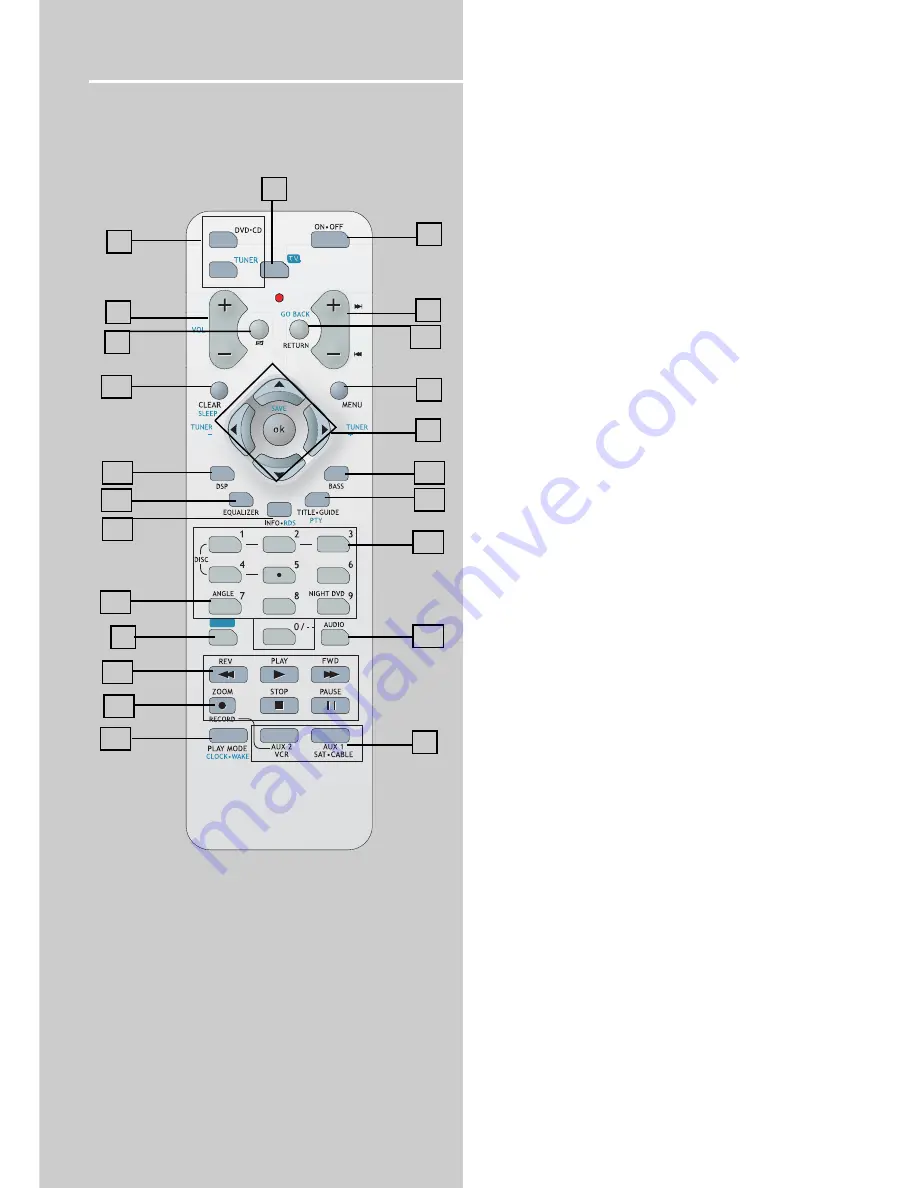
background image

PR

AV

6

Function Overview

Remote Control

Please be sure you have inserted the batteries into the
remote control (see relevant section on page 3.) You can test
it by pressing any button.

1. ON-OFF

• To turn on or turn off the receiver and other auxiliary components.

2. Source Buttons

• To turn on and select various audio / video sources.

3. PR+, PR- (Channel Buttons)

• To select programmed stations in TUNER mode.
• To skip to the next / previous chapter, track or image in DVD, CD , mp3
and JPEG mode.

4. VOL+, VOL- (Volume Buttons)

• To adjust the volume level.

5. MUTE

• To mute / un-mute all audio outputs.

6. AV

• Press to select VCR or TV input.

7. Adjustment Buttons

• When the display shows the general setup page, press the arrow buttons
to select the option you want to change, and press the up and down
buttons to make changes, then press 

OK 

to finalize your choice.

8.  Number Buttons

• In Tuner mode, press to select a preset station.
• In DVD/CD mode, enable pull down menu by 

INFO•RDS

 (Button 15), then

press the 

OK 

key to select field to be adjusted. Press the Number Buttons to

direct input the settings (e.g. CD track)

9.  MENU

• In Tuner mode:
- Press 

TUNER 

to select band.

- Press to store desired frequency in memory. The flashing word PROG will
appear on display. Input your desired channel number while the word is still
flashing and the frequency will be stored.
• In DVD mode, press for menu setup for DVD title.

10. Operation Buttons

• Press 

TUNER 

on the remote to enter tuner mode. In TUNER mode, you

can press 

TUNER 

to select band, and press 

TUNER + 

or 

TUNER - 

buttons to

tune down or up the radio frequency.
• In CD/DVD mode
- press the 

PLAY 

button to start playback.

- press the 

STOP 

button to stop playback.

- press the 

PAUSE 

button to pause playback.

- press the 

REVERSE/FORWARD

 buttons to search backward/forward

throughthe disc.
• In DVD mode
Press the 

PAUSE 

button to pause playback and then press the 

REV 

or 

FWD

buttons to make a backward and forward slow motion playback. A number
of speeds can be selected by toggling 

REVERSE 

or 

FORWARD 

buttons.

Reverse slow motion will be available at the same step as Forward play for
DVD only. Only 3 different speeds are available in VCD/SVCD forward play.

11. RETURN

• Press to go back to previous menu or exit setup menu completely.

12. AUDIO

• Press to select the audio channel you like. (e.g. Stereo / Mono Left /
Mono Right)
•  In SVCD mode, press to toggle 4 different audio channels (if
available).
•  In Tuner mode, press this button to switch from ST to MONO mode and
vice-versa.
•  In DVD mode, press to select different audio channel (if available).

13. ANGLE (DVD only)

• Press to select different screen display angles.

14.  ZOOM 

(VCD/SVCD/DVD/JPEG file)

• During VCD/SVCD/DVD/JPEG files playback, press 

ZOOM 

and then press

UP/DOWN/LEFT/RIGHT

 to pan the image.

15. INFO-RDS

• In DVD/CD mode, press to display playback information.
• In TUNER mode, press to display RDS information.

16.TITLE-GUIDE

• Press to go to the title menu at DVD mode.

17. DSP

• Press to change the surround sound settings. The display will toggle
among Dolby Digital, DTS and Stereo.

18. PLAYMODE

• Press to enter repeat mode selection.

19. EQUALIZER

• Press to toggle between BASS, TREBLE and speaker’s level setting, then
press 

LEFT/RIGHT

 to change the setting.

20. BASS

• To adjust BASS / TREBLE, press this button once to choose either bass or
treble, then press 

LEFT/RIGHT

 to adjust level. (Bass / treble adjustment is

not allowed for DTS source)

21. CLEAR / SLEEP

• Press once to enter or quit SLEEP mode.

22. TV

• Press to enable the remote to control a RCA TV.
• Press 

DVD

TUNER

AUX1

 or 

AUX2 

buttons to return to the appropriate

mode.

1

3

9

8

2

4

6

2

5

7

20

16

12

21

17

19

15

10

18

11

13

14

22

Summary of Contents for DPL911VD

Page 1: ...THOMSON 46 quai Alphonse Le Gallo 92648 Boulogne Cedex FRANCE www thomson net 55930860 ...

Page 2: ...DPL911VD It is important to read this instruction book prior to using your new product for the first time u s e r m a n u a l ...

Page 3: ...lease follow the directions below The moulded plug cannot be rewired and if removed must be dis posed of safely Do NOT under any circumstances plug the severed plug into any mains socket as this could result in electric shock Important If the plug is removed rewire the new plug as follows The wires in the mains plug are coloured in accordance with the following code BLUE NEUTRAL BROWN LIVE As the ...

Page 4: ...g up the Digital Home Theater system 9 General setup 10 Audio setup 11 Setting the language 12 Setting the parental 12 Setting the password 12 Set as defaults 12 Playing Discs General operation 13 Basic playback 13 Using the menu for DVD 13 Playing mp3 music files and displaying JPEG files 15 Using the menu for VCD 16 Using the menu for CD 17 Playing video CDs with PBC 17 Table of Content Other Fu...

Page 5: ...RAM CDV SACD DVD Audio High resolu tion tracks Data part of CD Extra disc with non standard shape e g heart disc with region code different from the one specified on the back of the unit Glossary of disc terms Title DVD The longest sections of a picture or a music piece on a DVD a movie etc for a picture piece on a video soft ware or an album etc for a music piece on and audio software Each title ...

Page 6: ...ot install more than 1 disc on disc tray Do not place the disc on the tray up side down Do not try to close the disc tray when the disc is not installed properly Accessary Check that you have the following items Main unit 1 Subwoofer 1 Speakers 5 Remote control 1 AAA batteries 2 Video cable 1 Speaker cords 6 AM loop antenna 1 FM pigtail antenna 1 Operations Manual 1 Inserting Batteries into the Re...

Page 7: ...d 9 PLAY indicator Arrow icon is lit during playback 10 Title indicator Shows the title number Display 11 Track Indicator Shows the track number on CD 12 Preset indicator Shows the preset station 13 Chapter indicator Shows the chapter number 14 Program indicator Shows when programming is in progress 15 Sleep indicator Shows when the sleep timer is activated 16 Repeat indicator Shows when the repea...

Page 8: ... press the REVERSE FORWARD buttons to search backward forward throughthe disc In DVD mode Press the PAUSE button to pause playback and then press the REV or FWD buttons to make a backward and forward slow motion playback A number of speeds can be selected by toggling REVERSE or FORWARD buttons Reverse slow motion will be available at the same step as Forward play for DVD only Only 3 different spee...

Page 9: ... the supplied speaker wire its corresponding terminal jacks To avoid short circuiting the speakers Short circuiting of the speakers may damage the system To prevent this make sure to take the following precau tions when connecting the speakers Make sure the stripped end of each speaker cord does not touch another speaker terminal or the stripped end of another speaker cord Note Be sure to match th...

Page 10: ... VCR TO AUDIO OUT SAT VCR S VIDEO S video provides a better connection for the video portion of the signal than composite video yellow color terminal When connecting S video cable a Composite video cable yellow RCA connector must also be used S video provides video output for DVD playback only VIDEO IN TV S VIDEO IN TV SCART IN TV SCART video output SCART video terminal provides the best quality f...

Page 11: ... the middle of the action because sound is coming from everywhere around you The subwoofer can enhance the bass performance of your system dramatically 1 Press the EQUALIZER button to select a channel The level of the channel will appear on the front panel display FL FR C SL SR SUB TRE BASS change cyclically TRE Treble level and BAS Bass level adjustable range 10 dB to 10 dB at 2 dB step 2 Use the...

Page 12: ...nals to each speaker respectively so you can decide if any fine tuning is needed for that speaker The test tone function can be activated even when there is no disc in the tray Dynamic range setting In many listening situations it is not recommended to set the volume too high and thus the loudest sound must be compressed downwards in level Likewise the very quiet sounds would be inaudible and must...

Page 13: ...s NTSC system select this mode It will change the video signal of a PAL disc and output in NTSC format PAL If the connected TV is PAL system select this mode It will change the video signal of a NTSC disc and output in PAL format Default setting Warning Do not change the setting unless you have a NTSC TV set imported from other countries Play mode setup Setting the Program You can use this functio...

Page 14: ...ct the RESET and press OK all settings in DVD CD mode will be reset to default setting Setting the Parental This function allows to set playback limitation level Playing some DVD discs can be limited depending on the age of the user Explanation of Ratings Limits The Rating Limits feature lets you determine what types of discs can be played in the player and what types of discs will require a passw...

Page 15: ...en banner display 1 Press INFO while playing a DVD disc The on screen banner display appears on the TV screen 2 Use the buttons to select the item you want to change And use the buttons to change the set tings Depending on the disc you can use the number buttons 0 9 to select the item 3 Use the number buttons 0 9 to input the time you want to access 4 Press INFO again to exit Time Display all Info...

Page 16: ...g playback press MENU to access the disc s menu Play Mode Icon DVD CD Info Displays The Play Mode options available depend upon the type of disc you re playing The default play mode standard play plays the disc s contents in the order in which the disc was created i e track 1 plays first followed by track 2 etc Repeat By default the Repeat feature is Off The options available depend upon the type ...

Page 17: ...an use ZOOM to magnify the picture and then press to pan the image Note The time taken for the contents of the disc to be displayed varies according to the size and number of JPEG files on the disc If nothing is displayed after a few minutes it is likely that certain files are too large Try reducing the files resolu tion and write another disc Before inserting a disc check that it is compatible wi...

Page 18: ...VCD disc with PBC on off To cancel PBC playback function and play a Video CD with PBC functions in Continuous Play mode Press INFO and set PBC OFF If a disc is playing the playback will not stop Press PLAY to start playing the disc in Continuous Play mode Using the VCD menu 1 Press INFO while playing a VCD The VCD menu appears on the TV screen The contents of the menu vary from disc to disc 2 Use ...

Page 19: ...to select the track you want to play Depending on the disc you can use the number buttons 0 9 to select the track Using the CD menu Playing Discs 17 Item 2 Select CD Program Mode Use the buttons to select CD Program Mode Normal play Plays tracks in normal order Shuffle on Plays tracks in random order Item 3 Repeat The repeat modes are Repeat A B Repeat all Repeat track and Repeat Off Item 4 CD Int...

Page 20: ...station 5 To preset another stations repeat steps 1 4 Listening to preset radio stations 1 In tuner mode press PR or number keys 0 9 to select the desired preset stations Tuning to a RDS station RDS stations broadcast on FM only 1 Follow steps under Tuning to a Station to tune to the desired radio station or follow steps under Using Presets to tune to a preset station 2 If RDS station is found sta...

Page 21: ... reverse is performed Press PLAY to return to normal play mode Check the speaker settings The left and right sounds are unbalanced or reversed Check that the speakers and components are connected correctly and securely Adjust front balance parameter using SELECT and VOLUME Severe hum or noise is heard Check that the speakers and components are connected securely Check that the connecting cords are...

Page 22: ...nnel driven at 10 THD 6 ohms 1kHz 2 x 45W 2 channel driven at 1 THD 6 ohms 1kHz Subwoofer power 1 x 60W at 10 THD 6 ohms 100Hz Frequency response 30 Hz 20 kHz Signal to Noise ratio 65 dB CCIR General Power supply 230V 50 Hz Power consumption 105 W Dimension 6cmH x 43cm W x 35cm D Speaker System 1 way shielded Impendance 6 ohm subwoofer 6 ohm Dimension 18cm H x 9 9cm W x 8 1cm D Specifications subj...

Page 23: ...not intended to be recharged Transportation information Unplug the unit when the STANDBY LED is on while in STANDBY mode Safety precautions Never open the cabinet under any circumstances Any repairs or internal adjustments should be made only by a trained technician Never operate this product with the cabinet removed Do not touch the player with wet hands If any liquid enters the player cabinet ta...

Reviews: