background image

Owner’s Manual   31

Miscellaneous

ENGLISH

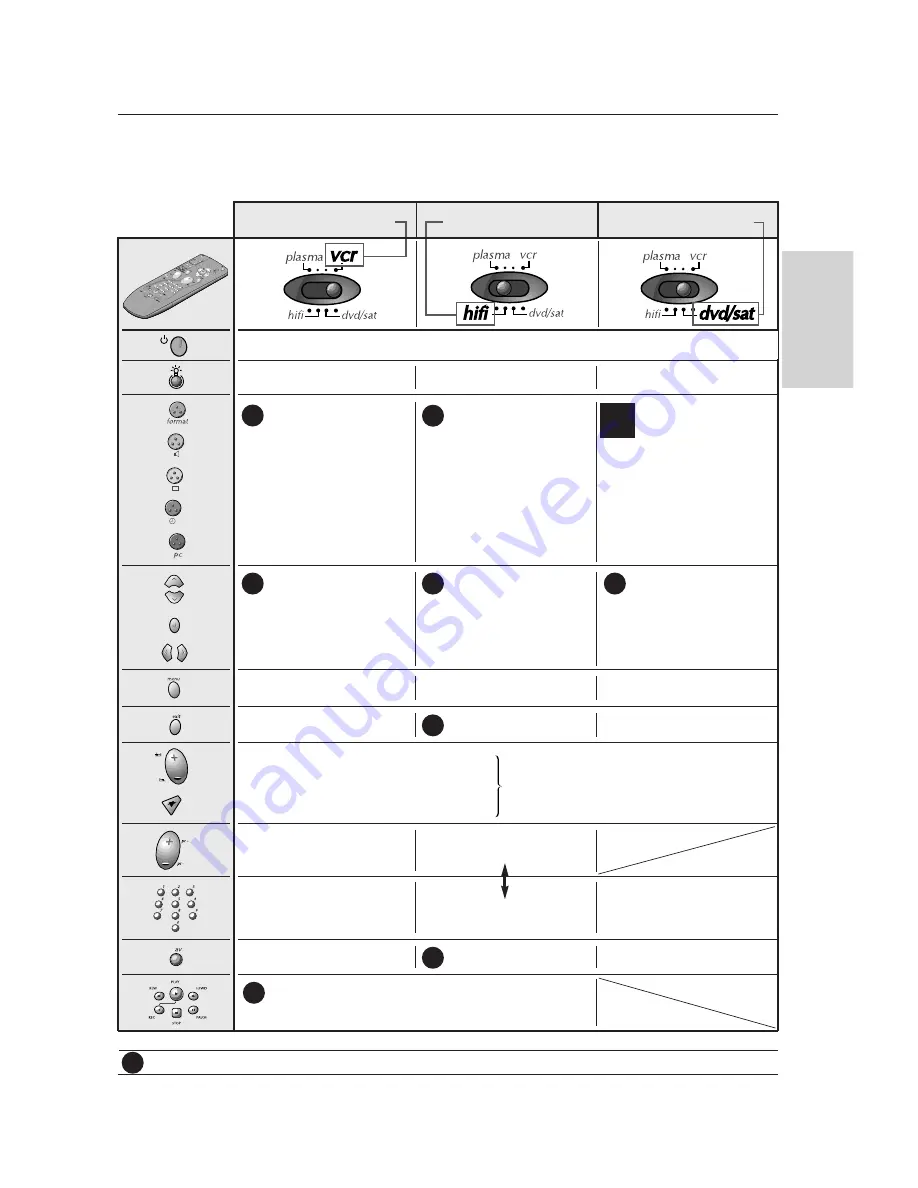
Controlling another device

Controlling another device

- Slide the button to the position of the device that you wish to control;

DVD, LD player or 

satellite receiver.

Video-cassette recorder

Ampli or audio system

VPS

ShowView

Information

NAVICLICK

Display of information on-screen

and navigation in the menus

Dialogue 

*

Sub-title 

*

Information 

*

Summary 

*

Angle 

*

Coaxial or 

digital DTS inputs

Stereo

Sound effects

(cinema, stadium, theatre, etc)

Delay

Selection of the speaker to be

adjusted

Access to Menus

Menu exit

Access to Menus 

*

PTY Stations 

Surround 

*

Change of channel

Cassette

= for THOMSON devices only

*

= If the function is available on the controlled device

Disc

(Rec = Zoom)

Cassette

Change of radio stations 

(if memorised)

Change of chapter (DVD)
ffw/backw

*

Change of

channels (SAT)

Direct access to channels 

and input of numerical values

Selection of radio stations

Direct Access to chapters (DVD

or 

to a channel (SAT)

Up / down navigation

in the menus

Confirmation

Selection Right / Left 

in the menus

Level Adjustment 

of the Speaker Sound

PR +/- *

Confirmation 

VOL +/- *

AV connectors selection

Station memory access

Lighting of keys

Lighting of keys

Lighting of keys

Sound muting

Sound volume 

of amplifier,

depending on

your

programming.

TH

TH

TH

TH

TH

TH

TH

TH

TH

DVD
only

Putting into standby /start mode

Only makes of apparatus of the 

THOMSON

group benefit from the actions of all the keys.

Summary of Contents for 42 WM 03 L

Page 1: ...ime Menu Options Setting the Clock 18 Setting the On Off Timer 18 Auto Sleep 18 Sleep Timer 18 Special Menu Options Child Lock 19 ISM Image Sticking Minimization Method 19 Low Power 19 Screen Menu Opt...

Page 2: ...ce of heat or dust Do not expose it to direct sunlight If you need to embed your monitor leave sufficient space around it for air circulation Do not install it directly near heating The maximum ambien...

Page 3: ...d gradations of colours photographs Adjust contrast to obtain the least noticeable transition between dark and light areas White characters on a black back ground Avoid displaying pictures presenting...

Page 4: ...l extension lead be used Your set can be located on a wall allowing you a wide angle view of those persons who are present in a large area room To do this without the kit fix appropriate metal attachi...

Page 5: ...cator Illuminates red in standby mode Illuminates green when the Monitor is turned on D D E E Buttons MENU Button To preserve your set screen Your set could be damaged if a bright fixed picture is dis...

Page 6: ...NTROL SERVICE EXTERNAL SPEAKER Connect to optional external speaker s DVI INPUT RGB INPUT AUDIO INPUT SOCKETS Connect the monitor output socket of the PERSONAL COMPUTER to this socket AUDIO INPUT S VI...

Page 7: ...dset DVI D Cable Accessories Optional extras can be changed or modified for quality improvement without any notification new optional extras can be added Contract your dealer for buying these items Op...

Page 8: ...s To control the monitor switch this key to the plasma position AV1 AV2 S Video DVI RGB To select pictures from a PC Standby Long Pressure Start Short Pressure To select the Sleep Timer To go back to...

Page 9: ...to pages 31 Programming You can program these two keys to adjust the sound volume of your monitor or amplifier Hold the menu key down and key in 001 for the monitor or key in 000 to return to the ampl...

Page 10: ...e monitor can be installed on a wall as shown above For further information refer to the optional Wall Mounting Bracket Installation and Setup Guide Installation Installation of the Monitor Installati...

Page 11: ...l and select AV1 or AV2 When connecting with S Video select the S Video 2 Insert a video tape into the VCR and press the PLAY button on the VCR See VCR owner s manual To watch cable TV 1 Press av butt...

Page 12: ...perating guide Back panel of the Monitor R L RS 232C INPUT CONTROL SERVICE EXTERNAL SPEAKER AC INPUT AUDIO INPUT RGB INPUT DVI INPUT R L AUDIO VIDEO R Camcorder Video game set Watching DVD How to conn...

Page 13: ...put port of the PC to the DVI INPUT port on the Monitor Connect the audio cable from the PC to the Audio input on the Monitor Audio cables are not included with the Monitor If using a sound card adjus...

Page 14: ...720x400 640x480 848x480 800x600 Horizontal Frequency KHz 31 468 37 861 31 469 37 927 31 469 35 000 37 861 37 500 43 269 31 500 35 000 37 500 31 500 37 799 39 375 35 156 37 879 48 077 46 875 53 674 49...

Page 15: ...button to select your desired language From this point on the on screen menus will be shown in the language of your choice 4 Press the menu button Using the remote control Using the remote control You...

Page 16: ...ngs select the Normal option When adjusting color temperature options red green or blue manually CSM is automatically changed to User 1 Press the menu button and then use D D E E button to select the...

Page 17: ...ass and balance manually SSM is automatically changed to User This feature maintains an equal volume level even if you change channels 1 Press the menu button and then use D D E E button to select the...

Page 18: ...n to select On 4 Press the G G button and then use D D E E button to adjust the hour 5 Press the G G button and then use D D E E button to adjust the minute 6 Only On Time function Press the G G butto...

Page 19: ...on and then D D E E button to select ISM Method 3 Press the G G button and then D D E E button to select either Normal White Wash Orbiter or Inversion If you unnecessary to set this function set Norma...

Page 20: ...REEN menu 16 9 Following selection will lead you to adjust the picture horizontally in a linear proportion to fill the entire screen useful for viewing 4 3 formatted DVDs 4 3 Following selection will...

Page 21: ...to select Position 3 Press the G G button and then D D E E or F F G G button to adjust the position 4 Press the menu button Screen Adjustments AV1 AV2 and S Video mode only Use this function to corre...

Page 22: ...sted value select Reset with the D D E E button and then press the G G button Auto Configure ARC Zoom In Out Position Manual Config Screen adj Reset VGA Mode Prev SCREEN VGA Mode G G MENU 640x480 848x...

Page 23: ...the screen display as shown below Selecting a Input Signal Source for the PIP 1 Press the menu button and then use D D E E button to select the PIP menu 2 Press the G G button and then use D D E E but...

Page 24: ...ard D Sub 9 3 2 5 4 6 7 8 PDP D Sub 9 External Control Device Setup External Control Device Setup Connect the RS 232C input jack to an external control device such as a computer or an A V control syst...

Page 25: ...tion 3 Wait more time 01 Power k a 0 1 02 Input Select k b 0 4 03 Aspect Ratio k c 0 4 04 Screen Mute k d 0 1 05 Volume Mute k e 0 1 06 Volume Control k f 0 64 07 Contrast k g 0 64 08 Brightness k h 0...

Page 26: ...l Transmission Data Min 0 Max 64 Refer to Real data mapping 1 See page 29 k f Set ID Data Cr Ack f Set ID OK Data x 07 Contrast Command 2 g G To adjust screen contrast You can also adjust contrast in...

Page 27: ...9 o Set ID OK Data x 09 Colour Command 2 i G To adjust the screen colour You can also adjust colour in the PICTURE menu Transmission Data Min 0 Max 64 Refer to Real data mapping 1 See page 29 k i Set...

Page 28: ...D OK Data x 21 Red Adjustment Command 2 v G To adjust red in colour temperature Transmission Data Min 0 Max 64 Refer to Real data mapping 2 See page 29 k v Set ID Data Cr Ack v Set ID OK Data x 22 Gre...

Page 29: ...Mode 1 Orbiter 2 Inversion 3 White Wash j p Set ID Data Cr Ack p Set ID OK Data x 29 Orbiter Time Setting Command 1 j Command 2 r G To adjust orbiter operation time term Transmission Data Min 1 Max FE...

Page 30: ...ease the menu button Volume and Mute keys are now configured to control the set To control the amplifier place the key on the hi fi position To return to factory settings repeat the above procedure ke...

Page 31: ...Cassette for THOMSON devices only If the function is available on the controlled device Disc Rec Zoom Cassette Change of radio stations if memorised Change of chapter DVD ffw backw Change of channels...

Page 32: ...r to p 16 Keep a certain distance between the Monitor and the VCR Activate any function to restore the brightness of the picture If still picture is on the screen for more than 5 minutes the screen ge...

Page 33: ...mm Weight pounds kg Power requirement Resolution Colour Operating Temperature Range Operating Humidity Range 42 WM 03 L 40 7 1033 24 5 622 3 2 81 75 34 AC100 240V 50 60Hz 852 x 480 Dot 16 770 000 256...

Reviews: