background image

23

22

3.5B Loading Procedure

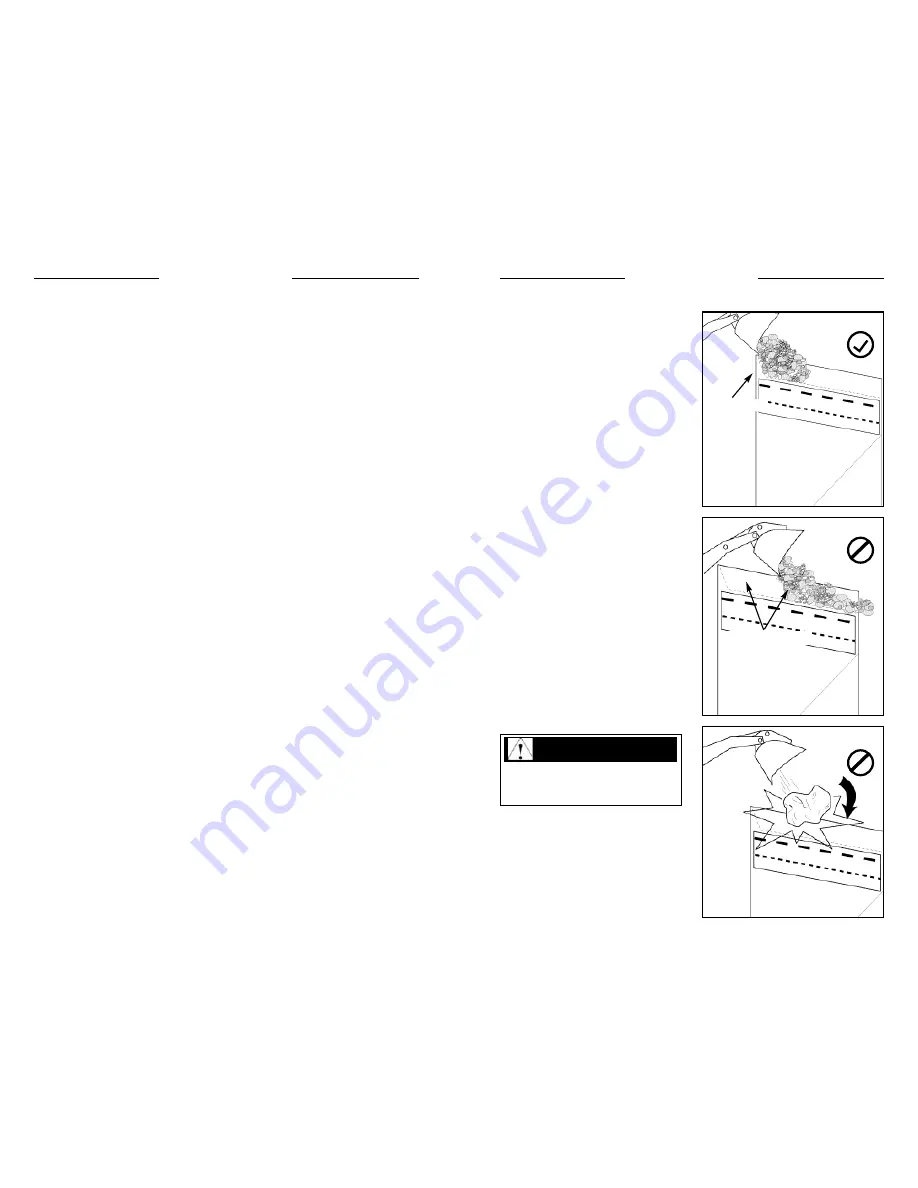
When loading material into the hopper,

keep the bucket as low as possible (fig.
S0010). Allow the material to slide down
the high side of the hopper plate onto the
top screen deck.

Check tailings for size. If you find good

material mixed in with the tailings, try
slowing the feed rate (dump) into the hop-
per.

Dumping the material further down the

deck wastes processing area (fig. S0011).
This will allow good material to flow off
with the tailings.

Use extra care when placing large

heavy objects on the top screen deck. Make
sure smaller material is in front of the load
before lowering onto the top screen deck.
This will provide some cushion effect.
Never drop large heavy objects directly
onto the top screen deck (fig. S0012).
Immediate damage to the wire screen cloth
or shaker assembly may occur.

Keep an eye on tailings and finished

product. Do not allow to build up around
the shaker deck area. Retrieve product
before excessive build up around the shaker
area.

S0010

S0011

S0012

Hopper high side

Wasted processing area

Large objects may roll uncon-
trollably off the top screen deck.

Assure the area where tailings are
being discharged has adequate run off
area.

WARNING

3.5 OPERATING PROCEDURES

Follow the set up procedures outlined

previous to this section.

This section contains important infor-

mation for getting the best performance
and efficiency from your machine.

3.5A. General

The shakerhead assembly contains two

sorting surfaces called screens. Certain
application will require you to change
screen sizes for best results. There are a
number of screen sizes, and multiple com-
binations are available to sort varied mater-
ial. Proper screen sizing makes this a truly
multipurpose and efficient machine, able to
handle fine sands, rock, wood product
refuse, etc.

The basic rule of thumb for screen siz-

ing is a 3 to 1 ratio, top to bottom respec-
tively.  Example:  3’’ (76mm) top screen,
1’’ (25mm) bottom screen. However, in
some cases, it may be more efficient to run
the material through a larger screen combi-
nation first, then changing the screens to
obtain the final product size. This would be
desirable when the material being sized
clogs the screens or feed rate becomes
excessively slow.

The most common type of screen mate-

rial is called “wire cloth”. Various diame-
ters of wire are overlaid together to make
varied openings. The actual diameter of the
wire used dictates the surface area of the
hole.

Example: A screen 2’’ square, using a

0.25 wire diameter would have a larger
hole opening than a 2’’ square using 0.50
wire diameter. The smaller diameter screen
will be more efficient, due to the larger
open area, but screen life will also be short-
er. A larger wire diameter material will
wear longer.

Wire cloth screens may be ordered in

square or rectangular (slotted) pattern.
Select the proper screen for your applica-
tion.  A slotted pattern will process material
faster, though larger material will slip
through. 

See Section 6 for more screen size

information. 

3. OPERATION

3. OPERATION

Summary of Contents for ProTough 300 Screener

Page 1: ...Owner s Operator s Service and Parts Manual Publication No 52812 September 2005 300 Screener...

Page 2: ...EMPT TO ENLARGE ITS RIGHTS UNDER THE WARRANTY BY MAKING CLAIM FOR INDEMNITY FOR BREACH OF CONTRACT FOR BREACH OF COLLATERAL WARRANTY FOR A TORT INCLUDING NEGLIGENCE MISREPRESENTATION OR STRICT LIABILI...

Page 3: ...g MAINTENANCE 1 Stop the engine before performing any service on the machine 2 Never refuel the machine while smoking or with the engine hot or running 3 Replace all missing illegible or damaged safet...

Page 4: ...ALS S0124 46164 46164 45413 Amber Reflective Tape 46155 Red Reflective Tape 46154 45414 TH23308 23308 38043 1 SAFETY PRECAUTIONS 1 SAFETY PRECAUTIONS Red White Reflective Tape 46152 Red White Reflecti...

Page 5: ...02 TH41064 41064 45903 1 2 DECALS 46369 46370 Red White Reflective Stripe 46152 White Reflective Stripe 46153 Amber Reflective Tape 46155 GREASE 45748 47061 1 2 DECALS 47062 45413 46163 39192 46181 1...

Page 6: ...ocated using the pictures provided Details of control operations and functions are explained in the Operations Section 3 S0144 S0125 S0124 Hydraulic fill Top wire cloth Bottom wire cloth Hopper Hitch...

Page 7: ...11 2 CONTROLS 10 Engine Controls 2 1 Hydraulic and Axle Controls 2 2...

Page 8: ...ulic axle lift needs to be engaged to release the axle lock from its support brackets as you push the lever B Hydraulic axle lift control Push to lower the machine Pull to raise to transport position...

Page 9: ...ns 3 2 Shut Down Procedure 3 3 Set up 3 4 Operating Procedures 3 5 General 3 5A Loading Material 3 5B Removing Finished Material 3 5C Removing Tailings Rough Material 3 5D Screening Selection Combinat...

Page 10: ...heck for bystanders before start up WARNING Bottom screen 3 1 PRE START INSPECTION A daily inspection should be performed to ensure safe operation and minimal down time The daily maintenance should be...

Page 11: ...ever a problem occurs Have the problem diagnosed and repaired before further operation IMPORTANT Allow the engine to warm approxi mately 15 minutes before engaging the shaker control If the engine lab...

Page 12: ...his section The machine must be operated on a level surface If necessary grade an area to accommodate Make sure you leave adequate room for maneuvering equipment around the machine to remove tailings...

Page 13: ...A General The shakerhead assembly contains two sorting surfaces called screens Certain application will require you to change screen sizes for best results There are a number of screen sizes and multi...

Page 14: ...S0004 For best efficiency allow at least a full bucket of material to accumulate before retrieving Do not allow the product to pile up around the shaker deck area fig S0005 This will impede the shake...

Page 15: ...with other traf fic S0024 S0061 S0032 S0023 Check wheels tires and axle grease Pintle hitch bolts Safety chains Breakaway switch Axle lock Axle lock supports Tether cable Clean debris from the shaker...

Page 16: ...ilter 4 4A Engine Fuel System 4 4B Engine Air Filter 4 4C Engine Fan Belt 4 4D Engine Cooling System 4 4E Shaker Shaft 4 4F Hydraulic System 4 4G Chassis Maintenance 4 4H 300 Hour Service 4 5 Fuel Fil...

Page 17: ...Fuel line shut off Hydraulic oil tank drain Spring bolts SO162 SO161 SERVICE ACCESS The following page s will depict how to access specific areas for service S0144 S0143 S0024 Oil fill Muffler Oil fi...

Page 18: ...complete 150 Hour service is to be performed initially at 50 Hours ITEM SERVICE REQUIRED Screen tension Give a quick visual check to the tension If loose adjust the tension See section 4 Spring Bolts...

Page 19: ...ompartment Never attempt to clean and reuse the air filter elements Damage can occur to the paper pleats causing dirt to enter the engine IMPORTANT S0145 Air restriction indicator 34 4 3 DAILY SERVICE...

Page 20: ...uipment Ensure all safety warning and instruc tion decals are in place and legible See section 1 2 for decal placements Make sure all compartment doors are closed and secured before operating Also che...

Page 21: ...activated brakes For safety the system has its own 12 volt battery source to activate the wheel brakes whenever the tethered break away switch has been activated This means if the machine has unhitche...

Page 22: ...engine 3 Remove the oil drain plug S0066 Have a container ready to hold approx imately 5 4 quarts 5 1 liters of fluid 4 Remove the engine oil filter with a fil ter wrench S0042 5 Apply clean motor oil...

Page 23: ...Fuel filter Fuel line shut off When servicing the fuel system stay away from open flame and sparks No smoking WARNING 42 S0053 S0070 C642 Engine oil filter Engine oil fill cap 4 4 150 HOUR SERVICE 4 4...

Page 24: ...Support the rear of the canister when inserting the elements Do not use the cover and latches to seat the air fil ter elements in to position Air filter indicator Cover clamps Primary filter element S...

Page 25: ...9b S0042 Coolant level Engine block coolant drain Radiator coolant drain Wear rubber gloves and use eye protec tion when handling coolant IMPORTANT 46 4 4 150 HOUR SERVICE 4 4D Engine Fan Belt Check t...

Page 26: ...der 4 4 150 HOUR SERVICE 4 4F Shaker Shaft The shaker shaft coupling S0065 S0028 needs to be checked for wear and alignment after the first 50 hours of opera tion and every 150 hours thereafter 1 Chec...

Page 27: ...MPORTANT Check axle oil level 50 4 4 150 HOUR SERVICE 4 4G Hydraulic System Change the hydraulic oil filter after the first 50 hours of operation and every 150 hours thereafter Check the oil level dai...

Page 28: ...est to radiator This valve action means that cylinder number 4 next to flywheel is on the compression stroke with both valves closed This is the proper point to check and or adjust the intake and exha...

Page 29: ...skin CAUTION Wear rubber gloves and use eye protec tion when handling coolant IMPORTANT C551 TO PREVENT VOIDING THE ENGINE WARRANTY the engine valve clearance is to be performed by an authorized Kubo...

Page 30: ...fting aid such as a hoist to prevent possible injury CAUTION 56 S0063 S0074 S0138 S0170 Hydraulic reservoir drain plug Suction hose Minimum level Hydraulic fill Hydraulic suction screen element 4 7B H...

Page 31: ...and engage the shaker to verify The screens must not bounce freely on the crown bar rubbers You will notice if the screens are loose by the rapping noise they will make If necessary tighten the bolts...

Page 32: ...EMATIC S0027 Oil Tank Filter Gear Pump Rear Control Valve Oil Cooler Rear Cylinder Shaker Motor Front Control Valve Front Cylinder 4 MAINTENANCE 60 4 10 ELECTRICAL SCHEMATIC ENGINE UP TO S N T3000357...

Page 33: ...heck repair replace ie rings valves cylinder Low cranking speed Battery charge low Charge battery Check electrical connections alternator capacity Faulty starter motor Check and repair 4 MAINTENANCE 4...

Page 34: ...lace ie rings valves cylinder Black exhaust Clogged air filter Check and replace Faulty injection system Check and repair Incorrect valve timing Check and repair Worn engine components Check repair re...

Page 35: ...Time Average 30 seconds Shakerhead Decks 2 Screen Area each mm in 1346 x 2459 53 x 82 Screen Type Top Side Tension Bottom End Tension Weight Gross kg lbs 4826 10640 Tongue kg lbs 1145 2525 Towing Hitc...

Page 36: ...A Alternator 30 Amp Starter kW hp 1 2 1 6 Engine Stop Solenoid Energized to Run Engine Shut Down Protection Oil Pressure Over Heat Circuit Protection 40 Amp Circuit Breaker 5 SPECIFICATIONS 5 3 FASTEN...

Page 37: ...Dimensions and Grades Metric M8 1 25 x 25 M8 1 25 x 25 Major thread diameter in millimeters Distance between threads in millimeters Length in millimeters Grade markings 8 8 10 9 12 9 5 3 FASTENER TORQ...

Page 38: ...he opening to fall through To accomplish these screen ing objectives there are a wide variety of types of screening media A Application There are two 2 major considerations that greatly effect screeni...

Page 39: ...75 74 7 WARRANTY INFORMATION Machines Purchased Through Thomas Dealers 7 1...

Page 40: ...7 WARRANTY INFORMATION 7 1 MACHINES PURCHASED THROUGH THOMAS DEALER GENERAL WARRANTY INFORMATION Thomas warrants for a specific period and on the conditions set forth in the applic able limited warran...

Page 41: ...the first 12 months or 1500 hours tires and non Thomas attachments are not covered by Thomas Warranty 7 WARRANTY INFORMATION 7 WARRANTY INFORMATION KUBOTA ENGINES For Thomas Dealers who are also Kubot...

Page 42: ...erhead 8 2 Shakerhead and Springs 8 2 1 Shaker Shaft Assembly 8 2 2 Screens Plates 8 2 3 Hydraulics 8 3 Schematic and Parts List 8 3 1 Control Valve 8 3 2 Cylinders 8 3 3 Gear Pump 8 3 4 Shaker Motor...

Page 43: ...83 82 8 1 MAINFRAME Hitch 8 1 1 Front Lift Assembly 8 1 2 Axle Wheel Assembly 8 1 3 Axle Lock 8 1 4 Compartment Doors 8 1 5 Mud Flaps 8 1 6 Rubber Skirting 8 1 7...

Page 44: ...45560 1 Draw bar forged 4 bolt 2 45492 4 Bolt 5 8 x 3 3 45458 8 Washer 5 8 flat grade 8 4 45450 4 Nut 5 8 3 way lock grade 8 5 50467 2 Hook w Safety Clasp 6 45921 1 Chain grade 70 1 2 x 84 long 8 1 1...

Page 45: ...ion 1 4423 1 Cotter Pin 2 46128 1 Pin 3 39982 1 Cylinder 4 41628 1 Pin 5 963176 1 Piston Extension 6 1386 1 Cotter Pin 7 963177 1 Foot Assembly 8 45010 1 Pin 8 1 2 FRONT LIFT ASSEMBLY 1 2 3 5 4 6 8 7...

Page 46: ...2 6 1644 16 Washer 3 4 flat 7 6699 8 Nylock nut 3 4 8 45910 1 Pin lower cylinder pivot 9 42860 1 Pin upper cylinder pivot 10 2010 4 Grease fitting 11 1676 2 Bolt 5 16 x 2 1 4 for axle pivot pin 12 16...

Page 47: ...Nut nylock 5 16 5 833 5 ft Cable 1 4 aircraft 6 45187 2 Clamp 1 4 wire rope 7 45519 1 Pulley 2 8 24980 1 Bolt 1 2 x 2 1 4 9 2010 2 Grease fitting 10 963304 1 Handle axle lock lift 11 8613 1 Nut nyloc...

Page 48: ...1 Paddle Handle Locking 6 963830 1 Left Door Assembly 7 47170 1 Right Access Panel 8 963799 1 Wheel Cover Assembly 9 47041 4 Front Plate Access To Springs 49705 A R Weatherstrip small amount arounds...

Page 49: ...Pin 16 43274 4 Pop Rivets 1 8 x 1 2 17 46178 1 Pin Striker 18 6393 1 Nut 7 16 19 1190 1 Bolt 5 16 20 1651 2 Flat Washer 5 16 21 16771 1 Nut 5 16 22 34266 1 Clevis Pin 3 8 x 1 3 32 23 8154 2 Washer Nyl...

Page 50: ...97 96 Item Part No Qty Description 1 1651 5 Washer 2 16771 5 Lock Nut 3 45898 1 Mud Flap Clamp 4 35313 1 Mud Flap 4 3 2 1 8 1 6 MUD FLAPS 8 1 6 MUD FLAPS...

Page 51: ...t No Qty Description 1 51352 2 Belt Side Skirting 2 51350P 2 Clamp for Side Skirting 3 50474 1 Belt Back Sirting 4 50472P 1 Clamp for Back Skirting 5 2823 20 Bolt 1 2 x 1 1 2 6 30485 20 Washer 1 2 7 5...

Page 52: ...101 100 8 2 SHAKERHEAD Shakerhead and Springs 8 2 1 Shaker Shaft Assembly 8 2 2 Screens Plates 8 2 3...

Page 53: ...476 24 Bolt 3 8 x 1 3 4 grade 8 5 45454 48 Washer 3 8 flat grade 8 6 45446 24 Nut 3 8 lock 7 1364 5 Bolt 3 8 x 2 8 1643 10 Washer 3 8 flat 9 7465 5 Nut 3 8 lock 10 46990 1 Bar skirt mount 11 46991 1 S...

Page 54: ...Coupling splined 12 45253 1 Spider hytrel 13 45491 6 Bolt 3 4 x 2 1 2 grade 8 13a 45490 2 Bolt 5 8 x 2 grade 8 14 45458 16 Washer 5 8 flat grade 8 15 45450 8 Nut 5 8 lock grade 8 16 45586 18 Bolt 9 16...

Page 55: ...738 1 Bar top screen tensioner Left 4 45459 12 Washer 5 8 flat grade 8 5 33547 12 Nut 5 8 flange grade 8 6 46949 1 Channel lower screen tensioner 7 U 3333 1 3 4 x 5 Sp 1 4 Dia 53 x 82 OB Note For scre...

Page 56: ...109 108 8 3 HYDRAULICS Hydraulic Circuit 8 3 1 Control Valve 8 3 2 Cylinders 8 3 3 Gear Pump 8 3 4 Shaker Motor 8 3 5 Hydraulic Oil Tank 8 3 6...

Page 57: ...25 963285 1 Hose port B to cylinder bottom port 26A 47377 2 Elbow 90 split flange 26B 47376 2 Flange kit 1 split 27 47239 1 Motor Sundstrand 28 21121 1 Connector 29 14886 3 Elbow 90 30 963280 1 Hose c...

Page 58: ...s 2 4 2 45899 1 Relief valve 3 46382 2 Link kit 4 46383 2 Handle 5 46555 1 Control valve 1 spool includes 6 8 6 46565 1 Relief valve 7 46380 1 Link kit 8 46381 1 Handle 8 3 2 CONTROL VALVE S0084 S0086...

Page 59: ...9 1 Seal kit 3 31033 1 Rod 4 29930 1 Piston part B 5 29929 1 Piston part A 6 2010 2 Grease fitting 7 41208 1 Hardened bushing 8 41207 1 Tube 9 23530 1 Nut 10 41206 1 Head plate 11 31032 1 Hardened bus...

Page 60: ...117 116 Item Part No Qty Description 1 47238 1 Gear pump Sundstrand 2 49233 1 Seal kit complete 8 3 4 GEAR PUMP S0087 1 2 8 3 4 GEAR PUMP...

Page 61: ...119 118 Item Part No Qty Description 1 47239 1 Motor Sundstrand 2 50440 1 Seal kit 8 3 5 SHAKER MOTOR S0088 1 2 8 3 5 SHAKER MOTOR...

Page 62: ...1 Oil tank welded 3 36733 1 Breather oil filler 4 35026 1 Gauge level oil tank 5 5170 4 Bolt 1 4 x 1 6 1650 8 Flat washer 2 on each bolt 7 6645 4 1 4 nut lock 8 1457 1 Plug 1 2 NPT not shown 9 45744 1...

Page 63: ...123 122 8 4 ELECTRICAL Engine Electrical 8 4 1 Chassis Electrical 8 4 2...

Page 64: ...Insulator terminal cover covers the end of the positive battery cable Item not shown 8 4 1 ENGINE ELECTRICAL Low Oil Coolant Hour Meter Charge Glow 19 50 30 17 ACC Murphy System 30 second delay G N O...

Page 65: ...2 44961 1 Switch Starter includes 3 3 44960 1 Ignition Key pair 4 50017 1 Engine Wire Harness 52142 1 Engine Assy D905 Tier II 8 4 1 ENGINE ELECTRICAL 8 4 1 ENGINE ELECTRICAL S N T3000358 onward S0274...

Page 66: ...al 9 46147 2 Lamp red tail and brake 48769 1 Wire Harness Axle 48770 1 Wire Harness Rear Marker Lights 48771 1 Wire Harness Front Top Marker Lights 48772 1 Wire Harness Front Lower Marker Lights 48773...

Page 67: ...131 130 8 5 ENGINE Intake System 8 5 1 Exhaust System 8 5 2 Radiator and Mounts 8 5 3 Throttle Control 8 5 4 Fuel System 8 5 5...

Page 68: ...3 1 Air restriction indicator 10 44856 1 Elbow 90 11 46168 1 Hose air duct 12 43695 1 Precleaner 13 6268 2 Clamp 14 12117 1 Clamp 15 962990 1 Plate air cleaner bracket 16 2 Bolt 8mm x 40mm 01153 50840...

Page 69: ...135 134 Item Part No Qty Description 1 42796 1 Muffler 2 21554 4 Bolt 3 21029 4 Washer lock 4 43467 1 Gasket exhaust 8 5 2 EXHAUST SYSTEM 1 2 3 4 S0079 8 5 2 EXHAUST SYSTEM...

Page 70: ...or foam cut to size 14 962616 1 Mount LH engine 15 46167 4 Bar engine block 16 42737 1 Reservoir coolant overflow with cap 17 44850 1 Cover coolant reservoir 18 18469 4 Washer cushion 19 16771 2 Nut l...

Page 71: ...foot 40 261 61 Hose coolant overflow 41 46357 1 Kit pump adapter 42 5170 2 Bolt 1 4 x 1 0 43 45942 1 Plate engine to radiator brace 44 6645 2 Nut 1 4 lock 45 1651 2 Washer 5 16 flat 46 21029 16 Washe...

Page 72: ...82 1 Throttle bracket 7 46190 1 Cable 72 8 46188 1 Throttle frame 9 46192 1 Throttle frame back 10 31744 5 Screw 11 1650 6 Washer 1 4 flat 12 46189 1 Throttle catch 13 6645 3 Nut 1 4 lock 14 2663 3 Bo...

Page 73: ...Cock shut off 1 4 8 023861 1 Hose end 9 19949 4 Clamp 10 042572 1 Reducer bushing 11 018318 1 Hose end 12 26737 2 Clamp 13 2663 4 Bolts 14 1650 8 Washers 15 6645 4 Nuts 16a 261 48 Tank To Filter 5 16...

Reviews: