ThingsLog LPMDL-1101 User Manual Download Page 12


Visit   us   at   

www.thingslog.com

;   (+359)   875   32   80   70;   

[email protected]


Initial   counter

   -­‐   Initial   value   of   the   counter   of   the   meter   

5.


To   enable   analog   sensor   readings   (connected   to   the   analog   inputs)   just   slide   the   slider   to   the   right   

6.


Delete   old   counters

      -­‐   once   you   are   ready   with   the   inputs   configuration   decide   do   you   want   to   keep   

the   old   values   or   not.   If   not   choose   “NO”   else   chose   “YES”.      

7.


Once   you   are   ready   press   “

Start   Setup

”   button.   

This   will   start   a   1000   seconds   counter.      You   will   have   to   touch   the   logger   with   a   magnet   prior   the   counter   
expiry.   This   will   put   the   logger   into   configuration   mode   and   it   will   try   to   obtain   its   configuration   from   the   
server.      

8.


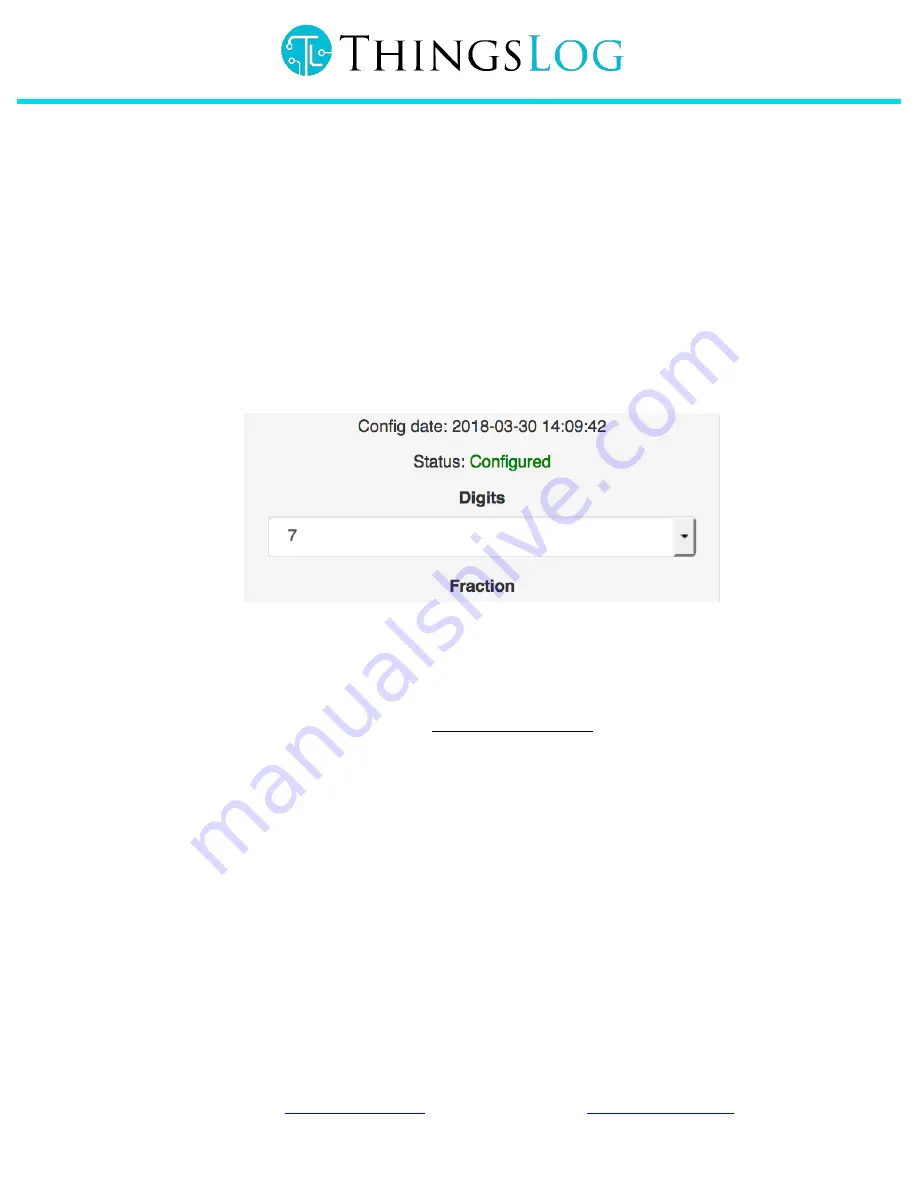
If   the   logger   is   able   to   do   so   you   will   be   able   to   see   the   following   message   on   your   screen.   


Figure   10   Confirmation   of   successful   configuration   

   
If    the    configuration    process    is    unsucessfull    and    the    device    stays    in    “Not    configured”    mode    please   

ensure   that   the   device   has   been   placed   in   an   area   with   propper   GSM   coverage.   If   you   are   not   sure   that   such   
is    available    in    your    area    please    let    us    know    at    [email protected].    But    please    note    that    if    there    is    no   
GSM   signal   there   are   only   a   few   things   you   can   do.   

8.4


Normal   operation   mode   &   short   functional   description   

Once   configured   the   logger   will   start   to   collect   and   transmit   readings   from   the   attached   sensors.   The   

logger   supports   the   following   main   functionalities:   

8.4.1


Readings   

From   the   readings   menu   the   user   has   access   to   the   readings   gathered   by   the   logger.   The   user   can   select   a   
time   interval   and   also   can   export   the   readings   to   a   file   in   csv   file   format.   

Summary of Contents for LPMDL-1101

Page 1: ...are in proximity distance you can meter with a single device gas power and heating Analog sensors metering LPMDL 1101 has two extra inputs for connecting analog sensors with 4 20 mA output An example...

Page 2: ...yer GPRS Class 12 Dust Water protection IP68 Battery power 4 5 V 3xAA alcaline batteries Table I Technical specification 3 Functional specification Pulse metering the logger supports pulses generated...

Page 3: ...e point of view nonauthorized modifications or additions are not authorized Terms of use The data logger is intended for use in the following environmental conditions for use indoors or outdoors witho...

Page 4: ...peratures not lower than 20 C and not higher than 60 C in the original package Transportation is allowed to happen accidentally at temperatures below 20 C but not more than 8 hours Protect against sho...

Page 5: ...Visit us at www thingslog com 359 875 32 80 70 sales thingslog com 5 Physical instalation Figure 1 Logger outlook and dimensions...

Page 6: ...gh which it can be attached to a firm surface In order to attach the logger you will need a wall with stiff flat surface close to the meter or the sensor which you would like to measure Mark and drill...

Page 7: ...Visit us at www thingslog com 359 875 32 80 70 sales thingslog com Figure 3 Logger input output ports Figure 4 LPMDL 1101 wiring scheme...

Page 8: ...ry monitoring capabilities The batteries have to be replaced if the voltage level is under 20 3 8 V Figure 6 On the left logger without batteries on the right logger with batteries In order to replace...

Page 9: ...owrd 4 Scann the QR code on the logger label Figure 7 Area to be scanned 5 If the scan is sucessfull the android app will be able to register your logger to your profile Note that you can register onc...

Page 10: ...ration ThingsLog LPMDL 1101 1 Connect your logger to your meters and sensors as described in section physical instalaltion 2 Navigate to meny All Devices and pick your newly added logger Figure 8 Menu...

Page 11: ...ord period Could be Minute Hour or Day This is the period on which the logger will log in memory the reading values from the pulse inputs or the period on which it will perform low power reading of it...

Page 12: ...so you will be able to see the following message on your screen Figure 10 Confirmation of successful configuration If the configuration process is unsucessfull and the device stays in Not configured...

Page 13: ...thingslog com 359 875 32 80 70 sales thingslog com Figure 11 Readings 8 4 2 Flow graph Flow menu allows the user to visualize the consumption flow of the meter captured by the logger Figure 12 Flow c...

Page 14: ...onsumption graph 8 4 4 Data export The system supports readings data export from a a certain time range in CSV file format Figure 14 Data export in CSV file format 8 5 Normal operation dashboard After...

Page 15: ...fined as condition in which the logger is detecting consumption over certain threshold over certain long period of time For example the logger has detected a NON zero consumption over 6 consequitive h...

Page 16: ...lower than the expected one ALL_ZERO_CONSUMPTION alarm signaling zero consumption throught certain time period For there is no consumption for 24 hours Could potentially indicate a fault meter DEVICE...

Reviews: