22
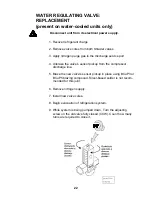
WATER REGULATING VALVE:
REPLACEMENT
(present on water-cooled units only)
Disconnect unit from its electrical power supply.
1. Recover refrigerant charge.
2. Remove valve cores from both Shrader valves.
3. Apply nitrogen purge gas to the discharge service port.
4. Unbraze the valve’s sensor pickup from the compressor
discharge line.
5. Braze the new valve’s sensor pickup in place using BCuP3 or
BCuP5 brazing compound. Silver-based solder is not recom-
mended for this joint.
6. Remove nitrogen supply.
7. Install new valve cores.
8. Begin evacuation of refrigeration system.
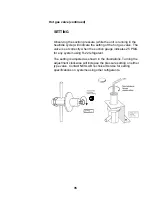
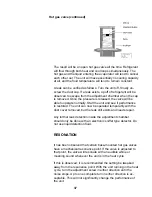
9. While system is being pumped down, Turn the adjusting
screw on the old valve fully closed (CCW). Count how many
turns are required to close it.
Summary of Contents for NESLAB HX 150
Page 9: ...9 Troubleshooting Chart Weak cooling ...
Page 10: ...10 Troubleshooting Chart Weak cooling continued ...
Page 11: ...11 Troubleshooting Chart Refrigeration pressures ...
Page 42: ...42 ...
Page 47: ...47 ...
Page 51: ...51 ...


