background image

11

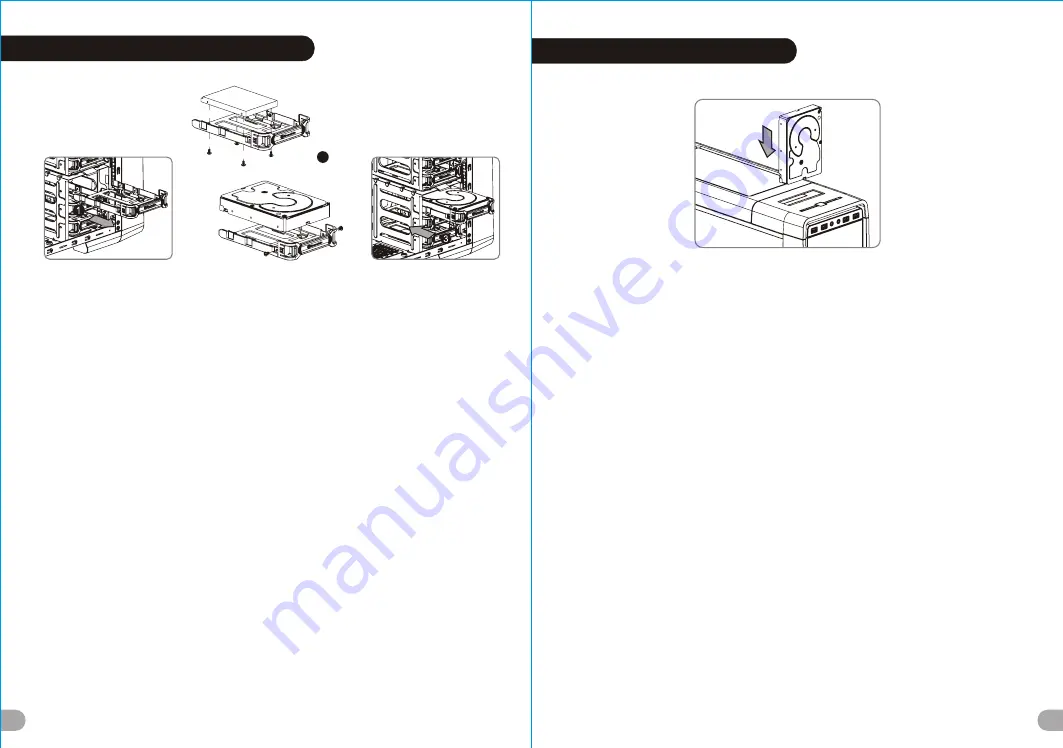
3.5” & 2.5” HDD Installation

12

English /

繁體中文 /

1. Pull the HDD tray out. 

1

. 將硬碟托盤取出

2. Place the 2.5” or 3.5” hard drive on the tray and 

2. 將2.5”或3.5”硬碟放置在硬碟托盤上,用螺絲固定

secure it with screws.

硬碟

3. Slide the HDD tray back to the HDD cage. 

3. 將硬碟托盤放回硬碟磁架中

Deutsch /

简体中文 /

1. Ziehen Sie den HD-Schacht heraus.

1. 将硬盘托盘取出

2. Montieren Sie die 2,5 oder 3,5 Zoll Festplatte im 

2. 将2.5”或3.5”硬盘放置在硬盘托盘上,

Schacht und sichern Sie sie mit Schrauben.

    用螺丝固定硬盘

3. Schieben Sie den Schacht wieder in den 

3. 将硬盘托盘放回硬盘磁架中

Festplattenkäfig.

日本語 /

Français /

1.

HDD

トレイを引き出して外します。

1. Enlevez le boîtier du disque dur.

2.2.5インチ

HDD

SSD 

もしくは 3.5インチ

HDD

2. Placez le disque dur de 2,5” ou de 3,5” dans le 

ライブをトレイにネジで固定します。

boîtier et fixez-le avec des vis.

3. 

HDD

トレイを

HDD

ケージに戻します。

3. Refaites glisser le boîtier du disque dur dans la 

cage de disques durs.

Русский /

1. Вытяните лоток для жестких дисков.

Español /

2. Установите 2,5- или 3,5-дюймовый жесткий 

1. Extraiga la bandeja del disco duro.

    диск в лоток и закрепите его винтами.

2. Coloque el disco duro de 2’5 ó 3'5” en la bandeja 

3. Установите лоток для жестких дисков 

y fíjelo con los tornillos.

    обратно в каркас.

3. Vuelva a meter la bandeja del disco duro en su 

hueco.

Türkçe /

1. HDD tepsisini d

ı

şarı çekin.

Italiano /

2. 2,5” veya 3,5” sabit disk sürücüsünü tepsinin 

1. Estrarre il vano HDD.

üzerine yerleştirin ve vidalarla sabitleyin.

2. Posizionare il disco fisso da 2,5” o 3,5” nel vano 

3. HDD tepsisini HDD kafesine geri yerleştirin.

e fissarlo con le viti.

3. Fare scorrere l’HDD indietro verso la struttura a 

ภาษาไทย

 /

gabbia HDD.

1. 

ดึงถาด

 HDD 

ออกมา

2. 

วางฮาร์ดไดร์ฟขนาด

 2.5” 

หรือ

 3.5” 

Português /

ลงบนถาดแล้วขันสกรูยึดให้แน่น

1. Puxe a bandeja do disco rígido para fora.

3. 

เลื่อนถาด

 HDD 

กลับเข้าในโครง

 HDD

2. Coloque o disco rígido de 2,5” ou 3,5” na bandeja 

e fixe com parafusos.

3. Deslize a bandeja do disco rígido de volta para a 

caixa do disco rígido.

HDD Docking Station

English /
The top HDD Docking slot is embedded to enable ultra fast transfer (up to 6.0Gbps) of large data to a 
SATA hard disk without having to use an external storage enclosure.  To ensure proper operation, please 
make sure the following settings are correct:

-  

Ensure all required drivers are installed for your motherboard or SATA controller card.

-  

Connect the SATA cable to an available SATA connector on the motherboard or SATA controller card.

-  

Connect the power cable to power supply.

-  

Ensure AHCI (Advanced Host Controller Interface) is enabled on your motherboard or SATA controller  

card. The AHCI enables for “hotswap” capability of the SATA hard drives without having to turn off the 
computer prior to connecting or disconnecting of the hard drive.  Please follow instruction provided


by 

your motherboard or SATA controller card to enable the AHCI function.

If you are using a brand new hard drive, the hard drive will need to be initialized (formatted) before it is 
accessible. For more information on how to initialize (format) a new hard drive, please refer to the hard 
drive user manual or visit 
System running on Windows 7: http://www.thermaltakeusa.com/Faq.aspx?ID=1143
System running on Windows Vista: http://www.thermaltakeusa.com/Faq.aspx?ID=1079
System running on Windows XP: http://www.thermaltakeusa.com/Faq.aspx?ID=1073

Deutsch /
Der obere Einführungsschlitz der HDD-Dockingstation ist eingelassen, um einen ultraschnellen Transfer 
(bis zu 6,0 GB/s) von umfangreichen Daten zur SATA-Festplatte zu ermögichen, ohne dafür ein externes 
Gehäuse verwenden zu müssen.  Um einen ordnungsgemäßen Betrieb zu gewährleisten, stellen Sie bitte 
sicher, dass die folgenden Einstellungen richtig sind:

-  

Stellen Sie sicher, dass alle erforderlichen Treiber für Ihr Mainboard oder SATA Controller-Karte 

installiert sind. 

-  

Verbinden Sie das SATA-Kabel mit einen freien SATA-Anschluss auf dem Mainboard oder der SATA


 Controller-Karte. 

-  

Verbinden Sie das Stromkabel mit dem Netzteil.

-  

Stellen Sie sicher, dass AHCI (Advanced Host Controller Interface) auf dem Motherboard oder der 

SATA-Controller-Karte aktiviert ist.   AHCI ermöglicht die "HotSwap"-Funktion der SATA-Festplatten, 
ohne dass Sie den Computer ausschalten müssen, bevor Sie die Festplatte anschließen oder entfernen.   
Bitte folgen Sie den Anweisungen Ihres Motherboards oder der SATA-Controller-Karte, um die AHCI-
Funktion zu aktivieren. 

Wenn Sie eine neue Festplatte benutzen, muss die Festplatte initialisiert werden (formatiert), bevor sie 
nutzbar ist. Weitere Informationen darüber, wie man eine neue Festplatte formatiert, entnehmen Sie bitte 
dem Benutzerhandbuch zur Festplatte oder besuchen Sie 
System läuft unter Windows 7: http://www.thermaltakeusa.com/Faq.aspx?ID=1143
System läuft unter Windows Vista:http://www.thermaltakeusa.com/Faq.aspx?ID=1079
System läuft unter Windows XP: http://www.thermaltakeusa.com/Faq.aspx?ID=1073

3.5" HDD

2.5" HDD

藍色線條為尺寸標示,請勿印刷上去!

產 品料 號

VP

7

00 S eri es

Ur ban S

3

1

說明 書

1

3

/03/ 04

A

產品 名稱

印刷 項目

子件 料 號

發 稿 日期

版 本

騎馬釘

28

80

X

X

X

X

X

書寫紙

單色

其他特殊處理效果

表面處理

2

厚度

(g/m )

裝訂方式

材質

頁數

印刷色彩

規格樣式

整本

MARKETING

CHECK

DESIGN

PRODUCT GM

其他特殊處理效果

表面處理

2

厚度

(g/m )

材質

印刷色彩

封面樣式(當封面與內頁樣式不同時尚須填寫

)

Poki

刀模線

125 

mm

176 

mm

Summary of Contents for Urban S31 Series

Page 1: ...ermaltake com User s Manual Benutzerhandbuch Mode d emploi Manual del usuario Manuale dell utente Manual do Utilizador 安裝說明書 用戶手冊 ユーザーズマニュアル Руководство пользователя kullanıcı elkitabı EEE Yönetmeliğine Uygundur คู มือการใช Tested To Comply With FCC Standards FOR HOME OR OFFICE USE Mid Tower Urb n 31 U Ur rb b n n VP700 Series 3 31 1series ...

Page 2: ...25 mm Turbo fan 1000rpm 16dBA Top exhaust optional 120 x 120 x 25 mm fan x 2 or 140 x 140 x 25 mm fan Bottom Intake optional 120 x 120 x 25 mm fan USB 3 0 x 2 USB 2 0 x 2 HD Audio x 1 Supports 1 2 3 8 1 4 water tube 3 x 5 25 1 x 3 5 Converted from one 5 25 drive bay 6 x 3 5 or 2 5 1 x 3 5 or 2 5 Side Panel Disassembly Motherboard Installation PSU Installation 5 25 Device Installation External 3 5 ...

Page 3: ... calore della CPU Il limite di altezza per il dissipatore di calore della CPU è 145 mm 5 7 Limite di lunghezza per la VGA schede grafiche Il limite di lunghezza per la VGA scheda grafica è 290 mm 11 4 Atenção Limite de altura para o dissipador do CPU O limite de altura para o dissipador do CPU é 145 mm 5 7 polegadas Limite de comprimento para VGA placa gráfica O limite de comprimento para VGA plac...

Page 4: ...Lay down the chassis 2 Install the motherboard in proper location and secure it with screws Deutsch 1 Legen Sie das Gehäuse auf die Seite 2 Installieren Sie die Hauptplatine in ihrer vorgesehenen Position und sichern Sie sie mit Schrauben Français 1 Posez à plat le châssis 2 Installez la carte mère dans l endroit approprié et sécurisez la avec des vis Español 1 Tumbe el chasis 2 Instale la placa m...

Page 5: ...sans outil de 5 25 pour déverrouiller le périphérique Español 1 Extraiga la tapa del hueco de la unidad de 5 25 2 Meta el dispositivo de 5 25 en el hueco de la unidad para cerrar el dispositivo Nota Presione el mecanismo libre de herramienta de 5 25 para abrir el dispositivo Italiano 1 Rimuovere il coperchio dell alloggiamento vano unità da 5 25 2 Fare scorrere il dispositivo da 5 25 nell alloggia...

Page 6: ...orrere l adattatore nel vano da 5 25 libero quindi montare il coperchio a da 5 25 a 3 5 sul pannello anteriore Português 1 Remova a cobertura de rede de 5 25 2 Fixe o dispositivo de 3 5 ao adaptador com parafusos 3 Deslize o adaptador para a baía de 5 25 livres e monte a cobertura de rede de 5 25 a 3 5 para o painel dianteiro 1 3 繁體中文 1 移除5 25 擴充槽檔板 2 將3 5 裝置放入轉接磁架並用螺絲固定3 5 裝置 3 插入轉接磁架至適當的位置 將5 25...

Page 7: ...therboard or SATA controller card Connect the power cable to power supply Ensure AHCI Advanced Host Controller Interface is enabled on your motherboard or SATA controller card The AHCI enables for hotswap capability of the SATA hard drives without having to turn off the computer prior to connecting or disconnecting of the hard drive Please follow instruction provided by your motherboard or SATA co...

Page 8: ... un connettore SATA disponibile nella scheda madre o nella scheda del controller SATA Collegare il cavo di alimentazione all alimentatore Verificare che l interfaccia AHCI Advanced Host Controller Interface sia abilitata sulla scheda madre o sulla scheda del controller SATA L interfaccia AHCI consente la funzionalità hotswap delle unità rigide SATA senza dovere spegnere il computer prima di colleg...

Page 9: ...ağıdaki ayarların doğruluğundan emin olun Ana kartınız veya SATA denetleyici kartınız için gerekli tüm sürücülerin yüklü olduğundan emin olun SATA kablosunu ana kart veya SATA denetleyici kartı üzerindeki kullanılabilir bir SATA konektörüne bağlayın Güç kablosunu güç kaynağına bağlayın Ana kartta veya SATA denetleyici kartında AHCI nin Gelişmiş Ana Bilgisayar Denetleyici Arabirimi etkinleştirildiğ...

Page 10: ... de Segurança do Teclado e Rato e fixe na parte traseira do painel no interior do chassis com parafusos Place the keyboard or mouse cables through the Keyboard Mouse Security Lock then secure it back to the back panel from inside of the chassis with screw Führen Sie die Kabel durch die Einheit Tastatur Maussperren und sichern Sie sie dann wieder an der Rückwand innerhalb des Gehäuses mit den Schra...

Page 11: ... Hilfe und lesen Sie unter dem Kapitel USB Anschlüsse nach USB 3 0 Anschluss 1 Stellen Sie sicher dass Ihre Hauptplatine den USB 3 0 Anschluss unterstützt 2 Verbinden Sie das USB 3 0 Kabel mit dem USB 3 0 Port auf Ihrem Computer Audio Anschlüsse Bitte beachten Sie die folgende Abbildung der Audio Anschlüsse und die Anweisung in der Gebrauchsanweisung Ihres Motherboards Bitte wählen Sie das Motherb...

Page 12: ...on N C KEY RED2 WHITE2 GREEN2 BLACK2 RED1 WHITE1 GREEN1 BLACK1 USB Function VCC1 D1 D1 GND NC VCC2 D2 D2 GND KEY Guida di installazione dei contatti Connessione del LED del case Nella parte anteriore del case sono presenti alcuni contatti per interruttori e LED Consultare il manuale utente del produttore della scheda madre quindi connettere i contatti alla parte superiore del pannello sulla scheda...

Page 13: ...ели на материнской плате изучите руководство пол ьзователя производителя материнской платы Подключение USB 2 0 См раздел Подключение в руководстве материнской платы Подключение USB 3 0 1 Убедитесь что материнская плата поддерживает подключение по стандарту USB 3 0 2 Подсоедините кабель USB 3 0 к свободному порту USB 3 0 компьютера Подключение аудиоразъема См следующую иллюстрацию аудиоразъема и ру...

Page 14: ...keTW USB 3 0 Connection PRESENCE BLACK SENSE1_RETURN AUD GND SENSE2_RETURN YELLOW BROWN RED PORT1 R PORT2 R PORT1 L BLUE PORT2 L SENSE_SEND KEY PURPLE GREEN ORANGE BLACK AUDIO HD AUDIO Function N C KEY RED2 WHITE2 GREEN2 BLACK2 RED1 WHITE1 GREEN1 BLACK1 USB Function VCC1 D1 D1 GND NC VCC2 D2 D2 GND KEY Ara Kablo Kurulum Kılavuzu Kasanın ön kısmında bazı ışıklar ve anahtar ara kabloları görebilirsi...

Reviews: