A40i, A60i
Manual 0-5466
OPERATION
4T-5
heavy bead, but does not adhere tightly to the cut
edge, and can be easily scraped off. "High speed
dross" usually forms a narrow bead along the bottom
of the cut edge and is very difficult to remove. When
cutting a troublesome steel, it is sometimes useful
to reduce the cutting speed to produce "slow speed
dross". Any resultant cleanup can be accomplished
by scraping, not grinding.
4T.06 Hand Torch Operation
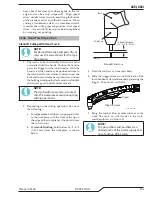
Standoff Cutting With Hand Torch
NOTE!
For best performance and parts life, al-
ways use the correct parts for the type
of operation.
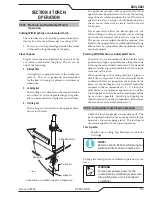
1. The torch can be comfortably held in one hand
or steadied with two hands. Position the hand to
press the Trigger on the torch handle. With the
hand torch, the hand may be positioned close to
the torch head for maximum control or near the
back end for maximum heat protection. Choose
the holding technique that feels most comfortable
and allows good control and movement.
NOTE!
The tip should never come in contact
with the workpiece except during drag
cutting operations.
2. Depending on the cutting operation, do one of
the following:
a. For
edge starts
, hold the torch perpendicular
to the workpiece with the front of the tip on
the edge of the workpiece at the point where
the cut is to start.
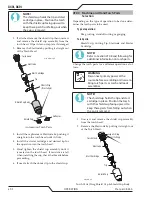
b. For
standoff cutting,
hold the torch 1/8 - 3/8
in (3-9 mm) from the workpiece as shown
below.
A-00024_AB
Shield Cup
Torch
Standoff Distance
1/8" - 3/8" (3 - 9mm)
Standoff Distance
3. Hold the torch away from your body.
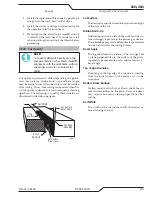
4. Slide the trigger release toward the back of the
torch handle while simultaneously squeezing the
trigger. The pilot arc will start.
Art # A-13150
Trigger
Trigger Release
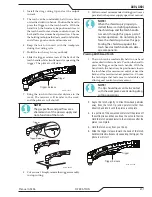
5. Bring the torch within transfer distance to the
work. The main arc will transfer to the work,
and the pilot arc will shut off.
NOTE!
The gas preflow and postflow are a
characteristic of the power supply and
not a function of the torch.
Summary of Contents for A40i
Page 6: ...This Page Intentionally Blank...
Page 8: ...This Page Intentionally Blank...
Page 12: ...TABLE OF CONTENTS This Page Intentionally Blank...
Page 16: ...A40i A60i WARRANTY INFORMATION Manual 0 5466 W 2 This Page Intentionally Blank...
Page 24: ...A40i A60i INTRODUCTION Manual 0 5466 2T 4 This Page Intentionally Blank...
Page 32: ...A40i A60i INSTALLATION Manual 0 5466 3 8 This Page Intentionally Blank...
Page 34: ...A40i A60i INSTALLATION Manual 0 5466 3T 2 This Page Intentionally Blank...
Page 80: ...A40i A60i OPERATION Manual 0 5466 4T 36 This Page Intentionally Blank...
Page 95: ...A40i A60i Manual 0 5466 PARTS LIST 6 3 This Page Intentionally Blank...
Page 99: ...A40i A60i Manual 0 5466 PARTS LIST 6 7 A 07994_AB 1 4 2 3 5 6 7 8 9 10 12 11 10 13...
Page 110: ...A40i A60i APPENDIX Manual 0 5466 A 10 APPENDIX 8 SYSTEM SCHEMATIC 400V 3PHASE CE Art A 13478...
Page 111: ...A40i A60i Manual 0 5466 APPENDIX A 11 Art A 13478...
Page 112: ...A40i A60i APPENDIX Manual 0 5466 A 12 APPENDIX 9 SYSTEM SCHEMATIC 208 480V 3PHASE Art A 13479...
Page 113: ...A40i A60i Manual 0 5466 APPENDIX A 13 Art A 13479...
Page 115: ...This Page Intentionally Blank...

