background image

P.14

3

Flying

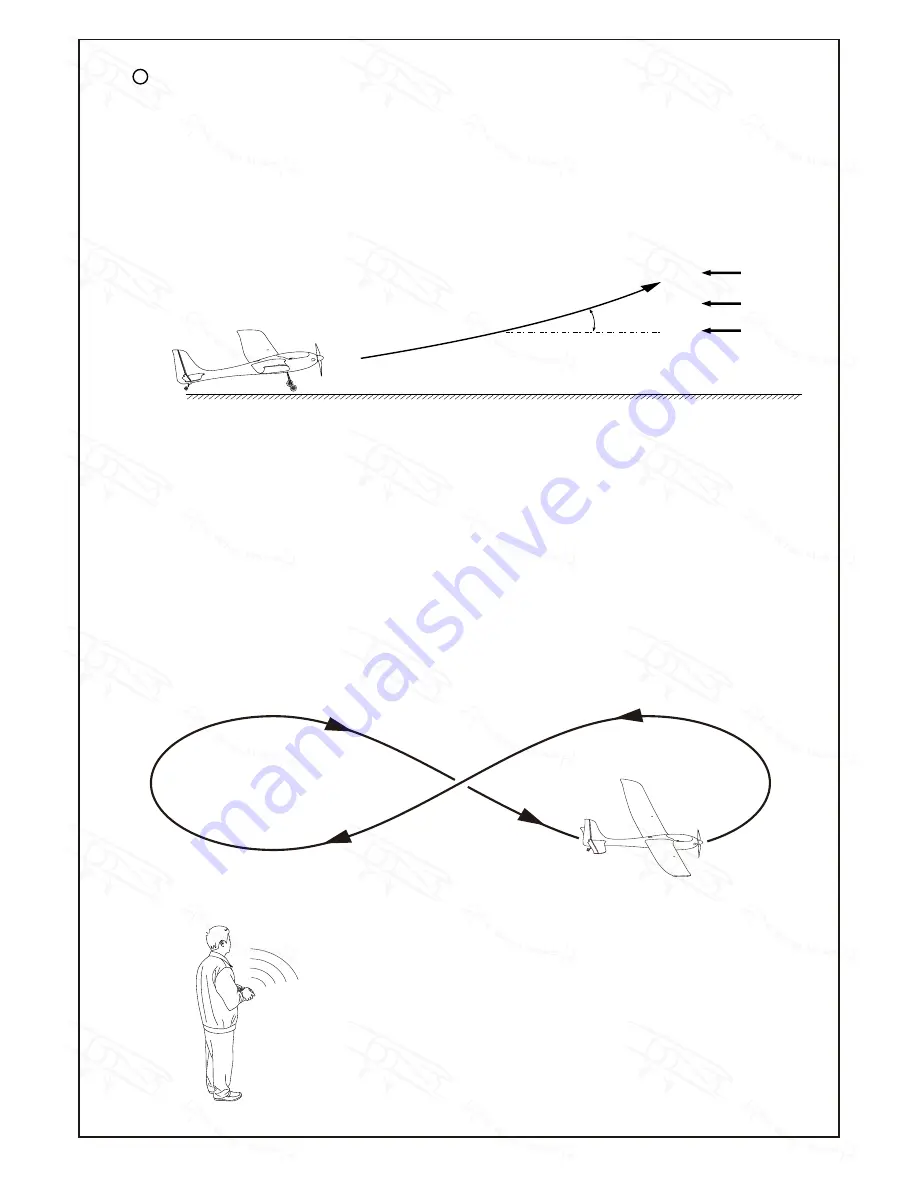
Now it is time to take off.  Don't fly if the wind is more than 5 miles per hour.  Wind is good for take off and landing, but if it is 
too windy, it will be very difficult to control the plane.  It is much better to wait for calm weather than crashing your beautiful 
plane.  Check that there is no one at the field.  If you have someone with you at the flying field, ask them to stay behind you.  
Check the wind direction.  Taxi the plane against the wind direction.  You can take off from left to right.  Taking off and landing 
against the wind is the rule of thumb.  Advance the throttle gradually and see the plane increase in taxiing speed.  By the time 
you reach full throttle, the plane should be lifted off the ground.  If the plane is not taking off, pull back the elevator slightly and 
the plane should lift off.  Maintain a 15° climb and turn left before you reach the end of the field.  Turn big circle, the plane will 
lose air speed when turning small circle and will drop the nose, pull up elevator a bit to bring back the climb angle.

When you reach 10 storey height, you can throttle back to about half throttle and try to fly in a level course.  Try to do the figure 
8 turn as you have practiced on the ground.  Try to do big circle turns, and when you see the plane drops during turning, pull 
back elevator slightly and throttle up a bit to maintain the plane at the same level.  Practice the figure 8 turn for the next 5 
minutes.  When you are OK with the figure 8 turn, try to do the counter clockwise turn.  Always try to fly the plane with the 
fuselage in a level manner.  If you find the plane always wants to dive, pull the trimming tab towards your body to trim up the 
elevator.  If you find the plane always wants to climb, push the trimming tab away from your body to trim down the elevator.  The 
goal is to fine trim the elevator so you can have a level flight at about half throttle.  With the elevator properly trimmed, you will 
find that when you throttle up, the plane will go up, and when you throttle down, the plane will descend.  When you get the plane 
under control, it is time for landing.

Wind

15°

GM080PO30211403

Summary of Contents for SkyNova

Page 1: ...ithout notice www thewingsmaker com Specifications Specifications Before commencing assembly please read these instructions thoroughly INSTRUCTION MANUAL Wing Span 62 9 in 1600 mm Polyhedral Wings 48...

Page 2: ...n of models The manufacturer will replace any servos due to manufacturer s defect but will not cover plane crashes due to damaged servos not detected before flying Symbols used throughout this instruc...

Page 3: ...2xD4x4mm 2 pcs CLEVIS PL4112105 1 pc STRAPER PL4112106 1 pc PUSHROD 1 4x60mm w Threads For Elevator 1 pc 9 TAIL LANDING GEAR PL3410030 1 set SCREW PA2x8mm 1 pc 10 MAIN LANDING GEAR 2 5mm 1 set SCREW P...

Page 4: ...lizer Polyhedral wings P 3 Decals 1 Bottom View Top View Cut out decal sheet peel off backing sheet and apply on fuselage stabilizer and wings Decal Bottom View Top View Left View Right View Bottom Vi...

Page 5: ...Hinge Section View Completed Transparent decals to reinforce stabilizer Apply decal sheets on both sides to fasten rudder Make sure no decal sheet cover the hinge gap Check free movement of rudder bef...

Page 6: ...Pushrod 6 Clevis Pushrod 1 4x45mm Horn Fuel Tube d2xD4x4mm Servo wire Plastic Bracket Plastic Stand Straper Fuel Tube d2xD4x4mm For pre assembled version the horn is factory glued and servo installed...

Page 7: ...PA2x8mm Plastic Collar 1 2mm Clevis Pushrod 1 4x60mm Horn Fuel Tube d2xD4x4mm PA2x8mm Screw 2 PA2 3x8mm Screw 1 Bottom View 10 0 Landing Gear Fuselage M3x3mm Set Screw 3 1mm Collar Wheel 40mm Landing...

Page 8: ...Motor Brushless ESC EZ Connector 2 Pin EZ Connector d3xD7mm Washer M3x8mm 1 2 3 4 5 6 IDSET Rudder Servo Receiver Elevator Servo ESC Plug in the Rudder Servo wire to channel 1 Plug in the Elevator Se...

Page 9: ...er and receiver to bind 1 2 Advance throttle stick the motor should start running check motor shaft for rotating direction The motor should be turning counter clock wise If rotating direction is not c...

Page 10: ...plane will dive down when flying Move aileron stick to right side Move aileron stick to right side The rudder should move to right the plane will bank right and turn to right when flying Move aileron...

Page 11: ...g into the Fuselage Inset the left wing onto the carbon wing tube press the wings against the fuselage align the anchor holes and apply the nylon bolt Make sure you have unplugged the battery before w...

Page 12: ...he battery tray Don t plug in the battery yet Put on the battery check C G mark underneath wings Support the model by two fingers on the C G mark move battery position if necessary to balance the mode...

Page 13: ...th transmitter 4 Make sure the propeller is cleared of any object 5 Check movement of Elevator and Rudder by moving the Aileron and Elevator sticks as shown in step 14 Advance throttle stick slowly to...

Page 14: ...o train your coordination of your controls on the throttle and turning Do this for at least 10 rounds until you are familiar with the response of the sticks After you feel confident in doing figure 8...

Page 15: ...e and will drop the nose pull up elevator a bit to bring back the climb angle When you reach 10 storey height you can throttle back to about half throttle and try to fly in a level course Try to do th...

Page 16: ...lift stall and falls to the ground If you want the plane to touch down further down the runway throttle up a bit to increase the air speed of the plane Never pull up elevator to pull up the nose of t...

Page 17: ...Extreme caution should be exercised when working with electric powered models Make sure the propeller is cleared of all objects especially your hands before connecting the battery to the model Make su...

Page 18: ...d2xD4x4mm Bottom View 15 For Step 1 to Step 11 please refer to previous section Aileron Servo Horn 12 Horn Servo wire Plastic Bracket Hinge Setting Hinge Section View Completed Bottom View Hinge Bott...

Page 19: ...les and apply the nylon bolt Insert the right wing into the Fuselage Inset the left wing onto the carbon wing tube press the wings against the fuselage align the anchor holes and apply the nylon bolt...

Page 20: ...Cord Aileron Servo R Rudder Servo Receiver Elevator Servo ESC Plug in the Aileron Servos wire to channel 1 Plug in the Elevator Servo wire to channel 2 Plug in the ESC Throttle wire to channel 3 Plug...

Page 21: ...aileron stick to right side Move aileron stick to left side Move aileron stick to left side Mode 1 Mode 2 Mode 1 Mode 2 Please move the servo reverse switch for Aileron AIL up to the REV position and...

Page 22: ...should move down plane will dive down when flying Move Rudder stick to right side Move Rudder stick to right side Move Rudder stick to left side Move Rudder stick to left side Mode 1 Mode 2 Mode 1 Mod...

Page 23: ...P 22 C G 18 Unplug battery check C G mark underneath wings Support the model by two fingers on the C G mark move battery position if necessary to balance the model on the C G marks GM080PO30211403...

Page 24: ...th transmitter 4 Make sure the propeller is cleared of any object 5 Check movement of Ailerons Elevator and Rudder by moving the sticks as shown in Step 16 and Step 17 Advance throttle stick slowly to...

Page 25: ...raight line with vertical stabilizer Try to get an experienced flyer to check through your installation before flying Ask him her to do the first flight for you He she can trim out the control surface...

Page 26: ...o a running propeller Extreme caution should be exercised when working with electric powered models Make sure the propeller is cleared of all objects especially your hands before connecting the batter...

Page 27: ...ing Power 110W Operating Voltage 2 3S Li Po Operating Current 10A Peak Current 15A max 15 sec Internal Resistance 50 m ohms Diameter 27 6mm Length 25mm Weight 40g Shaft Diameter 3mm Shaft Length 14 mm...

Page 28: ...THE WINGS MAKER www thewingsmaker com GM080PO30211403...

Reviews: