background image


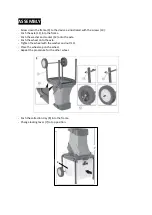
ASSEMBLY 


– 

Screw down the frame (9) to the device as illustrated with the screws (10). 

– 

Push the axle (11) into the frame. 

– 

Push the washer and socket (12) onto the axle. 

– 

Push the wheel onto the axle. 

– 

Tighten the wheel with the washer and nut (13). 

– 

Place the wheel cap on the wheel. 

– 

Repeat the procedure for the other wheel. 


– 

Push the collection tray (8) into the frame. 

– 

Change locking lever (7) to top position. 


Summary of Contents for 193895001

Page 1: ...DER WITH COLLECTOR HOPPER SPARES SUPPORT 01793 333212 Please read understand this manual payingparticular attention to the safety instructions before use The manufacturer reserves the right to change the product specification and livery according to continued product improvements ...

Page 2: ......

Page 3: ...equires assembly before use See the Assembly section for instructions Please check that all parts required for the assembly of this spreader are included If for any reason you believe a part for the assembly is missing or damaged please contact us If you require any assistance with regards to the contents or operation of your machine please contact us TEL 01793 333212 MON FRI 8 00AM TO 5 30PM EXCL...

Page 4: ... described in these instructions for use Any other use is incorrect The manufacturer will not assume responsibility for damage resulting from such use ELECTRICAL REQUIREMENTS Connect the main leads to a standard 230V 10 50Hz 1Hz electrical supply which has protection devices for under voltage over voltage over current as well as a residual current device RCD with maximum residual current rated at ...

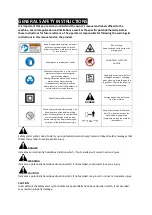
Page 5: ...ing parts cleaning or working on the log splitter Consult the technical manual before servicing Double Insulated Protection DANGER Foreign bodies may be thrown from the machine Check your machine before turning it on Keep guards in place and in working order Frequently check to see that tools are removed from the machine area before turning it on Replace damaged missing or failed parts before usin...

Page 6: ...they are not safety glasses goggles Wear protective hair covering to contain long hair preventing it from getting caught in machinery AVOID ELECTRICAL SHOCK Check that the electrical circuit is adequately protected and that it corresponds with the power voltage and frequency of the motor Check that there is a ground connection and a regulation differential switch further up the circuit Ground the ...

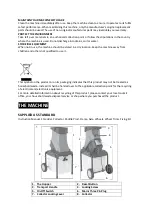
Page 7: ... dry location Keep the machine away from children and others not qualified to use it This symbol on the product or on its packaging indicates that this product may not be treated as household waste Instead it shall be handed over to the applicable collection point for the recycling of electrical and electronic equipment For more detailed information about recycling of this product please contact y...

Page 8: ... 11 into the frame Push the washer and socket 12 onto the axle Push the wheel onto the axle Tighten the wheel with the washer and nut 13 Place the wheel cap on the wheel Repeat the procedure for the other wheel Push the collection tray 8 into the frame Change locking lever 7 to top position 8 7 ...

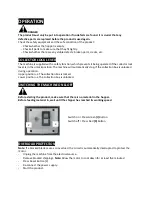
Page 9: ... machine will automatically stop if the collection box is unlocked during operation Upper position The collection box is locked Lower position The collection box is unlocked SWITCHING THE MACHINE ON OFF Before starting the product make sure that there is no material in the hopper Before feeding material in wait until the chipper has reached its working speed Switch on Press Green I Button Switch o...

Page 10: ...that has been stored for a few days is therefore withered and damp This prevents blocking of the motor cylinder Do not put soft waste such as kitchen waste into the chipper compost it instead Large branches with leaves must first be chipped completely before any other material is fed in If you cut heavy material or branches without interruption this may block the chipper Pull out the material by h...

Page 11: ...er To clean neverusecleansersorsolvents This can cause irreparable damage to the device The plastic parts can be eaten away by the chemicals MAINTENANCE CHANGING BLADES SAFETY GLOVES MUST BE WORN AT ALL TIMES Loosen the closure screw 4 and fold out the hopper Insert a suitable object Allen Key or Screwdriver as shown and hold it in the hole 14 Loosen the screws 15 with an Allen Key Turn or replace...

Page 12: ...ers and your environment You also risk invalidating your manufacturer s warranty PROBLEM PROBABLE CAUSE REMEDY SUGGESTED Motor not running No Mains Voltage Check cable plug socket and fuse Cable Faulty Contact your local Approved Service Dealer or Electrical Specialist if out of Warranty Motor Protection Activated Remove all chipped debris press reset button Safety Trigger not triggered Check the ...

Page 13: ...__________________________________ _____________________________________________ _____________________________________________ _____________________________________________ _____________________________________________ _____________________________________________ _____________________________________________ _____________________________________________ ___________________________________________...

Page 14: ...TS DIAGRAM THISWB 193895001 62 NOTE Parts Lists are supplied for information purposes only not all parts are stocked individually we recommend you contact our Spares Team on 01793 333212 for expert advice ...

Page 15: ...85B 2 TH102990141 Over Load Protector 1 TH301080368 Motor Bracket 1 TH301080366 Switch Panel 1 TH102010386A Motor Stator 1 TH102020203 Solenoid Switch 1 TH104030010 Male Tab F6 3 0 5 2 45 TH104030247 S T Screw 4 2X35 2 TH103050142 Little Belt Wheel 1 46 TH4080039 Back Forced Switch 1 TH103050144 Bearing 1 47 TH301080361 Blade Panel Upper Cover 1 TH102010386B 1 Motor Rotor 1 47 1 TH104020072 Nut M8...

Page 16: ...arranty failure to do so will invalidate the 2nd year of the warranty A reduced warranty period of 90 days applies to those items which are subject to normal wear and tear e g wheels tyres cutter bars cylinders bottom blades belts cables grass bags spark plugs All Handy Handy Pro All others Mowerland and Q Garden domestic products 1 year from the original date of sale to the first domestic user 90...

Page 17: ... products GJ Handy Co Ltd will never warranty in terms of the merchantability or the fitness for a particular purpose No person is authorised to make any warranties representations or promises expressed or implied on behalf of GJ Handy Co Ltd or to modify the terms conditions or limitation of this warranty policy in any way Neither GJ Handy Co Ltd nor any company affiliated with GJ Handy Co Ltd sh...

Page 18: ...nformity assessment procedure followed was in accordance with EN60335 1 A11 2014 EN13683 A2 2011 EN62233 2008 EN55014 1 2006 A2 2011 EN55014 2 1997 A2 2008 EN61000 3 2 2014 EN6100 3 11 2000 Notified Body TÜV SÜD Product Service GmbH Address es Zertifizierstelle Ridlerstraße 65 80339 München GERMANY Guaranteed Sound Power Level 106 dB A Authorised signatory technical file holder Date 08 03 2016 Sig...

Page 19: ......

Page 20: ...S TEL 01793 333212 MON FRI 8 00AM TO 5 30PM EXCL BANK HOLIDAYS EMAIL customerservice handydistribution co uk Tosee our complete range of garden machinery and equipment visit www thehandy co uk Distributed by Handy Distribution Murdock Road Dorcan Swindon SN3 5HY ...

Reviews: