background image

Premier Elite ComWiFi

 Installation Manual 

12 

INS644 


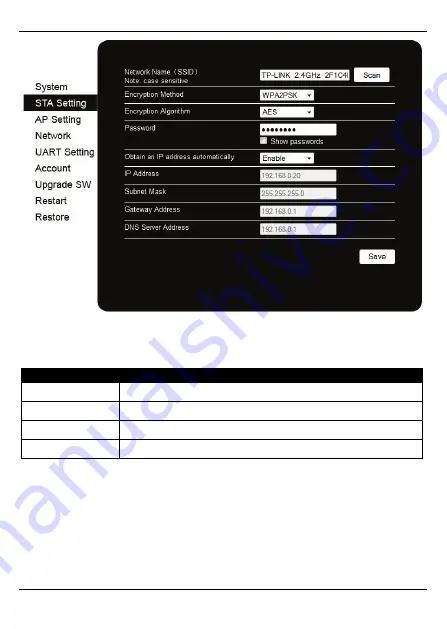
Click 

Save

  and 

Restart

, you can then close the web browser. The unit will 

restart


during this period. 

Re-scan for wireless networks on the WiFi device and connect to the Wi-Fi router. 


In  the  web browser on  a  PC  on the same network, you should be able to connect to the 

ComWiFi

  with the new IP address you have given it. This will prove the settings have been 

accepted. 

In this example the IP address assigned to the 

ComWiFi

 is within the DHCP Pool, and 

should therefore be reserved so that it cannot be used by another device. 

Record the details here 

IP Address 


Subnet Mask 


Gateway 


DNS 


Summary of Contents for Premier Elite ComWiFi

Page 1: ...Installation Manual Premier Elite ComWiFi INS644 ...

Page 2: ...ontrol panel is connected to a network the following functions can be achieved Control the alarm system using the Texecom mobile apps and send push notifications Upload Download via Wintex UDL Two Modules are available CEK 0001 Premier Elite ComWiFi PCB Antenna CEK 0002 Premier Elite ComWiFi SMA External Antenna Typical LAN configuration Premier or Premier Elite Control Panel ComWiFi Module Wirele...

Page 3: ...le requires a basic understanding of networking and TCP IP protocol If you are not familiar with these concepts you may require assistance from an IT professional before attempting to install the module The ComWiFi module is designed to be fitted inside the control panel and is powered via the harness connection supplied Network Hub Switch Wintex Upload Download Wintex Upload Download Router or Ga...

Page 4: ...na or the ComWiFi with external antenna may be used For metal panels the ComWiFi with external antenna is required A 6 5mm hole will need to be drilled in the control panel housing to mount the external antenna Metal Panel CEK 0002 Polycarbonate Panel CEK 0001 Small Poly Livefront Large Poly Drill 6 5mm hole Drill 6 5mm hole Drill 6 5mm hole ...

Page 5: ...rdware flow control CTS for future use b Signal Strength c Hardware flow control DTR for future use LED Off On Slow Flashing Fast Flashing A C Unit Not connected OK N A Communication with panel B No or Low Signal less than 40 Signal Strength Good better than 66 Signal Strength Marginal between 40 66 N A 3 Antenna Antenna connection 1 2 3 A B C ...

Page 6: ...Panel Changing other settings within the setup pages may cause incorrect operation of the ComWiFi and you will be advised to return the unit to factory settings 2 Initial Module Setup These steps MUST be carried out FIRST Connect the ComWiFi onto the comport of the control panel using the lead provided Using a Wi Fi enabled computer tablet or mobile device scan for new wireless networks Select the...

Page 7: ...mWiFi secure Click on Account on the left side of the screen and then enter a new User Name and Password followed by Save You will be prompted to Restart the unit Once the unit has restarted reconnect if required and continue Please note it is NOT possible to retrieve the User Name Password once it has been changed You will have NO access to the device without it It is not possible to default the ...

Page 8: ...router as changes will need to be made to ensure the ComWiFi will function as expected and so that you can configure the router to allow access from the outside world WAN should you require You will need to know the following the default information should be available from the router documentation The router s SSID wireless network name The WiFi password The IP address of the router ...

Page 9: ...t number used to identify the channel for remote initiated connections The default setting is 10001 The range for port settings is 1 65535 except for the following reserved ports Port Numbers Reserved for 1 1024 Reserved well known ports 9999 Telnet setup 14000 14009 Reserved 30718 Reserved 10000 10999 Recommended for raw socket connections Gateway The gateway address or router allows communicatio...

Page 10: ...d another device is given the address by the router To overcome these potential issues it is advised that the IP address is either reserved for the ComWiFi or the IP address used for the ComWiFi is outside of the DHCP Pool Accessing the Router On a PC open the web browser and type the router s IP address into the address bar as shown and press enter Values used are typical only they may or may not...

Page 11: ...here you accessed the ComWiFi do the following Click on the STA tab on the left side of the screen Ensure Obtain an IP Address Automatically is Enabled Under the Network Name click on Scan and then select the WiFi network This is the name of the wireless router SSID that is connected to the internet Enter the router password if required Click Save When prompted Restart the device disconnect from t...

Page 12: ...o the Wi Fi router In the web browser on a PC on the same network you should be able to connect to the ComWiFi with the new IP address you have given it This will prove the settings have been accepted In this example the IP address assigned to the ComWiFi is within the DHCP Pool and should therefore be reserved so that it cannot be used by another device Record the details here IP Address Subnet M...

Page 13: ...starts at 192 168 0 50 and ends at 192 168 0 199 We now have the option of assigning an address between 2 49 or 200 254 On the WiFi enabled device where you accessed the ComWiFi do the following Click on the STA Setting tab on the left side of the screen Ensure Obtain an IP Address Automatically is Disabled Under the Network Name click on Scan and then select the Wi Fi network This is the name of ...

Page 14: ...e previous steps Pressing when complete Pressing the key twice will enter a dot For Example 192 168 0 150 Scroll down once to change the port number This is required if you wish to setup port forwarding through the router The port can be left as 10001 Scroll down and enter the Gateway address assigned to the ComWiFi Scroll down once and enter the subnet mask assigned to the ComWiFi Press twice Pre...

Page 15: ...manufacturers website for more information This will be required in order to use the app remotely To setup Port Forwarding do the following Connect to the Router Look for settings for Forwarding or Port Forwarding these could be under advanced settings or in the Firewall settings Each manufacturer is different Once you have found the option you will have something like this Add a new rule using th...

Page 16: ...WAN Before attempting to connect to the system from a remote location please read the section on Port Forwarding this will need to be done to allow access from outside of the LAN Fixed IP address Uncommon If you have a fixed IP address internet connection complete all of the details above BUT replace the Host Address with the Fixed IP address provided by the Internet Service Provider Dynamic IP Ad...

Page 17: ...the New Layout choose Yes Choose My Sites o A warning box will appear saying you have No Site Settings take note of the instruction and press OK Swipe Left iOS or hold Android on the Site Name and choose Edit Click on Site Name and enter a Site Name Site Summary Click Back and then IP Details enter the IP address and Host Port of the ComWiFi from the previous steps in these instructions o Update I...

Page 18: ... Choose enter a User Name Choose enter a Password enter a valid Email Address Notifications will not be setup without a valid address Leave the Account Number field blank Click Register Account You will receive an email with a Verification Code follow the instructions in the email Enter the Verification Code you are given into the Account Number box and press Register Once you have completed this ...

Page 19: ...i Options then Program Digi Using the Scroll key select Which ARC you wish to use Press and scroll to change the ARC protocol to either SIAII or Contact ID both are supported Press twice then In the Pri Tel No screen enter the Push Notification Sever Address exactly like this 54 88 92 200 10001 To enter the dot press the key twice To enter the press the key twice o 54 88 92 200 10001 Press In the ...

Page 20: ... CORRECTLY Control Panel Setup for Polling To setup the Control Panel for Polling do the following Press twice Press then twice Global Options System Timers Scroll to Poll IP Every Press and then enter a value 15 minutes 015 The polling time is controlled by the server and may be changed Enable Digi Dial All Numbers Test Call To test the settings initialize a Push Notification and update the IP ad...

Page 21: ... User when they enter their code and the fault is still present In the case of this type of system the chances of a User actually seeing the fault will be minimal It is also a requirement of systems with additional communication devices that signal to an ARC or other response authority to report these faults Non EN50131 System If the system is installed and configured to NOT comply with EN50131 an...

Page 22: ...fication directly to the app Do NOT do this on an EN50131 system or on a system that has additional communication that signals to an ARC or other response authority Checking IP Updates Now do the following to confirm that the setup is correct Login to the App Connect To Site you should now be online with the system Go back to My Sites Go to Edit Site and click IP Details The IP address will have c...

Page 23: ...tworks Select the Com WiFi network Enter the password texecom2015 and press Connect Open a Web browser and type the IP address 10 10 100 254 into the address bar You will need to enter the user name and password that you have setup previously Click on Restore on the left side of the screen Click on OK to restore factory settings All user data including the user name and password will be set back t...

Page 24: ... updates will be available from our website on the ComWiFi Downloads section To upgrade the WebPages displayed by the ComWiFi do the following Assign an IP address as per the previous instructions on Page 11 or 13 Using a PC connect to the IP address of the ComWiFi in a web Browser o In the address bar type the IP address for example 192 168 0 25 o Enter the User Name Password to access the device...

Page 25: ...file you downloaded this will contain new WebPages which will include English and the chosen Language Press Upload the page will look like this The process can take several minutes so please be patient Once complete the page will change and may appear as below depending on your browser The web address will read http 192 168 0 25 data_success html indicating the operation has been completed success...

Page 26: ...lation Manual 26 INS644 Please wait for a few minutes for the ComWiFi to reset Reconnect to the ComWiFi through the browser and the new language chosen will now be available to select from the top right hand corner of the WebPage ...

Page 27: ...rnet Service Provider ISP and as such make no claims for reliability of connections or system performance Push Notifications Push notifications are used entirely at the users own risk and Texecom will accept no liability for system failure missed communications failure of polling failure of message delivery or any other failing which may occur ...

Page 28: ...the device and to make configuration changes to routers and switches where required 12 Troubleshooting Q My web browser is not displaying the login page for the ComWiFi A Ensure that you are running the latest version of the web browser If need be try using a different web browser such as Google Chrome Q I cannot connect to the ComWiFi using Wintex or the APP A Change the comport that the ComWiFi ...

Page 29: ...11 65 EU RoHS Directive The product therefore meets all the requirements to enable it to be CE marked Weee Directive 2012 19 EU WEEE directive Products marked with this symbol cannot be disposed of as unsorted municipal waste in the European Union For proper recycling return this product to your local supplier upon the purchase of equivalent new equipment or dispose of it at designated collection ...

Page 30: ...S644 Warranty All Texecom products are designed for reliable trouble free operation Quality is carefully monitored by extensive computerised testing As a result the ComWiFi is covered by a two year warranty against defects in material or workmanship ...

Page 31: ...Premier Elite ComWiFi Installation Manual INS644 31 Notes ...

Page 32: ...ashire BB4 4PW England Technical Support UK Customers Tel 08456 300 600 Calls charged at 3 36 pence per minute from a BT landline Calls from other networks may vary International Customers Tel 44 1706 233875 Email techsupport texe com Texecom Limited 2015 INS644 ...

Reviews: