Operation and Test Setup
www.ti.com
10
SNVU542 – July 2017
Submit Documentation Feedback
Copyright © 2017, Texas Instruments Incorporated
LMS36x5x-Q1 EVM User's Guide
4.2
Measure Load Transient
1. Connect power supply to posts VIN1 and GND1, and make sure the power supply can provide
sufficient peak current.
NOTE:
There is no reverse polarity protection or fuse on the evaluation board.
2. Connect transient load to posts VOUT and GND. For all power wires, it is preferable to use twisted lab
wires to reduce inductive parasitic of lab cables. If the power supply wires are very long > 50 cm,
solder additional 470-µF, 50-V bulk capacitor to posts VIN1 and GND1. Use sufficient power wires to
avoid voltage drops and use short sense probe connection for the measurement.
3. To accurately sense the output voltage, the scope probe must be placed directly over the output
capacitors Co1, Co2, Co3, and Co4. Make sure to connect the scope probe GND ring directly to the
output capacitor GND pad for minimal ground loop. Ground loops can introduce ringing in observed
waveforms which is an artifact; not present on the PCB. Alternatively use a differential probe over the
output capacitors. Do not use wires as a differential probe and always probe directly with shortest
possible pins.
Make sure the IC is enabled by having jumper J2 set to [EN-VIN] and check test point EN is driven
high and not drooping during the load transient.
4.3
Measure EMI
1. Connect power supply cable from LISN to posts IN+ and IN–, and make sure the board is placed 5 cm
above the table.
NOTE:
The length of the LISN cable to VIN+/VIN– must be between 20 cm to 40 cm for conducted
EMI CISPR 25.
2. Connect resistive load directly to posts VOUT and GND. Use extremely short leads.
NOTE:
To accurately measure EMI, make sure the table has a good ground connection to the
chamber; connect the battery GND cable to the table without touching the EVM, especially
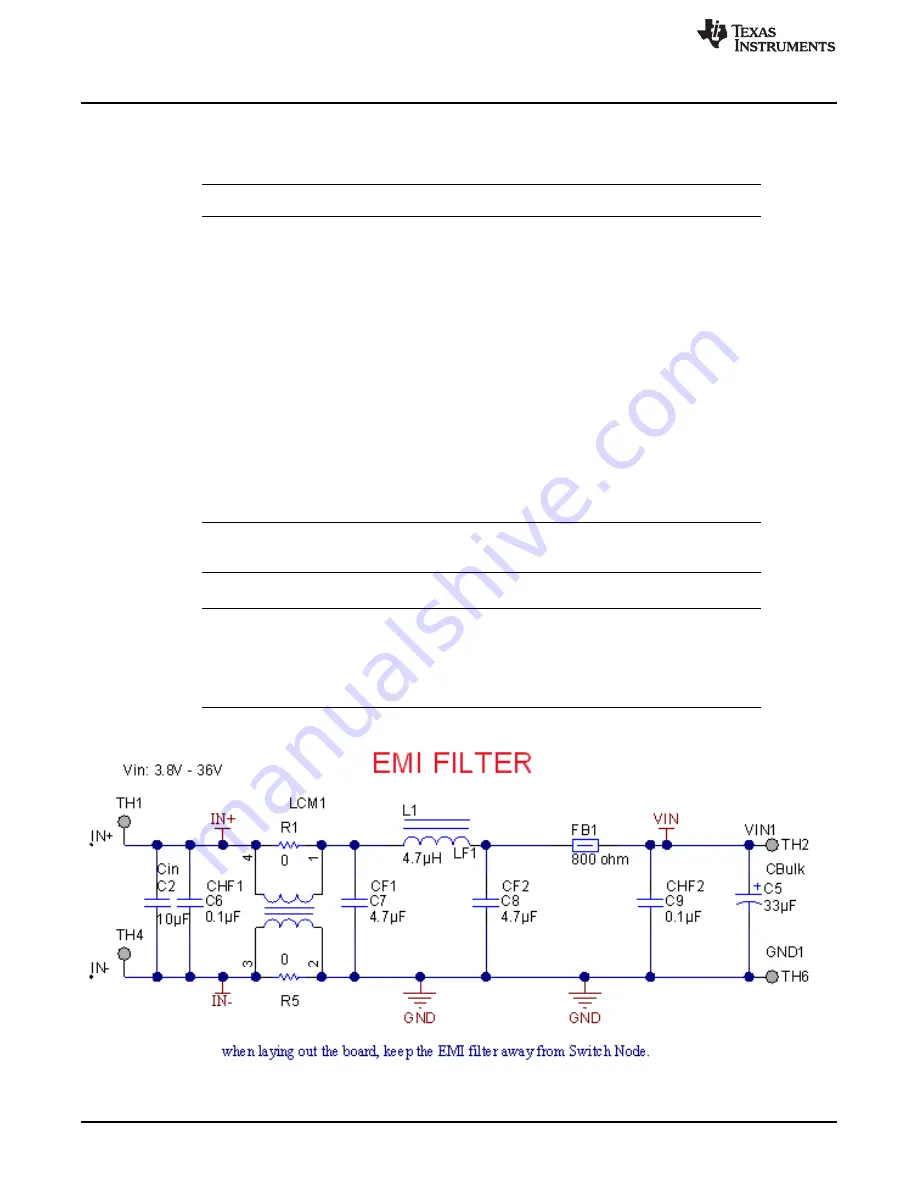
the region near the switch node. The board has a very effective 3-stage EMI filter where the
common-mode choke is not assembled by default. If the common-mode choke is added,
remove the bypass resistors R1 and R2.
Figure 11. 3-Stage EMI Filter Schematic


