Tevion DVD 5000 User Manual Download Page 17

-17-

OPERATION

2. Color distortion may occur with some kinds of

JPEG picture files depending on their source

such as downloading from the Internet.

II. Operation for Card Reader

This player will enter DVD working status after

power on. Press the 

CARD/DVD

 button on the

remote control to select the card reader, the screen

will display “Loading Card” then the unit will switch

to card reader status.

Digital Media Card Compatibility

This card reader supports five different cards -

CompactFlash, MultiMediaCard, Secure Digital,

SmartMedia, and Memory Stick.

The CompactFlash model is compatible with CF I/

II of 8/16/32/64/128/256 and 512MB capacity.

The Secure Digital model is compatible with most

brands of Secure Digital of 8/16/32/64/128/256 or

512MB capacity.

The MultiMediaCard is compatible with most brands

of MultiMediaCard/PRO of 8/16/32/64 or 128MB.

The Memory Stick model is compatible with

Memory Stick & Memory Stick Duo of 4/8/16/32/64

or 128MB.

The SmartMedia model is compatible with Smart

media of 8/16/32/64/128MB.

Media supported for above cards:

JPEG pictures, MP3, WMA and MPEG4.

Inserting cards

Press the right side of the card reader door to

open it and then insert the card.

Caution:

To avoid com

plications while attempting to us

e

this Card R

eader, we recommend reading thi

s

entire chapter

 and follow the instructions to inser

t

different card

s.

Warning!

Do not bend t

he cards of force them into the reader

.

If forced they

 may be damaged, if damaged th

en

data may be l

ost forever.

Inserting a

 SmartMedia Card

1. Position th

e SmartMedia card so that it is on i

ts

side with

 the gold contacts located on the

bottom, th

e media’s notched corner should be

facing the left when the gold contacts are on

the bottom. Please refer to illustration 

below

for proper insertion.

2. Insert the card into the slot with the gold

contacts on the bottom and the notched corner

facing left. Gently push the card in all the way

until the card is fixed in place.
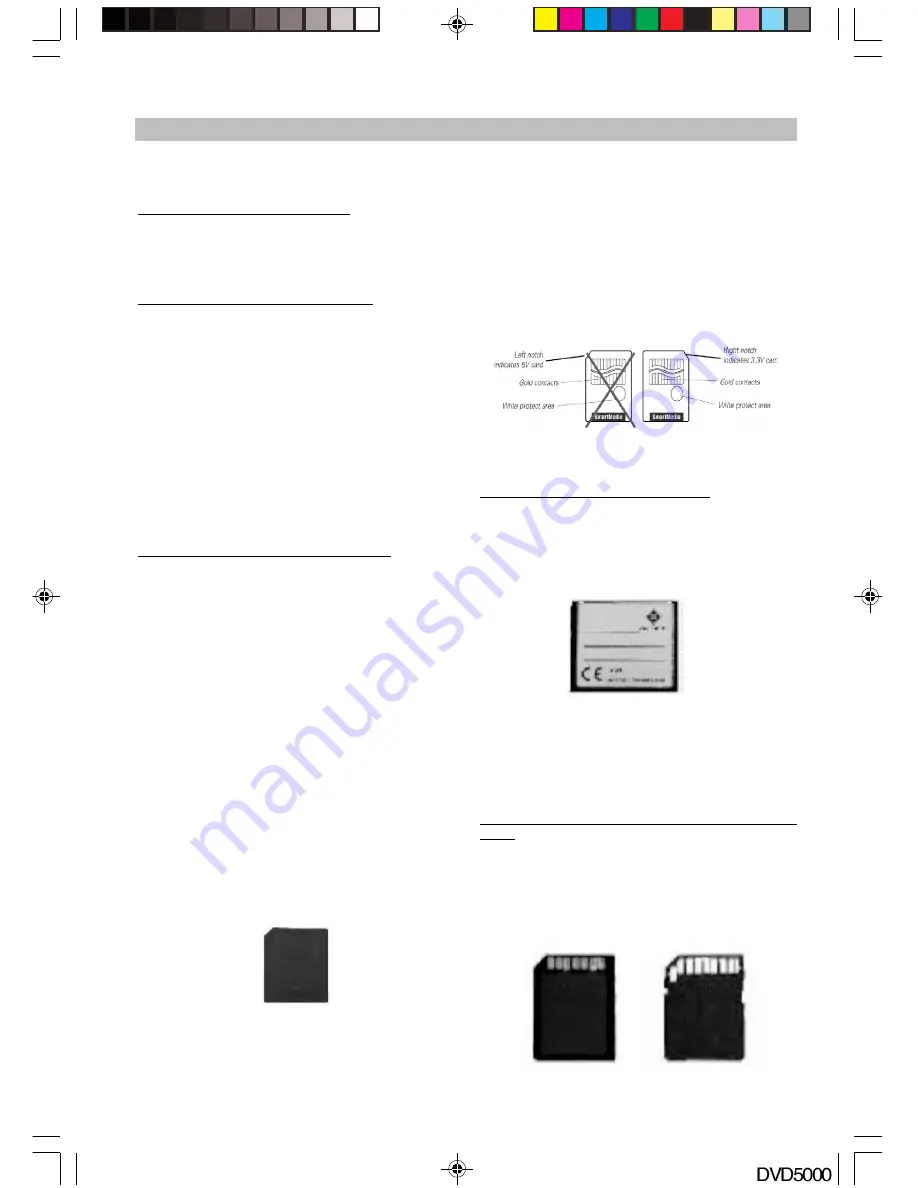
Remark:

 This product can only accept 3.3V

SmartMedia cards. Notice the notched corner of

the SmartMedia card. The location of the notch

for a 3.3V SmartMedia card will appear on the

right-hand side when you are looking directly at

the gold contacts from the top (refer to the

illustration at the bottom of the page).

IMPORTANT NOTE: 5V SmartMedia cards are not

supported.

SmartMedia Card Comparison (view of cards from

top)

5.0V SmartMedia cards (INCOMPATIBLE)

3.3V SmartMedia cards  (COMPATIBLE)

Inserting a CompactFlash Card

1. Position the CompactFlash card on its side with

the media manufacturer’s label down (refer to

the image) and the connectors facing away

from you. Insert the CompactFlash into the

reader with the CompactFlash connectors first

and label facing downwards.

2. Gently push the card in all the way until the

card will insert no further.

WARNING:

 Be careful not to insert the

CompactFlash card in the wrong direction - be

sure the connectors are facing inward and the

card’s label is on the top side.

Inserting a MultiMediaCard or Secure Digital

Card

1. Position the MultiMediaCard or Secure Digital

card on its side with the media’s label on the

bottom and gold contacts on the top. The media

should be positioned so that the gold contacts

are farthest from you and inserted into the

reader first. Please refer to below image for

proper media insertion.

DVD5000_IB.p65

05-10-22, 23:17

17

Summary of Contents for DVD 5000

Page 1: ...DVD 5000 DVD PLAYER with DivX Playback 5 in 1 Card Reader PLEASE READ FULLY AND RETAIN THESE INSTRUCTIONS FOR FUTURE USE DVD5000_IB p65 05 10 22 23 16 1...

Page 2: ...15 u Repeat 15 u Return 15 u Mark 15 u CLR 15 u Angle Audio 15 uPROGRAM 15 u Search 15 u Title For DVD Only 16 u Menu 16 u Subtitle 16 TABLE OF CONTENTS u VIDEO OUT 16 u WMA MP3 JPEG MPEG4 16 Operati...

Page 3: ...RNING To reduce the risk of electric shock do not expose this product to rain or moisture NOTE This DVD player uses the Macro Vision copy protection code system copied DVD media without this code will...

Page 4: ...d candles on any electrical apparatus 11 Connect only to a suitable 230 240 50 Hz power supply 12 Always unplug from the power source when any electrical apparatus is not in use 13 Do not abuse or dam...

Page 5: ...liances u Never put any heavy object on the AC power cord FEATURES AND PRECAUTIONS u Do not attempt to repair the AC power cord u Remove dust dirt etc from the plug at regular intervals u If the unit...

Page 6: ...lay button 6 SKIP button 7 PAUSE button 8 VFD Display Displays the relevant working status 9 Remote control sensor 10 Disc tray 11 Slot for SD SM MMC MS cards 12 Slot for CF I II cards 13 Card reader...

Page 7: ...l and can be connected to a digital audio decoder or amplifier with coaxial input 10 2CH Audio LEFT output jack 11 2CH Audio RIGHT output jack 12 Optical output jack Outputs a digital audio laser sign...

Page 8: ...LOWF button 19 MUTE button 20 ZOOM button 21 PAGE button 22 PAGE button 23 MARK button 24 VOLUME button 25 A B button 26 SKIP button 27 CARD DVD button 28 OK select button 29 DISPLAY button 30 VIDEO O...

Page 9: ...when disc tray closes 3 Shows LOAD when reading disc 4 Shows NOdISC without disc loaded 5 Shows when playing DVD discs 6 Shows CD when playing CD discs 7 Shows D when playing Dolby Digital discs 8 Sho...

Page 10: ...ve scan function you can use this unit s progressive scan output by using the Y Pb Pr output jacks setting the DVD player s VIDEO OUT as Y Pb Pr Notes 1 Select the following speaker size setting in th...

Page 11: ...5 1 channel input connectors 3 Audio cords not supplied 4 To audio input connector subwoofer 5 To audio input connector center 6 To audio input connector surround L R 7 To audio input connector front...

Page 12: ...or match Keep the protective cap and always reattach the cap when not using the connector to protect the laser beam against dust Coaxial digital audio output connector Sound having 96 KHZ sampling wil...

Page 13: ...on the remote control damaged parts may lead to a malfunction u Do not mix old and new batteries u If the remote control is not going to be used for a long period of time remove the batteries to avoid...

Page 14: ...ncluding MPEG4 discs have no such function STANDBY When you press the STANDBY button the player will switch to Standby status When pressed again the player will return to normal working status SKIP SK...

Page 15: ...from that point Marked positions can be recalled anytime by pressing MARK button on the remote control Note 1 All the marks are cleared when the power is off or the disc is removed 2 Somediscsincludin...

Page 16: ...OM with JPEG WMA MP3 or MPEG4 and enter playing control menu as below Note Some characters of the folder file names may not be displayed correctly These control modes are available Folder Normal Folde...

Page 17: ...de with the gold contacts located on the bottom the media s notched corner should be facing the left when the gold contacts are on the bottom Please refer to illustration below for proper insertion 2...

Page 18: ...n Removing Cards The cards can only be removed when the card reader is at non working status and the cards indicator must be off otherwise the reader or the cards may be damaged or data on the cards m...

Page 19: ...play Audio Portuguese Portuguese audio Display English English DVD menu German German DVD menu French French DVD Display Dutch Dutch DVD Display Italian Italian DVD Display Spanish Spanish DVD Display...

Page 20: ...ro Logic Off Turn off the Pro Logic function PCM Output Digital signal in PCM Raw Output Raw digital signal Digital Output Off Turn off digital output Pink Noise OFF Left Center Right Left Surr Right...

Page 21: ...ith such discs the ANGLE button can be used to view the scene from different angles CHAPTERNUMBER These numbers are recorded on DVD discs A title is subdivided into many sections Each of them is numbe...

Page 22: ...ded double layer 2 CD disc u 12cm disc u 8cm disc Video output u output level 1 0 2 Vp p 75 ohm u horizontal resolution 500 lines u S N ratio 60dB Audio output Impedance 10k ohm u output level 1 8 0 2...

Page 23: ...se switch to NTSC output or use VIDEO S VIDEO or SCART to connect TV set Picture is distorted during fast forward or reverse The picture will be somewhat distorted at times this is normal advance or r...

Page 24: ...REGION CODE SET UP PROCEDURE FOR MODEL TEVION DVD5000 1 OPEN TRAY 2 PRESS NUMBERS 2812 THEN SELECT REGION CODE 6 is All Region Mode 3 CLOSE TRAY...

Page 25: ...ity inspections For any customer query or in the unlikely event of a product failure please phone or email the helpline contact details below for assistance DO NOT RETURN THE PRODUCT TO THE RETAILER W...

Reviews: