background image

21

 • MusicStation

The MusicStation can receive mono and 
stereo stations in the range from 87.5 to 
108 MHz.

Playback

Select “Radio” as source (see page 15).

 Setting the radio stations

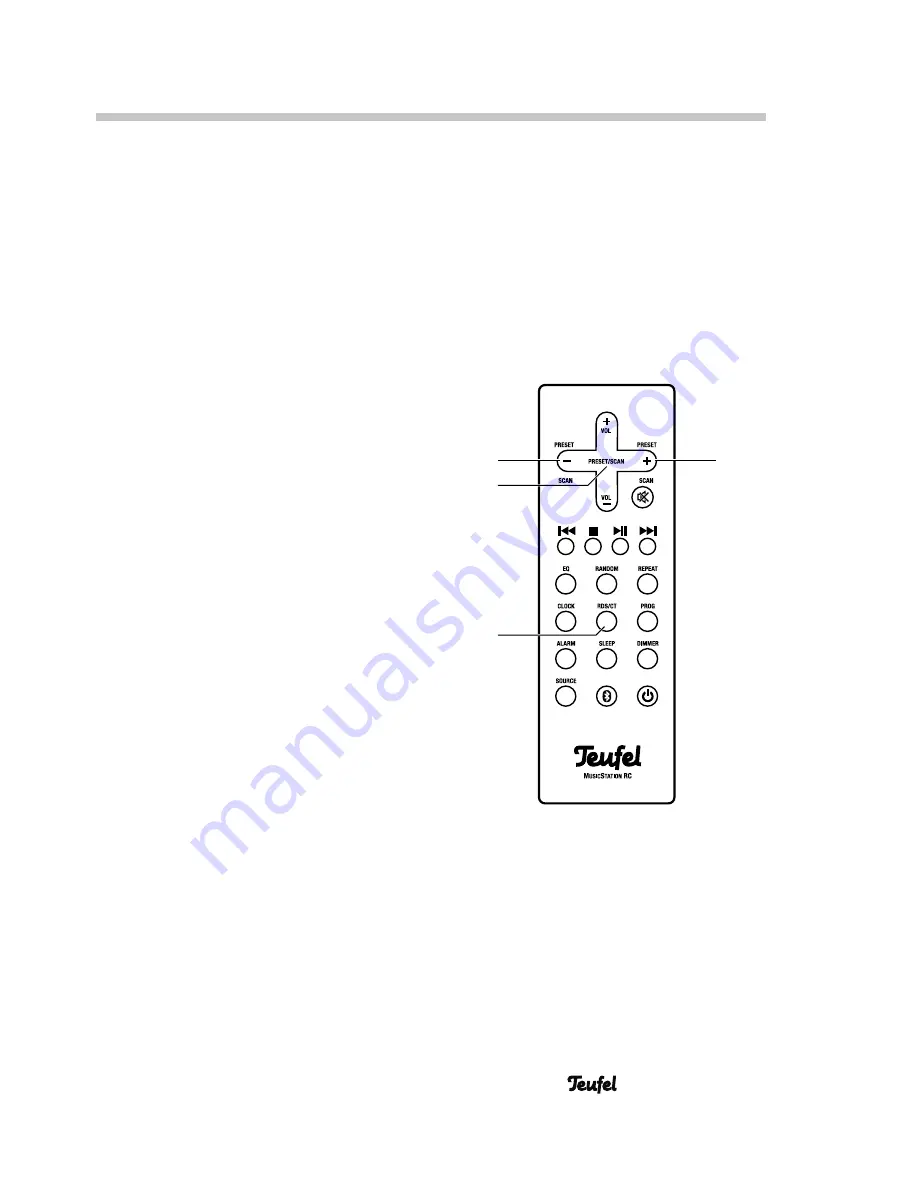
With the PRESET/SCAN button 

(35)

 you 

can switch between the stored stations 
(see next page) and the frequency setting.

Use the /– buttons 

(16/36)

 to 

set the receiving frequency. Every time 
you tap the button, the frequency will be 
increased or decreased by one increment 
(0.05 MHz).

Start the station scan by pushing and 
holding the /– buttons 

(16/36)

The search will stop at the first station 
received with sufficient signal.

 RDS

For stations with RDS, the name of the 
station is shown in the display and you 
can use the RDS/CT button 

(28)

 to call 

up the radio text and time (not all radio 
stations offer this service).

With RDS, you can also set the clock of 
the MusicStation (see page  17)

Radio Playback

35

36

16

28

Summary of Contents for musicstation

Page 1: ...Technical Description and Instruction Manual Compact 2 2 FM Radio with CD USB and Bluetooth MusicStation ...

Page 2: ...4 Functionality 14 Basic Functions 15 Activating and deactivating 15 Selecting a source 15 Setting the volume 16 Setting the sound 16 Dimmer 16 Clock Alarm Clock 17 Setting the time 17 Displaying the time 18 Sleep function 18 Alarm clock 19 Radio Playback 21 Playback 21 Setting the radio stations 21 Station memory 22 CD Playback 23 Suitable CDs 23 Inserting a CD 23 Playback 23 Ejecting a CD 24 USB...

Page 3: ...l packaging If you wish to exercise your eight week right of return we ask that you be abso lutely sure to hold onto the packaging We can only accept the return of the MusicStation WITH THE ORIGINAL PACK AGING Empty boxes are not available Complaints In case of complaint we will need the following information to process your enquiry 1 Invoice number Can be found on the sales slip enclosed with the...

Page 4: ...proper use The product is intended for private use Before operating the MusicSta tion please first read the safety notes and instruction manual carefully Only in this way can you ensure that all functions are used in a safe and reliable manner Store the instruction manual in a safe place and also be sure to pass it on to any subsequent owner Explanation of symbols Protection class II Dual insulati...

Page 5: ...other visible damage Set up the unit so that the mains plug is easily accessible and no vent slots are blocked If the device emits smoke smells burnt or produces unusual sounds immedi ately disconnect it from the mains and do not operate it further Never open the device housing Repairs may only be carried out by an authorised specialist workshop other wise all warranty claims are waived Only parts...

Page 6: ...o longer possible to safely close the battery compartment stop using the product and store it so that it is not accessible for children If you suspect that a button cell battery has been swallowed or otherwise incor porated promptly consult a physician Leaking battery acid may lead to chem ical burns Do not allow battery acid to come into contact with skin eyes or mucus mem branes In the event of ...

Page 7: ...other heat generating equipment such as amplifiers etc NOTE Power overload due to lightning strike may damage or destroy the unit If the unit is to be left unsupervised for a long period e g during a holi day or if a thunderstorm is forecast disconnect the mains adapter from the socket ...

Page 8: ...adapter plug 24 V DC 햷 1 connector cable with 3 5 mm stereo jack plugs 햸 1 FM throw out aerial 햹 1 wall bracket 햺 2 rubber feet for 햹 Checking the delivery Check that all items have been deliv ered and that nothing is damaged If the delivery is incomplete or exhibits transport damages please contact our service team see page 3 Do not in any case operate the device if it is damaged 햲 햳 햴 햵 햶 햷 햸 햹 ...

Page 9: ...Increase the volume 6 Decrease the volume 7 Fast forward play next track 8 Play pause 9 Fast rewind play last track 10 SOURCE Select a source 11 FM Antenna jack 12 24V 1 75A Input jack for mains adapter 13 AUX IN Audio input jack 14 HEADPHONE Headphone jack 15 USB Connector jack for USB stick 13 14 15 11 12 24V 1 75A Front side 1 2 10 8 7 4 5 6 9 3 ...

Page 10: ...ing 25 SOURCE Select a source 26 SLEEP Sleep function 27 ALARM Set alarm clock 28 RDS CT Switch RDS display set the clock according to RDS 29 CLOCK Show time 30 RANDOM Random playback 31 EQ Adjust the sound 32 Stop playback 33 Fast rewind play last track 34 VOL Decrease the volume 35 PRESET SCAN Switch station memory slot transmission fre quency 36 PRESET Station memory slot sta tion scanning in r...

Page 11: ...proper mounting may cause dam age If mounting the subwoofer on the wall make sure that this task is done in a professional manner Before drilling the holes use a metal detector to ensure that there are no electrical cables or pipes in the wall within the drilling area Use only suitable screws and dowels for fixing Verify the carrying capacity of the walls 1 Stick the rubber feet 햺 into the recess ...

Page 12: ...a but also a cable television connection You will need a coaxial connector cable for this If no antenna connection is available at the set up location you can use the en closed throw out aerial 햸 Push the aerial plug into the FM jack 11 and adjust the position of the throw out aerial until the reception is optimal Then fix the aerial in place External source device You can connect a source device ...

Page 13: ...e the device Connecting to a power supply 1 Push the required mains adapter onto the AC adapter plug 햶 until it locks into place 햴 Euro plug for Germany and many other EU countries 햵 Type G for Great Britain Ireland and many other Commonwealth countries 2 Insert the small plug of the mains adapter 햶 into the jack 12 3 Insert the mains adapter in an easily accessible mains socket If the sensor butt...

Page 14: ...ructed by objects Fluorescent and energy saving light bulbs installed in the vicinity of the unit may impair the functions of the remote control Remote control WARNING Swallowing the product battery may result in severe internal injury or even death Store both new and used batteries so that they are not accessible to children If it is no longer possible to safely close the battery compartment stop...

Page 15: ... signal is received and there is no button activity for 20 minutes the MusicStation will automatically switch to standby Automatic deactivation is only activated with radio playback Selecting a source When the unit is switched on the recently selected audio source is activated With the SOURCE button 10 or 25 you can switch the source in this order Radio BLUETOOTH CD player USB MODE USB storage dev...

Page 16: ...button 17 to turn the sound off The symbol will flash in red on the display 2 To turn the sound back on Push the but ton 17 again or change the volume Setting the sound Push the EQ button 31 to sequence through the predefined sound patterns ROCK JAZZ POP CLASSIC and EQ OFF sound unchanged Dimmer With the DIMMER button 22 you can adjust the display brightness 34 37 17 22 31 2 5 6 ...

Page 17: ...tion with an RDS signal see page 21 2 Push the RDS CT button 28 for ap proximately 3 seconds If the message NO CT appears on the display the MusicStation has not yet received the time signal from the radio station Release the RDS CT button 28 and repeat step 2 Once the message STORED CT ap pears on the display the time has been received and the internal clock has been set accordingly Manually If n...

Page 18: ... SETTING OK The time is now set Displaying the time In order to read the time briefly push the CLOCK button 29 The display will then show the time for three seconds Sleep function This function allows the MusicStation to switch itself off after a preset period of time 1 Start the desired playback 2 Push the SLEEP button 26 several times to select the desired time 120 90 60 30 or 15 minutes By push...

Page 19: ...eps the function will be aborted and your entry will be discarded 1 Push the ALARM button 27 for three seconds The activation alarm time ON will appear on the display and the number of hours will flash 2 Set the number of hours with the PRE SET buttons 16 36 3 Briefly push the ALARM button 27 once The display will now flash the minutes 4 Set the number of minutes with the PRESET buttons 16 36 5 Br...

Page 20: ...e PRESET buttons 16 36 to set the volume when the device activates 00 40 Please remember that 20 is already quite loud 13 Briefly push the ALARM button 27 once The display will briefly show the note SETTING OK The alarm time has now been set A clock symbol will appear on the display to indicate that the alarm is activated 14 Prepare for playback e g insert a CD select a radio station and turn the ...

Page 21: ... frequency Every time you tap the button the frequency will be increased or decreased by one increment 0 05 MHz Start the station scan by pushing and holding the PRESET buttons 16 36 The search will stop at the first station received with sufficient signal RDS For stations with RDS the name of the station is shown in the display and you can use the RDS CT button 28 to call up the radio text and ti...

Page 22: ...e desired station as described above 2 Briefly push the PROG button 21 PR xx will appear on the display 3 Set the desired slot number for the station with the PRESET buttons 16 36 4 Push the PROG button 21 The station has now been saved Selecting stations from the memory You can increase and decrease the slot number with the PRESET buttons 16 36 36 16 21 ...

Page 23: ...ts than CDs 1 Select CD as source see page 15 2 Insert the CD carefully into the CD slot with the printed side back The CD will be retrieved and the message CD Reading will appear on the display Playback will automatically start after a few seconds Playback During playback you will see the setting of the repeat function see next page the two digit number of the current track and the elapsed time o...

Page 24: ...back release the button Random playback Push the RANDOM button 30 All tracks are played in random order and the message RDM will appear on the display Deactivation Push the RANDOM button 30 again Repeat function Alternate the repeat function with the REPEAT button 20 the selected function will appear on the left of the display Rp1 repeat the current track RpA play all tracks and then start again f...

Page 25: ... page 15 2 Insert the USB stick in the USB jack 15 The plug only fits the jack in one position The display will show the message USB Reading If there are any music files on the stick playback will start automatically If no readable files are found on the USB stick the message Usb reading will continue to be shown on the display Playback During playback you will see the setting of the repeat functi...

Page 26: ...acks are played in random order and the message RDM will appear on the display Deactivation Push the RANDOM button 30 again Repeat function Alternate the repeat function with the REPEAT button 20 the selected function will appear on the left of the display Rp1 repeat the current track RpA play all tracks and then start again from the beginning Removing a USB stick NOTE Risk of damage Never remove ...

Page 27: ...ice on your MusicStation you must first connect the devices with each other The technical term for this is pairing 1 Select BLUETOOTH as source see page 15 2 Push the button 24 The message BT PAIRING will appear on the display 2 3 Let your source device search for Bluetooth devices You will find more information about this in the instruction manual of your source device After the search run the Mu...

Page 28: ...ice Please note that simultaneous playback from multiple source devices is not pos sible Pause playback Push the button 8 or 19 Continue playback Push the button 8 or 19 again Stop playback Push the button 32 Play next track Tap the button 7 or 18 Play previous track Tap the button 9 or 33 Deactivate the Bluetooth function on your source device to terminate the Bluetooth connection If your device ...

Page 29: ...ound in Blue tooth mode No Bluetooth connection Establish a connection see page 27 MusicStation has not been selected as the output device On your source device select Mu sicStation as the output device Bluetooth connection impaired by another radio system e g cordless tele phone Wi Fi Set up the MusicStation and or source device in another location Move to another room to test No sound via cable ...

Page 30: ...in harmful substances or not to a collec tion point run by the communal authority or borough or to a retailer so that they can be disposed of in an environmentally friendly manner Please only turn in batteries and storage batteries which are empty labelled with Cd cadmium Hg mercury Pb lead Please use a soft damp microfibre cloth for cleaning Please be absolutely sure to observe the following note...

Page 31: ...dizinprodukte Klasse 1 Medical device directive Class 1 93 42 EEC 5 Funkanlagen und Telekommunikationsendeinrichtungen Radio and Telecommunication Terminal Equipment R TTE 1999 5 EC 6 Ökodesign Richtlinie Energy Using Product Directive EuP 2009 125 EEC 7 Richtlinie zur Beschränkung der Verwendung bestimmter gefährlicher Stoffe in Elektro und Elektronikgeräten Rohs Richtline 2011 65 EC Harmonisiert...

Page 32: ...sponsibility is assumed for the correctness of this information Technical changes typographical errors and other errors reserved Technical Data You can find additional technical data in the product description on our website at www teufelaudio com This product conforms with Council of the European Union guidelines 2004 108 EC 2006 95 EC and 1999 5 EC Operating voltage Mains adapter 100 240 V 50 60...

Reviews: