background image

4

WARNING 

•  Please download any photos you have on the camera before 

opening the battery compartment.

•  Opening the battery compartment and/or removing the battery will 

erase the photos currently stored in the camera.

•  Download your photos as often as possible. Photos may be lost  

when the batteries run low.  

Starting Your Camera

•  Press and hold the mode button to start the camera.
•  The camera will sound a beep to confirm that it is ready for use. 
•  The LCD display will indicate the number of photos that can be taken 

before it becomes necessary to download them to your PC. 

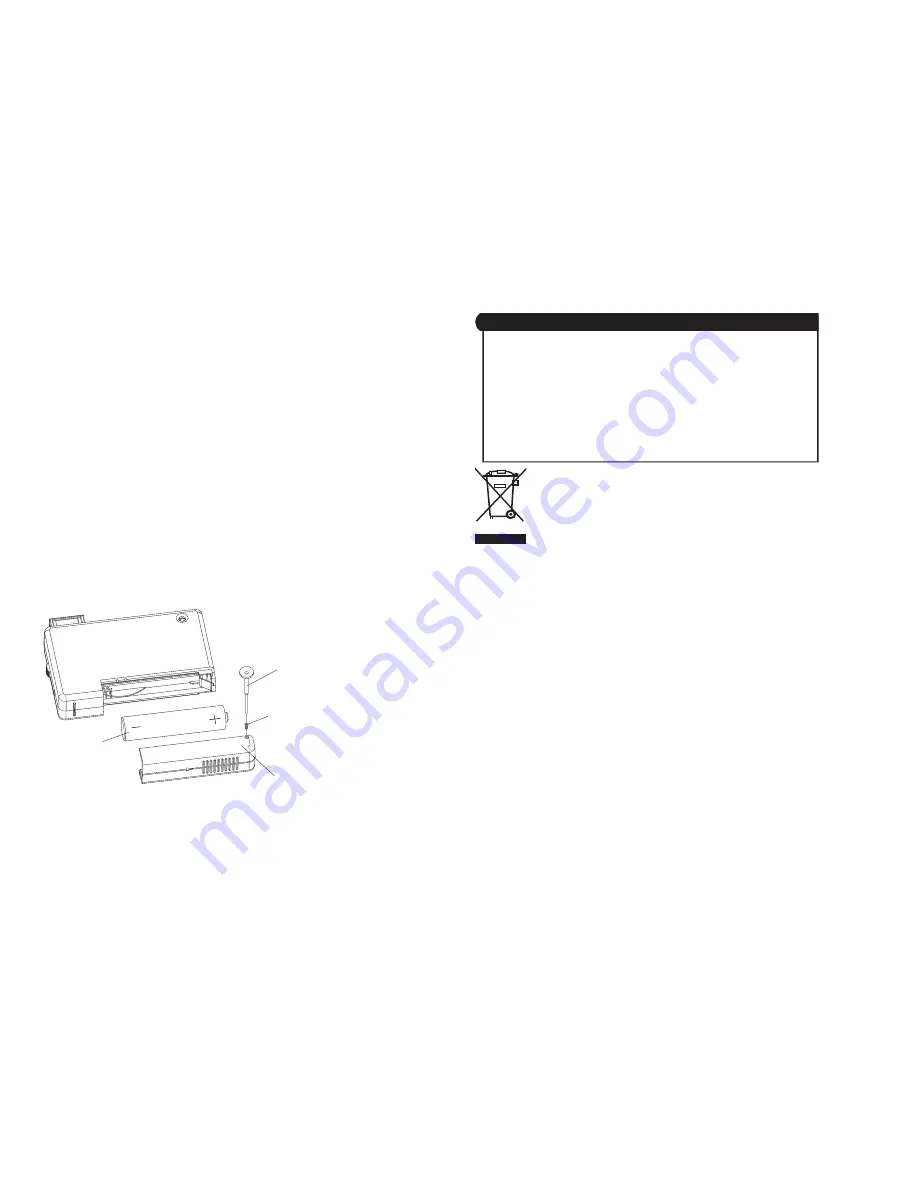
Preparing Your Camera for Use

Battery Installation

Your camera requires  x .5V AAA battery (preferably alkaline),  

which must be inserted as follows:

.  Open the battery compartment by sliding the cover in the direction 

indicated. 

.  Insert the battery in accordance with the polarity (+/-) shown on  

the inside of the cover.

3.  Close the battery compartment.

The LCD display will flash to if your battery is running low in which case 

you will need to replace the camera’s batteries before taking photos.

Note:

 If you do not intend to use your camera for an extended period, 

remove the battery to avoid leakage and corrosion.

Produced after 3th August 005
If at any time in the future you should need to dispose of this product please note that 
waste electrical products should not be disposed of with household waste. 
Please recycle where facilities exist. Check with your Local Authority or retailer for 
recycling advice. 
(Waste Electrical and Electronic Equipment Directive)

  .   Batteries should be replaced by an adult.
  .   Non-rechargeable batteries are not to be recharged.
  3.   Rechargeable batteries are to be removed from the toy before being charged.
  4.  Rechargeable batteries are only to be charged under adult supervision.
  5.   Different types of batteries or new and used batteries are not to be mixed.
  6.  Only batteries of the same or equivalent type as recommended are to be used.
  7.   Batteries are to be inserted with the correct polarity.
  8.   Exhausted batteries are to be removed from the toy.
  9.   The supply terminals are not to be short-circuited.
0.  Do not dispose of in fire.

Battery Instructions

Screwdriver

Screw

Battery cover

Battery

Summary of Contents for Spy shot digital camera

Page 1: ... Spy shot digital camera Owner s Manual ...

Page 2: ...ur Camera for Use 4 Starting Your Camera 4 The Camera Modes 5 Installing Spy Shot Photo Manager Software 6 Software Camera Driver Installation 7 Downloading Photos 9 Capturing AVI video using WebCam Express 10 Camera Maintenance 11 Technical Support 11 Appendix A Technical Specifications 11 Appendix B Troubleshooting 12 ...

Page 3: ...ystem Requirements To be able to download photos to your PC you will need the following minimum configuration Windows 2000 MEXP Pentium based PC or equivalent 80MB hard disk free space and 64MB or more RAM Available USB Interface CD ROM Drive Colour display 24 bit or higher recommended Not configured for Mac A Quick Look at Your Camera Battery compartment LCD display USB plug Microphone Mode butto...

Page 4: ... will need to replace the camera s batteries before taking photos Note If you do not intend to use your camera for an extended period remove the battery to avoid leakage and corrosion Produced after 13th August 2005 If at any time in the future you should need to dispose of this product please note that waste electrical products should not be disposed of with household waste Please recycle where f...

Page 5: ...o Photo position 2 Compose your shot using the viewfinder The optimal distance between the camera and the subject is approximately 5 feet 3 Hold the camera steady and press the shutter button to take photos 4 The camera will beep when a photo is taken If the camera fails to beep or if a 0 appears on the LCD display this is an indication that the memory is full in which event no further photos can ...

Page 6: ...f photos that can be taken at the current resolution and compression Frequency The camera has 2 Frequency settings 50HZ for the U S and Asia and 60HZ for Europe and Japan To set the camera for the correct frequency 1 Press the mode button to select the icon for 60HZ or the F5 icon for 50HZ shown on the LCD screen 2 Press the shutter button to change the frequency setting The default setting is 50H...

Page 7: ...n list and click the Install button to install Spy Shot Photo Manager and PhoTag Webcam Express 3 On the Spy Shot Photo Manager screen click the Next button 4 Please review the license terms and click the Agree button to continue the step by step instructions that will appear on your screen during the installation process NOTE To achieve maximum clarity the optimal distance between the camera and ...

Page 8: ...led and then click Install 6 Click Finish to let the Spy Shot Photo Manager installer finish the installation program 7 This will automatically launch the Install shield for the camera driver Click Next to continue 8 Once the program has finished installing you will have to restart your computer ...

Page 9: ...he Spy Shot Photo Manager icon that is on your desktop to launch the Spy Shot Photo Manager program Desktop Icon 5 Click on the Get Photos button on the Main Menu 6 The Get photos from Spy Shot camera window will appear a Select a folder to place your photos sounds and videos b Select the Automatically add the voice memos to the corresponding photo option to add a sound memo into your picture To d...

Page 10: ...program Adjust your WebCam to the desired position The screen will display what the WebCam sees Desktop Icon 2 To add audio to your video plug a microphone into your computer 3 Click the Capture button to start recording the video The elapsed recording time will appear under the video 4 Click the Pause button to pause recording To continue recording click the Capture button again 5 To finish recor...

Page 11: ...tion on warranty information please email warranty sakar com Image Sensor CMOS Sensor 100K 352 x 288 pixels Resolution 352 x 288 CIF Memory 1M x 16 bytes SDRAM Number of pictures nP Hr 20 CIF Lr 81 QCIF CP Hr 60 CIF Lo 243 QCIF Lens f 3 6 F2 4 Focus Range 40cm to Infinity Shutter Range 1 5 1 2400 second Status LCD display Numeric LCD Self Timer Timer with 10 sec delay Video mode 24 bits R G B Vide...

Page 12: ... Once your computer is back up plug the camera into your computer s USB port 5 Right click on the My Computer icon Select Properties If you are running Windows ME Click on Device Manager If you are running Windows 2000 or XP Click on hardware and then Device Manager If the camera is installed correctly there will be a category listed for Imaging Devices and clicking on the next to it should reveal...

Page 13: ... vary from those shown in the photographs 5 Please take note As an extra precaution check this toy regularly for signs of wear or damage Warning Please retain for future reference TESCO Quality We are happy to refund or replace any TESCO product which falls below the high standard you expect Just ask any member of staff This does not affect your statutory rights We are here to help TESCO Stores Lt...

Reviews: