A charger that may be suitable for one type of battery may create a risk of fire when used with another
battery.
Use battery operated tool only with specifically designed battery pack.
Use of any other batteries may create a risk of fire.
NEVER
place hands or other body parts near the drill bit or chuck during operation.
Hold the drill by its handle only. Because the cordless driver drill operates by battery power, be aware of the
fact that it can begin to operate at any time.
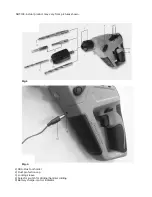
Charging the battery pack
(Fig. 2)
The charging procedure begins as soon as the mains plug of the battery charger is plugged into a socket
outlet and the charge connector
(15)
is plugged into the socket
(14)
on the bottom of the handle.
The battery charge-control indicator
(5)
indicates the charging progress. During the charging process, the
indicator
(5)
LED lights from one to four. When the battery charge-control indicator
(5) all four LED’s are
green
, the battery is fully charged.
During the charging procedure, the handle of the machine warms up. This is normal. Disconnect the battery
charger from the mains supply when not using it for long periods.
The power tool cannot be used during the charge procedure; it is not defective when inoperative during the
charging procedure.
Battery Charge-control Indication
The battery charge-control indicator
(5)
indicates the charge condition of the battery for a few seconds when
the On/Off switch
(9)
is pressed through halfway of fully.
LED Capacity
All four LED
′
s are on > 90%
Three LED
′
s are on > 70%
Two LED
′
s are on > 30%
One LED is on
≤
30%
Once only the one LED is lit, the drill must be re-charged.
The supplied battery charger is designed for the Lithium-Ion battery in your machine.
Note:
The battery is supplied partially charged. To ensure full capacity of the battery, completely charge the
battery in the battery charger before using your power tool for the first time.
The lithium ion battery can be charged at any time without reducing its service life. Interrupting the charging
procedure does not damage the battery.
The Li-ion battery is protected against deep discharging by the “Electronic Cell Protection (ECP)”. When the
battery is empty, the machine is switched off by means of a protective circuit: The inserted tool no
longerrotates.
Temperature Dependent Overload Protection
When using as intended for, the power tool can’t be subject to overload. When the load is too high or the
allowable battery temperature of 70 °C is exceeded, the electronic control switches off the power tool until
the temperature is in the optimum temperature range again.
Additionally, the battery charge-control indicator
(5)
flashes green at the same time until the On/Off switch
(9)
is released.
WARNING! Do not continue to press the On/Off switch after the machine has been
automatically switched off.
The battery can be damaged. The battery is equipped with a NTC temperature
control which allows charging only within a temperature range of between 0 °C and 45 °C. A long battery
service life is achieved in this manner.
When the battery charge-control indicator
(5)
lights up
ONE LED
for approx. 5 seconds with the On/Off
switch
(9) pressed through halfway or fully
, then the battery has less than 30% of its capacity and
should be
charged.
WARNING: Improper use of the battery or battery charger can lead to serious injury.
To avoid these injuries:
A)
NEVER
disassemble the battery.
B)
NEVER
incinerate the battery, even if it is damaged or is completely worn out.
The battery can explode in a fire.
C)
NEVER
short-circuit the battery.
D)
NEVER
insert any objects into the battery charger’s air vents. Electric shock or
damage to the battery charger may result.


