background image


General Maintenance 

1. Keep the air vents free from obstruction and clean regularly. 
2. Check regularly for any dust particles entering the grills around the motor and the switch. Use a soft brush 

to remove any dust particles. Wear safety glasses to protect your eyes whilst cleaning. 
3. Monitor the dust bag (if equipped) and empty when approximately half full. Always empty into an 

appropriate container. REMEMBER: dust can be hot and cause fire. 

4. If the cutting tool has become dull, replace it. Dull cutters will cause increased tear-out and ragged edges 

on the cuts. 

5. Lubricate all moving parts at regular intervals. 
6. To clean the body of the power tool, only use a soft damp cloth. Do NOT immerse in water. A mild 

detergent can be used but NOT petrol or any alcohol based product. 
7. Should the power cord become damaged only allow a fully qualified electrician to replace or repair. 


Declaration of Conformity


We ACL Group (Intl.) Ltd, England DN6 8LZ declare that the Cordless Impact Drill has been manufactured 

according to our full quality assurance procedures. 

The declaration is to certify that it conforms to CE, EMC, LVD and RoHS directives: 

EN55014-1:2006+A1 

EN55014-2:1997 +A1+A2 
All provisions of Annex 1 of Council Directive 2004/108/EC – EMC directive 

 
EN60745-1: 2009+A11 

EN60745-2-1: 2010 

EN60745-2-2: 2010 

EN60745-2-6:2010 


All provisions of Annex 1 of Council Directive 2006/42/EC – Machinery Directive 

RoHs 2002/95/EC


Mr. Alan Garnett, UK QA Manager 


Environmental Protection 

RECYCLING: WASTE ELECTRICAL PRODUCTS SHOULD NOT BE DISPOSED OF WITH HOUSEHOLD WASTE. 

PLEASE RECYCLE WHERE FACILITIES EXIST. CHECK WITH YOUR LOCAL AUTHORITY OR RETAILER FOR 

RECYCLING ADVICE. 


Summary of Contents for T14LCID

Page 1: ...14 4V Cordless Impact Drill T14LCID User Manual Please read and retain for future reference...

Page 2: ...10 Snap spring 39 Bearing 695 11 LED light 40 Shaft 12 PCB guard shield 41 Shaft out bushing 13 Charge socket 42 Washer 14 Bearing HK2210 43 Shaft out bushing 15 Big gear snap ring 44 Spring 16 Big g...

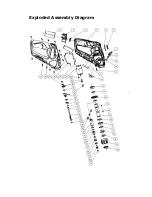
Page 3: ...Exploded Assembly Diagram...

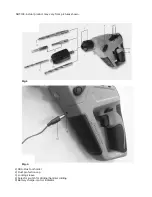
Page 4: ...ICE Actual product may vary from pictures shown Fig 1 Fig 2 1 SDS Plus tool holder 2 Dust protection cap 3 Locking sleeve 4 Selector switch for drilling hammer drilling 5 Battery charge control indica...

Page 5: ...direction switch 9 On Off switch 10 Keyless chuck with SDS Plus 11 Drill bit 12 Screwdriver bit with SDS Plus 13 Drill bit with SDS Plus 14 Socket for charge plug 15 Charge connector The accessories i...

Page 6: ...rger Input 230 240V AC 12 1W 50Hz Output 18V DC 400mA Read this entire manual before using this product Failure to do so can result in serious injury Save this manual for future reference Copyright 20...

Page 7: ...p children and bystanders away while operating a power tool Distractions can cause you to lose control Electrical safety Before use ensure that the power outlet you are using matches the plug on your...

Page 8: ...n springs may be improperly mounted Certain cleaning agents such as gasoline carbon tetrachloride ammonia etc may damage plastic parts When servicing a tool use only identical replacement parts Follow...

Page 9: ...STAND ON TOOL Serious injury could occur if the tool is tipped or if the cutting tool is unintentionally contacted 22 CHECK DAMAGED PARTS Before further use of the tool damaged part s i e guard shoul...

Page 10: ...to injuries Avoid unintentional switching on Ensure the On Off switch is in the off position before inserting battery pack Carrying the power tool with your finger on the On Off switch or inserting t...

Page 11: ...ied partially charged To ensure full capacity of the battery completely charge the battery in the battery charger before using your power tool for the first time The lithium ion battery can be charged...

Page 12: ...ed immediately turn the trigger switch off to prevent an overload which can damage the battery pack or motor Use reverse to loosen jammed bits 5 Do NOT operate the Forward Reverse lever when the trigg...

Page 13: ...switch 9 is pressed Light pressure on the On Off switch 9 results in low speed impact rate Further pressure on the switch increases the speed impact rate MOUNTING AND DISMOUNTING THE BIT The SDS Plus...

Page 14: ...o not dispose of the exhausted battery The battery must explode if it is incinerated The product that you have purchased contains a rechargeable battery The battery is recyclable At the end of its use...

Page 15: ...ed but NOT petrol or any alcohol based product 7 Should the power cord become damaged only allow a fully qualified electrician to replace or repair Declaration of Conformity We ACL Group Intl Ltd Engl...

Page 16: ...tl Ltd and its distributor expressly state that all repairs or parts replacement should be done by certified or licensed technicians The buyer assumes all risk and liability arising out of his or her...

Page 17: ...ACL Group Intl Ltd Doncaster England Email info terratekintl com www terratekintl com...

Reviews: