background image

/ TerraTV Radio+

11

Windows 98 Installation

Step – 1

12.


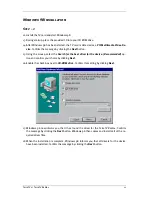
Install the TV card and start Windows 98.

13.


During startup, place the provided CD into your CD ROM drive.

14.


After Windows 98 has been started, the TV card is detected as a 

PCI Multimedia Video De-

vice

. Confirm the message by clicking the 

Next

 button.

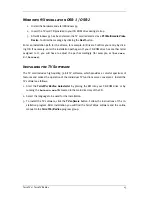
15.


Using the mouse, select the 

Search for the best driver for the device. (Recommended) 

op-

tion and confirm your choice by clicking 

Next

.

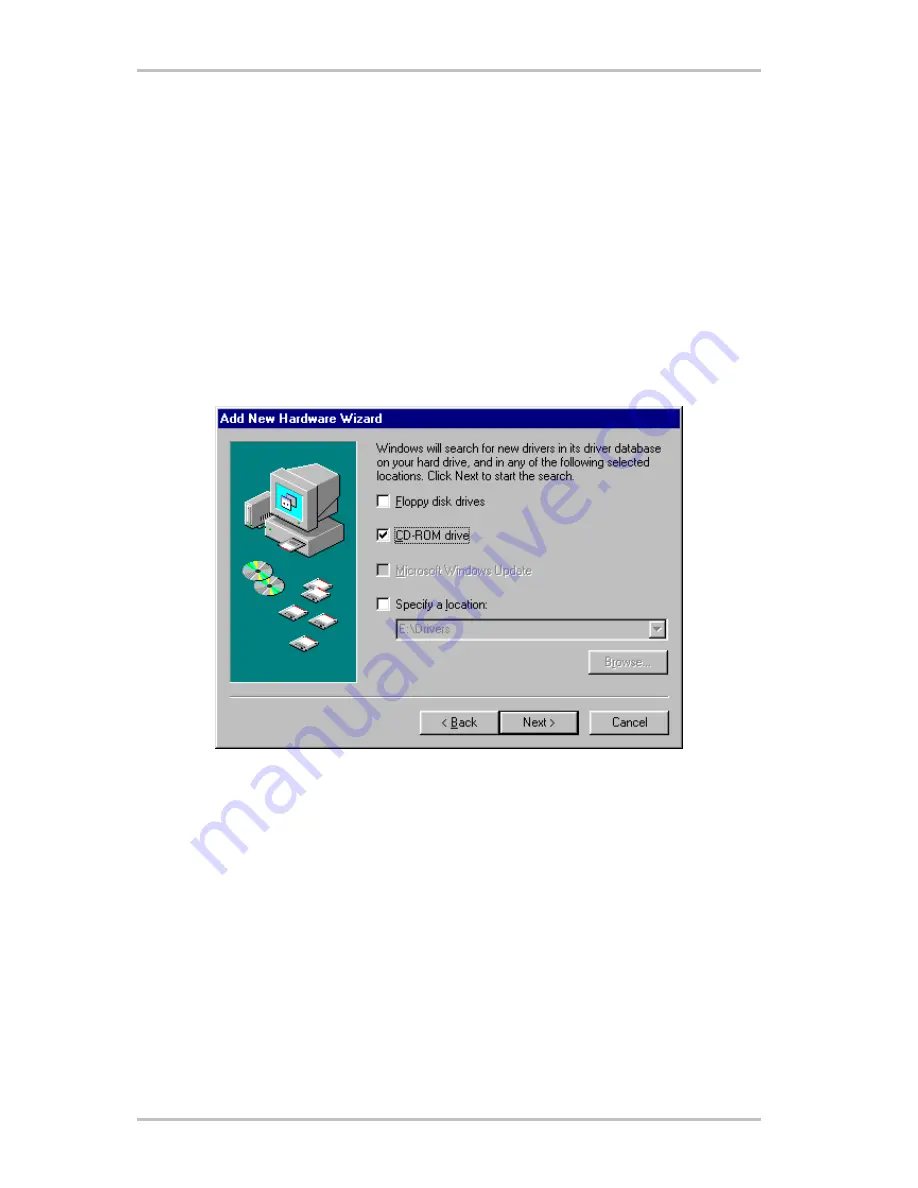
16.


Enable the check box next to 

CD-ROM drive

. Confirm this setting by clicking 

Next

.

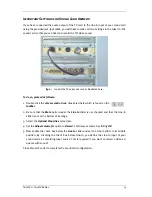
17.


Windows 98 now informs you that it has found the driver for the TerraTV Radio+. Confirm

the message by clicking the 

Next

 button. Windows 98 then copies and installs all of the re-

quired driver files.

18.


When the installation is complete, Windows 98 informs you that all drivers for the device

have been installed. Confirm the message by clicking the 

Next

 button.

Summary of Contents for Radio+

Page 1: ...TerraTV TerraTV Radio 1 ReceiverSystem TerraTV Radio Manual english 23 08 99...

Page 2: ...and MIDI Master Pro are trademarks registered by TerraTec Electronic GmbH Nettetal In most cases the designations used in this handbook for software and hardware are also registered trade marks and a...

Page 3: ...ngs for Sound Card Owners 15 On the Search for Connections The Connection of External Devices to the TV Card 16 Connecting an External Device with Antenna Out 16 Connecting an External Device with Vid...

Page 4: ...Second to be Recorded 40 More or Less Determine the Compression 41 The Right Sound The Audio Parameters for Video Sequence Recording 42 In Detail More Video Recording Settings 43 Attention Trap Recor...

Page 5: ...for fast navigation through the station jungle Forget about tiresome manual station selection The search function of the TV software auto mates the installation of stations without manual interventio...

Page 6: ...onferencing 2 year warranty System Requirements Pentium 90 MHz Windows 95 or Windows 98 1 free PCI 2 1 master slot Active speakers or a sound card 1 free interrupt CD ROM drive to install the drivers...

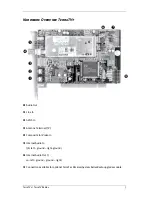
Page 7: ...Audio Out Line In SVHS In Antenna Terminal TV Composite In Video In Internal Audio In J8 left ground right ground Internal Audio Out J 10 left ground ground right Connection available for optional Te...

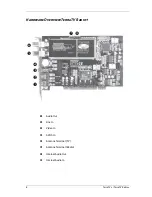
Page 8: ...8 TerraTV TerraTV Radio Hardware Overview TerraTV Radio Audio Out Line In Video In SVHS In Antenna Terminal TV Antenna Terminal Radio Internal Audio Out Internal Audio In...

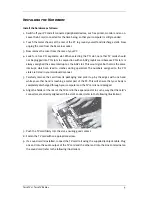
Page 9: ...rrupt which can lead to crashes during operation The numbers assigned to the PCI slots are listed in your mainboard manual 5 Carefully remove the card from its packaging and pick it up by the edges wi...

Page 10: ...tion called Important Set tings for Sound Card Owners on page 15 10 Reinstall the cover of your PC case 11 Using the supplied adapter connect the antenna cable which you would normally connect to the...

Page 11: ...ch for the best driver for the device Recommended op tion and confirm your choice by clicking Next 16 Enable the check box next to CD ROM drive Confirm this setting by clicking Next 17 Windows 98 now...

Page 12: ...all of the required driver files 5 When the installation is complete Windows 98 informs you that all drivers for the device have been installed Confirm the message by clicking the Next button This co...

Page 13: ...to adjust the path accordingly for example G Drivers Z Drivers Installing the TV Software The TV card includes high quality 32 bit TV software which provides a colorful spectrum of features and makes...

Page 14: ...n install the newest version of DirectX The DirectX 6 0 drivers are provided in the DirectX directory of the CD If you own a mainboard with VIA or SIS chipset you should check certain settings in your...

Page 15: ...trated here which is found on the taskbar 2 Be sure that the Mute option under the Line In slider is not checked and that the Line In slider is not at the bottom of its range 3 Select the Options Prop...

Page 16: ...you want to connect So first of all check to see which outputs your device has Refer to the following illustration Antenna Out Video Out SVHS Out Scart out Compare your device to the illustration sho...

Page 17: ...the cinch cable with one end in the video out of the external device and the other end in the video in of the TV card 2 Under the menu point Options Video Source in the TV software choose the setting...

Page 18: ...cable with the one end in the SVHS Out of the device you want to connect and the other end in the SVHS In of the TV card 2 In the TV software under the menu point Options Video Source choose the sett...

Page 19: ...ill need y cable the other two cinch connectors and a y cable see illustration cinch connectors Proceed with the connection to the TV card as follows 1 Connect the cinch plug for video with the Video...

Page 20: ...ection There are cables for feeds into the VCR Video In and there are cable types for feeds out of the VCR Video Out Use a cable with the signal direction Video Out Preferably you should buy a model t...

Page 21: ...e the following illustration In addition you will need a so called y cable an extension cable which has two cinch plugs on one end and a mini jack plug on the other Audio Out Audio Extension Cord y ca...

Page 22: ...s Set the 4 3 and 16 9 views in the window mode of the TV software or set the full screen mode so that you can just sit back and relax The mosaic gives you a quick overview of all the installed channe...

Page 23: ...a but ton Use the following keys or key combinations to carry out the individual functions Function Keys Previous Channel Cursor Down Next Channel Cursor Up Turn Volume Up Page Up Turn Volume Down Pag...

Page 24: ...on If you click on the surface of the TV software with the right mouse button a context menu ap pears which allows you to quickly access a few practical functions of the TV software fig 7 This menu op...

Page 25: ...he Channel List in the Status Bar The channel list which you can open with a simple mouse click in the status bar of the TV software represents a very quick navigational possibility for everyday use f...

Page 26: ...does not have optimal picture quality To change the channel settings do the following 4 Open the Channel Scan window under the menu point Channel Channel Scan 5 With a mouse click choose a station fro...

Page 27: ...can window To add a station manually proceed as follows 1 Open the Channel Scan window under the menu point Channel Channel Scan 2 Click Add 3 Enter the station s name and the channel or the frequency...

Page 28: ...new teletext window of the teletext soft ware You can also do this through the symbol bar interface shown here The Menu Point Save As After you have shot a frame you can save it as a bmp file through...

Page 29: ...tio on and off If you make the TV window larger or smaller while this side ratio is activated the TV picture will always be shown in a 4 3 format The 4 3 format corresponds to the normal television fo...

Page 30: ...set or fine tune the stations The Menu Point Video Device With the help of this menu point you can choose a driver for recording Normally the entry Ter raTV Radio MSVideo Brooktree PCI Video Capture s...

Page 31: ...as video sources Tuner This setting displays the signal shown by the TV software which is fed in through the antenna in of the TV card Composite If you have set Composite the TV software displays the...

Page 32: ...o be recorded and the number of bytes that are to be used per pixel fig 12 In this window determine the size and number of bytes used for recording The setting Image Dimensions Through the point Image...

Page 33: ...card s drivers are installed This is because these image formats work in conjunction with special compression formats which are matched to the television hardware When you prepare a video sequence for...

Page 34: ...re information on this menu point in the topic Attention Recording Parameters of Video Sequences The Menu Point Compression This menu point allows you to choose from numerous compression settings whic...

Page 35: ...ou can maximize it by dou bleclicking Start This menu point starts the mosaic Best Fit Scales the momentary recording up or down to the optimal size This point can only be chosen while the mosaic is b...

Page 36: ...a new version or if you have difficulty operating the TV card 1 Call up the control panel and doubleclick on the software symbol 2 Choose TerraTV Radio Software from the displayed list 3 You will be...

Page 37: ...d the quality of your recording The deciding factors are a The video format of the television picture you want to record b The number of frames per second to be recorded c The set compression factor d...

Page 38: ...l practical purposes not use ful If you have dropped frames when using a 384x288 video format you should try reducing the video format to 192x144 or read the following segment on the number of frames...

Page 39: ...deo format you want to use for video se quence recording For best results choose the video format 192 x 144 or 384 x 288 3 Image Format also allows you to choose how many bytes to be saved per pixel f...

Page 40: ...is might mean you will have to set a smaller video format with higher frame rates Otherwise you will overstep the amount of data your hard drive can handle Setting the Frames per Second to be Recorded...

Page 41: ...ion 2 Now you can choose a compression process from the list displayed Depending on the ver sion of Windows you are using or the capabilities of the installed video support you will find a number of c...

Page 42: ...nternet then the quality of the sound recording is secondary More important is having a file as small and com pact as possible and you can only achieve that with the sound quality Telephone or No Audi...

Page 43: ...ically turn off To set these proceed as follows 1 Choose the menu point Options Video Recording Settings 2 Go to the option Record Video Enter the name of the file to be created and where it is to go...

Page 44: ...ning television program or Ext Videosource if you want to record the sound from a connected external device 3 If necessary set all parameters such as the number and size of the frames to be re corded...

Page 45: ...nline manual 2 A very high dropped frame rate is displayed The possible solutions to this problem are the same as with the first point 3 No sound is being recorded with the video sequence For any soun...

Page 46: ...f you are not sure as to what type of connection your VCR camera requires refer to the topic Connecting External Devices in this on line manual for further information 2 Determine the size of the fram...

Page 47: ...eresting teletext pages such as stock tips and recipes directly or print them out Through the integrated teletext caching all pages are loaded in the background and can be accessed at the touch of a b...

Page 48: ...at a fixed interval Because of this it can happen that you are not able to read the entire contents of the subpages In that case simply use The button Lock Subpage which stops the current subpage This...

Page 49: ...rmat The Menu Point Save As Lets you save teletext pages directly as txt files or in the teletext software format The menu point Print Prints out the teletext page currently displayed to your printer...

Page 50: ...l the teletext pages to the background allowing you to then access them at the touch of a button The menu point Reveal The menu point Teletext Reveal means that additional normally hidden data in fig...

Page 51: ...s you to flip back through the teletext subpages The menu point History Forward This menu point allows you to flip forward through the teletext subpages The menu point Index Page This menu point bring...

Page 52: ...hree status lights have the following meanings Green The teletext is being decoded or is decoded Yellow The teletext cannot be decoded Red No teletext signal is being received Clicking inside this fie...

Page 53: ...nning computer Please also note the name of the support team member who answers your call as you will need it if you have to return a defec tive card If you live in one of the countries below please c...

Page 54: ...this one is always assigned the same interrupt as the AGP slot This leads to interrupt overlap and pos sible computer crashes In this case it is better to install the TV card in another PCI slot You w...

Page 55: ...e Video Overlay function Question 4 Why do I need a DirectX graphics card driver with Video Overlay support Answer 4 As with all the current TV cards with Brooktree 848 or 878 chips the TV data provid...

Page 56: ...will appear to jerk In this case only setting a smaller video format Options Video Format will help Current sys tems can record video sequences fluidly with a maximum video format of 384x288 pixels Q...

Page 57: ...uld not be cause for any problems Question 8 How much data accrues when recording video sequences Answer 8 This question cannot be answered in general terms The following facts must be considered The...

Page 58: ...secured you just need to tell your sound card that it should rec ord sound from the Line In input Do this by double clicking on the volume control icon on the taskbar and then choose the menu point O...

Page 59: ...th a satellite receiver With satellite receiv ers it sometimes happens that they do not broadcast on one channel but rather between two different channels This can have a negative influence especially...

Reviews: