background image


Setup Menu Tree 

13-280142  Rev. B 

Page 27 

P

P

h

h

o

o

n

n

e

e


C

C

o

o

n

n

f

f

i

i

g

g

u

u

r

r

a

a

t

t

i

i

o

o

n

n


w

w

i

i

t

t

h

h


S

S

t

t

a

a

t

t

i

i

c

c


S

S

e

e

r

r

v

v

e

e

r

r


A

A

d

d

d

d

r

r

e

e

s

s

s

s


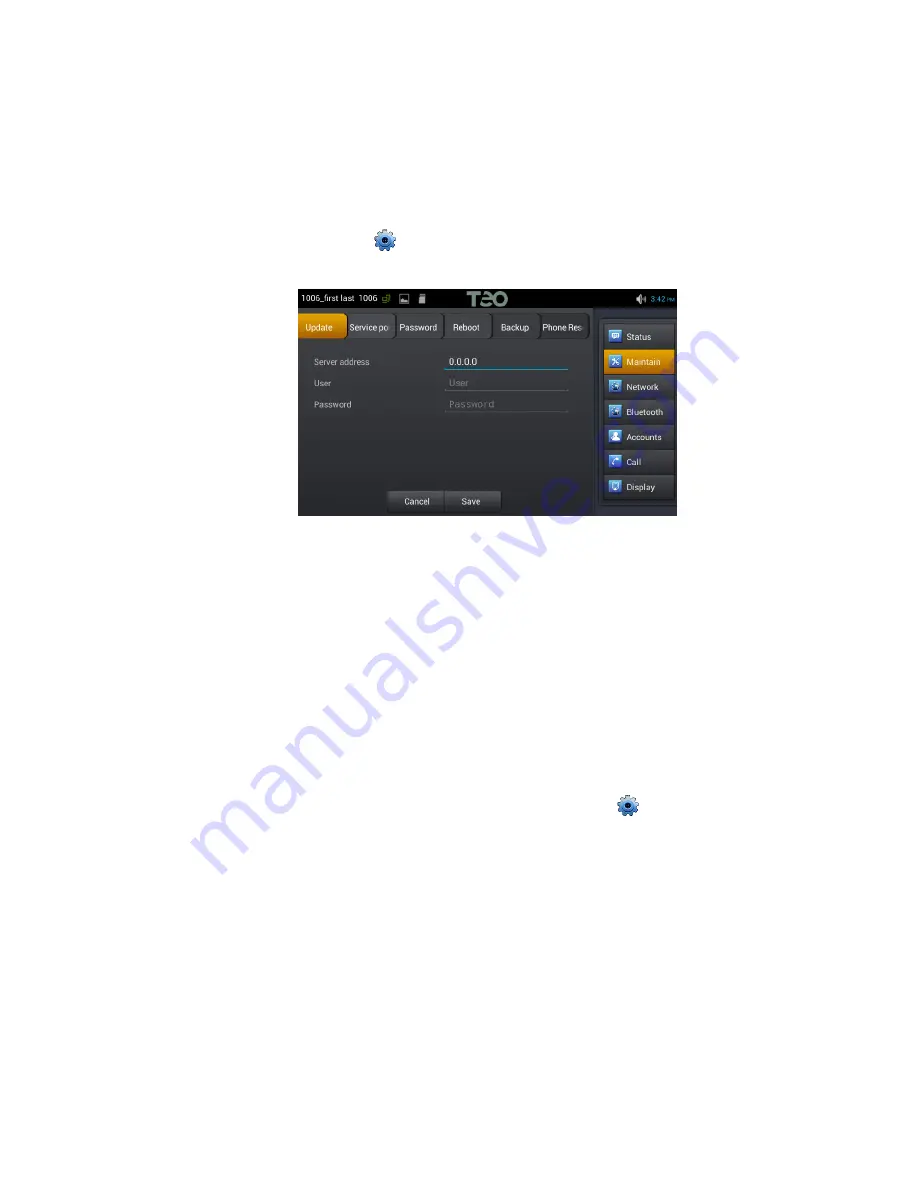
Perform the following steps if your server does not have Option 66 configured with the Teo 

Update Server address. You will need to set the appropriate server address and login 

credentials in the phone menu to enable auto provisioning. 

1.


If this phone was configured on another extension, it must be removed from Teo 

UCM and reset to factory defaults 

(page 28)

2.


Tap the 

Phone Settings


 icon. 

3.


In the icon list at the right, tap 

Maintain


4.


If 0.0.0.0 is displayed as the current 

Server address 

under the 

Update

 tab, delete this 

entry and enter the correct Teo UC server address. This entry can be either an IPv4 

address or a fully qualified domain name. 

5.


Enter the user extension login credentials. 
User is the 

extension number@tenant domain

 (e.g. 1000@teo) for multitenant 

systems, or


just the

 extension number 

(e.g. 1000) for single tenant systems. 

Password is the SIP password assigned to the extension. 

6.


Tap 

Save

7.


Tap the 

Reboot

 tab, and then tap the 

Reboot

 button to restart the phone using the 

new server address and login credentials. 

8.


After rebooting has completed, tap the 

Phone Settings


 icon. Verify that a non-

zero phone IP address is shown on the Status screen; if not, reboot again. 

9.


After a few minutes, the configuration will be downloaded to the phone. 

10.


Verify phone registration by making a test call. 


Summary of Contents for 9160

Page 1: ...Technologies Inc 11609 49 th Place West Mukilteo WA 98275 4255 800 524 0024 425 349 1000 Fax 425 349 1010 www teotech com I IP P P Ph ho on ne e 9 91 16 60 0 I In ns st ta al ll la at ti io on n I In ns st tr ru uc ct ti io on ns s ...

Page 2: ...Teo IP Phone 9160 Installation Instructions Page 2 13 280142 Rev B 2017 Teo Technologies Inc All rights reserved ...

Page 3: ...Mounting 11 Handset Retainer Clip 13 Line and Power Connections 14 Configuration 15 DHCP Server Configuration 15 Phone Configuration in Teo UCM 17 Completing Configuration at the Phone 26 Appendix A Service and Warranty 29 Appendix B Specifications 31 Appendix C Regulatory Statements 33 C C Co o on n nt t te e en n nt t ts s s ...

Page 4: ...Teo IP Phone 9160 Installation Instructions Page 4 13 280142 Rev B ...

Page 5: ...atures of the 9160 include Call Forwarding Call Transfer blind attended Conference Call Pickup Redial Pre dial Message Waiting Indicator Email Calendar Web Browser Contacts 140 Programmable Touchscreen Feature Keys Local Presence Direct Station Select with Presence Monitoring Caller ID display Call Logs with Missed Incoming Outgoing calls Handset Headset and Speakerphone operation Dedicated Headse...

Page 6: ... ca at to or rs s 1 Display color touchscreen shows call progress line states DSS BLF and icons for apps The viewing angle is set by selecting the high or low base mounting position page 9 2 Headset Key activates the optional headset 3 Option Key displays user options actions 4 Speaker Key activates the speakerphone ...

Page 7: ...trolled by the network 11 Headset Jack a jack on the left side of the telephone connects to an optional wired headset The phone is switched to headset mode when a headset is connected 12 Handset Jack a jack on the left side of the telephone connects to the included handset 13 HDMI Connector connects to an external audio video monitor mirrors the phone display 14 USB and Memory Card Connectors 15 N...

Page 8: ...Teo IP Phone 9160 Installation Instructions Page 8 13 280142 Rev B ...

Page 9: ...es the best screen readability and easy control operation for the phone s location If you need to remove the stand slide it down to disengage the snap tabs and then lift off the stand The low desktop stand position is shown the removal procedure is the same for high desktop and wall mount positions Stand Removal I I In n ns s st t ta a al l ll l la a at t ti i io o on n n ...

Page 10: ...ions Page 10 13 280142 Rev B To install the stand insert the four tabs on the stand into the slots on the telephone and then slide the stand toward the top of the telephone until it locks into place Low Desktop Position High Desktop Position ...

Page 11: ... 11 W Wa al ll l M Mo ou un nt ti in ng g The phone stand must be disassembled for wall mounting Remove the stand from the phone base Refer to page 9 Remove the screw that holds the two stand sections together Slide the sections apart ...

Page 12: ... suitable for the wall material Note Wall mounting screws are not supplied with the phone On the wall or a wall plate drill two holes with a distance of 6 04 inches apart If drilling into drywall only make sure to install an anchor system for the screws Drill a third hole 2 7 inches below the first two holes and centered between them Thread a screw into each hole with each head extending about 3 1...

Page 13: ...ip W Wa al ll l M Mo ou un nt t o or r H Hi ig gh h D De es sk kt to op p P Po os si it ti io on n A Ap pp pl li ic ca at ti io on ns s For high desktop position or wall mount use the handset retainer clip should be installed with the tab protruding into the hookswitch area L Lo ow w D De es sk kt to op p A Ap pp pl li ic ca at ti io on ns s For low desktop position use the handset retainer clip s...

Page 14: ... ea ad ds se et t Plug the supplied handset into the Handset jack Plug a compatible headset into the Headset jack P Po ow we er r The 9160 is compatible with IEEE 802 3af Power over Ethernet utilizing power over spare cable pairs midspan power source or phantom power powered switch hub port The phone provides an 802 3af PD Class 2 indication to the power sourcing equipment and requires a maximum o...

Page 15: ...e to read its configuration information from the UC server update its settings and complete registration with the system This process can take up to two minutes 5 Verify phone registration by making a test call D DH HC CP P S Se er rv ve er r C Co on nf fi ig gu ur ra at ti io on n A Au ut to om ma at ti ic c I IP P C Co on nf fi ig gu ur ra at ti io on n D DH HC CP P DHCP Dynamic Host Configurati...

Page 16: ...as sk k Enter the network subnet mask for the phone IP address range 3 3 D De ef fa au ul lt t G Ga at te ew wa ay y Enter the default gateway IP address 6 6 D DN NS S S Se er rv ve er r Enter the DNS server IP address 6 66 6 U Up pd da at te e S Se er rv ve er r B Bo oo ot t S Se er rv ve er r H Ho os st t N Na am me e Enter the Teo UC server IP address or fully qualified domain name with the pro...

Page 17: ...DD NEW DEVICE The phone will be added to the list 6 Select a device in the list to view or edit its options as explained below D De ev vi ic ce e I In nf fo o a an nd d P Pa as ss sw wo or rd ds s LABEL enter a name to identify the phone optional WEB PASSWORD restricts access to the phone s web based configuration utility MENU PASSWORD restricts access to some configuration items on the phone disp...

Page 18: ... ringing and enables headset operation when a headset is connected HANDSET all operations that automatically go off hook such as Answer speed dial or DSS will connect to the speakerphone first Ringing for incoming calls is heard on the speaker HEADSET if a headset is connected automatic off hook operations connect to the headset instead of the speakerphone Ringing for incoming calls is heard in th...

Page 19: ...efault gateway statically uncheck AUTOMATICALLY OBTAIN FROM DHCP Leaving the fields blank will allow static network information to be set locally at the phone otherwise set values as desired DNS To set the DNS server s statically uncheck AUTOMATICALLY OBTAIN FROM DHCP Leaving the fields blank will allow static name server values to be set locally at the phone otherwise set values as desired NTP To...

Page 20: ...hows line appearance status LINE and ADDITIONAL LINE keys for a call appearance must be consecutive The ADDITIONAL LINE option is available only if the preceding key is configured for a line appearance DSS BLF initiates a voice call or picks up a ringing call to an assigned extension The key shows the presence status of the assigned extension DSS BLF VIDEO initiates a video call or picks up a ring...

Page 21: ...Ke ey ys s 1 Click the MULTIFUNCTION KEY SETTINGS tab Five screens of multifunction softkeys are available with 28 softkeys per screen arranged in four columns Key numbers in the UCM correspond to phone keys as shown in the following illustrations Softkeys 1 7 also appear on the default home screen screen 1 screen 2 ...

Page 22: ...een 3 screen 4 screen 5 2 Click a key in the list Fields will be shown below the list depending on the current key type 3 Select a key type from the TYPE list 4 Enter a label in the LABEL field to identify the key 5 Fill out any additional fields such as SPEED DIAL number ...

Page 23: ...t is not required for a phone to have listener zones configured for each multicast sender key a phone may page to zones it does not receive Likewise a phone can be configured to listen to zones without having paging keys for those zones Proper operation of IP multicasting for paging requires that your local networking equipment is configured to support the IGMP protocol and multicasting You should...

Page 24: ...ed the phone will automatically place the call on hold and respond to the multicast page If a Priority 1 multicast page is in progress when a normal call is placed to the phone the incoming call will be immediately redirected to voicemail and the page will not be interrupted Likewise if the same or lower priority page e g Priority 2 is initiated when the phone is on a normal call the normal call w...

Page 25: ...or down in the list C Co on nf fi ig gu ur ri in ng g M Mu ul lt ti ic ca as st t P Pa ag gi in ng g K Ke ey ys s 1 Click the MULTIFUNCTION KEY SETTINGS tab 2 Select an unused key 3 Set the key TYPE to MULTICAST 4 Enter the paging zone name in the LABEL field to identify the key 5 Enter the appropriate IP ADDRESS and PORT for the paging zone The recommended IP address range is 239 0 0 2 to 239 255...

Page 26: ...er rv ve er r A Ad dd dr re es ss s 1 If this phone was configured on another extension it must be removed from Teo UCM and reset to factory defaults page 28 2 After the phone initializes enter the Authentication Username and Password when prompted Username is the extension number tenant domain e g 1000 teo for multitenant systems or just the extension number e g 1000 for single tenant systems Pas...

Page 27: ... current Server address under the Update tab delete this entry and enter the correct Teo UC server address This entry can be either an IPv4 address or a fully qualified domain name 5 Enter the user extension login credentials User is the extension number tenant domain e g 1000 teo for multitenant systems or just the extension number e g 1000 for single tenant systems Password is the SIP password a...

Page 28: ... ti io on n If this phone was configured on another extension reset it to the factory default configuration before proceeding 1 Tap the App Drawer icon 2 Tap the Settings app icon 3 Scroll to and tap Backup reset 4 Tap Factory data reset and then tap Reset phone followed by Erase everything to confirm The reset process will take 2 3 minutes ...

Page 29: ... needless removal of equipment and subsequent customer inconvenience Teo Technical Support Department 11609 49 th Place West Mukilteo WA 98275 4255 USA Phone 425 349 1000 800 524 0024 Fax 425 349 1010 E mail tech teotech com Web www teotech com Teo is committed to meeting the product needs of our customers Please write or call us with any suggestions for improvement A A Ap p pp p pe e en n nd d di...

Page 30: ...ss than 7 years old or still manufactured by Teo may be repaired at the factory for a flat rate charge Repaired out of warranty units are warranted for 90 days from the date of repair The repair or replacement of a product under this warranty represents the entire obligation of Teo Teo shall not be liable for any special or consequential damages resulting from or caused by any defect failure incap...

Page 31: ...n nt ts s Power over Ethernet 802 3af Class 2 5 W max excluding wiring losses Optional Local Power 12 VDC 1 A D Di is sp pl la ay y 7 inch diagonal color LCD screen 800 x 480 pixels P Ph hy ys si ic ca al l D Di im me en ns si io on ns s 8 H x 6 25 D x 10 W high desktop position 7 H x 6 75 D x 10 W low desktop position W We ei ig gh ht t 4 lbs including stand and handset E En nv vi ir ro on nm me ...

Page 32: ...Teo IP Phone 9160 Installation Instructions Page 32 13 280142 Rev B ...

Page 33: ...nstable cart stand or table The product may fall causing serious damage to the product 11 This product should be operated only from the type of power source indicated on the marking label 12 Do not allow anything to rest on the power cord Do not locate this product where the cord will be abused by persons walking on it 13 Do not overload wall outlets and extension cords as this can result in the r...

Page 34: ...C Rules These limits are designed to provide reasonable protection against harmful interference when the equipment is operated in a commercial environment This equipment generates uses and can radiate radio frequency energy and if not installed and used in accordance with the instruction manual may cause harmful interference to radio communications Operation of this equipment in a residential area...

Reviews: