


TEMPUR-Choice
™
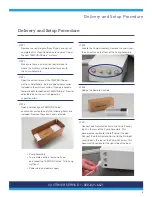
STEP 4
Place the Pump Assembly under the base at the
head of the bed with the hose connections pointing
to the head. The air nozzles on the front of the Pump
Assembly are color-coded (red, yellow, green, and
purple).
STEP 5
Locate the hoses from the head of the mattress.
STEP 6
Position the hoses to the left of the mattress so they
do not get pinched or stuck between the headboard
and mattress. Your left is determined as if you were
lying on your back on the bed looking at the foot.
Installation
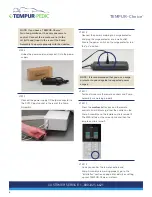
STEP 1
Ensure you followed the steps in the section entitled
“Delivery and Setup Procedures” on page 3.
STEP 2
Remove the mattress from the carton. If you purchased
a Tempur-Pedic foundation or TEMPUR-Ergo
™
Premier
adjustable base remove it from its carton and complete
set-up before proceeding to step 3.
STEP 3
Place the mattress on your foundation or base.
Leave clearance space at the head of the bed to
position the Pump Assembly and for easy access to
connect the hoses.
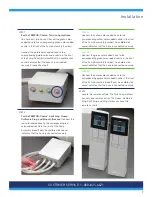
STEP 3A
For installation on an existing bed frame (with or
without a base)
: Your TEMPUR-Choice
™
mattress
can be assembled directly on your bed frame. For
a slat-supported bed frame (a bed frame with slats
that run from one side of the bed to the other),
position the slats evenly to support the base and
mattress. If your bed frame has fewer than three
slats, it is recommended that you add additional
slats for adequate support for the base and
mattress.
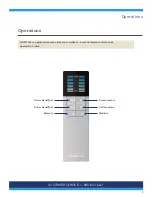
STEP 3B
For installation on a TEMPUR-Ergo
™
Premier
adjustable base
: Refer to the
TEMPUR-Ergo
™
Premier Complete Reference Guide
for details
on the adjustable base installation. For a
Tempur-Pedic base installation, when routing the
hoses and remote control cables, make sure they
are not tangled, kinked, or caught in the base.
Left Side
Right Side
6
CUSTOMER SERVICE: 1–800–821–6621


