


2
INTRODUCTION
IMPORT
ANT
PRECAUTIONS
ASSEMBL
Y
BEFORE YOU
BEGIN
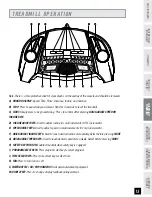
TREADMILL OPERA
TION
CONDITIONING GUIDELINES
TROUBLESHOOTING &
MAINTENANCE
LIMITED WARRANTY
COMMON PRODUCT QUESTIONS
ARE THE SOUNDS MY TREADMILL MAKES NORMAL?
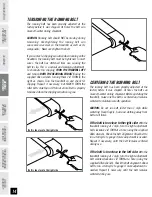
All treadmills make a certain type of thumping noise due to the belt riding over the rollers, especially new
treadmills. This noise will diminish over time, although may not totally go away. Over time, the belt will
stretch, causing the belt to ride smoother over the rollers.
WHY IS THE TREADMILL I PURCHASED LOUDER THAN THE ONE AT THE STORE?
All fitness products seem quieter in a large store showroom because there is generally more background noise
than in your home. Also, there will be less reverberation on a carpeted concrete floor than on a wood overlay
floor. Sometimes a heavy rubber mat will help reduce reverberation through the floor. If a fitness product is
placed close to a wall, there will be more reflected noise.
TROUBLESHOOTING - TREADMILL
Your treadmill is designed to be reliable and easy to use. However, if you experience a problem, please reference the
troubleshooting guide listed below.
PROBLEM:
The console does not light up and/or the belt does not move.
SOLUTION:
Verify the following:
• Double check that all connections are secure, especially the console cable. Unplug and reconnect the console
cable to verify.
• Make sure the console cable is not pinched or damaged in any way.
• Turn the power off, unplug power cable and wait 60 seconds. Remove motor cover. Wait until all red LED
lights have gone off on the motor control board before proceeding. Next, verify that no wires are loose or
disconnected.
• Verify that the outlet the machine is plugged into is functional. Double check that the breaker has not tripped,
it is on a dedicated 15-amp circuit, it is not on a GFCI equipped outlet, and it is not plugged into a power
strip/surge protector or extension cord.
• The power cord is not pinched or damaged and is properly plugged into the outlet AND the machine.
• The power switch is turned to the ON position.
TROUBLESHOOTING


