11
INTRODUCTION
IMPORT
ANT
PRECAUTIONS
ASSEMBL
Y
BEFORE YOU
BEGIN
TREADMILL OPERA
TION
CONDITIONING GUIDELINES
TROUBLESHOOTING &
MAINTENANCE
LIMITED WARRANTY
ASSEMBLY
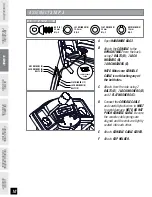
STEP 4
A
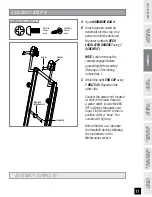
Open
HARDWARE BAG 4
.
B
An extra person would be
beneficial for this step. One
person to hold the deck and
the other to attach
DECK
LOCK LATCH BRACKET
using 2
SCREWS (F)
.
NOTE:
Lock latch must be
securely engaged before
proceeding with assembly.
(See page 13 for folding
instructions.)
C
Attach the right
END CAP
using
2
BOLTS (A)
. Repeat on the
other side.
Connect the power cord, located
at front of the main frame, to
a power outlet. Locate the ON/
OFF switch by the power cord
input. Flip the switch to the on
position. After a “beep”, the
console will light up.
Before the first use, lubricate
the treadmill deck by following
the instructions in the
Maintenance section.
BOLT (A)
15mm
Qty: 4
SCREW (F)
20 mm
Qty: 2
HARDWARE BAG 4 CONTENTS :
BOLT (A)
END CAP
DECK LOCK
LATCH BRACKET
SCREWS (F)
ASSEMBLY COMPLETE!


