background image

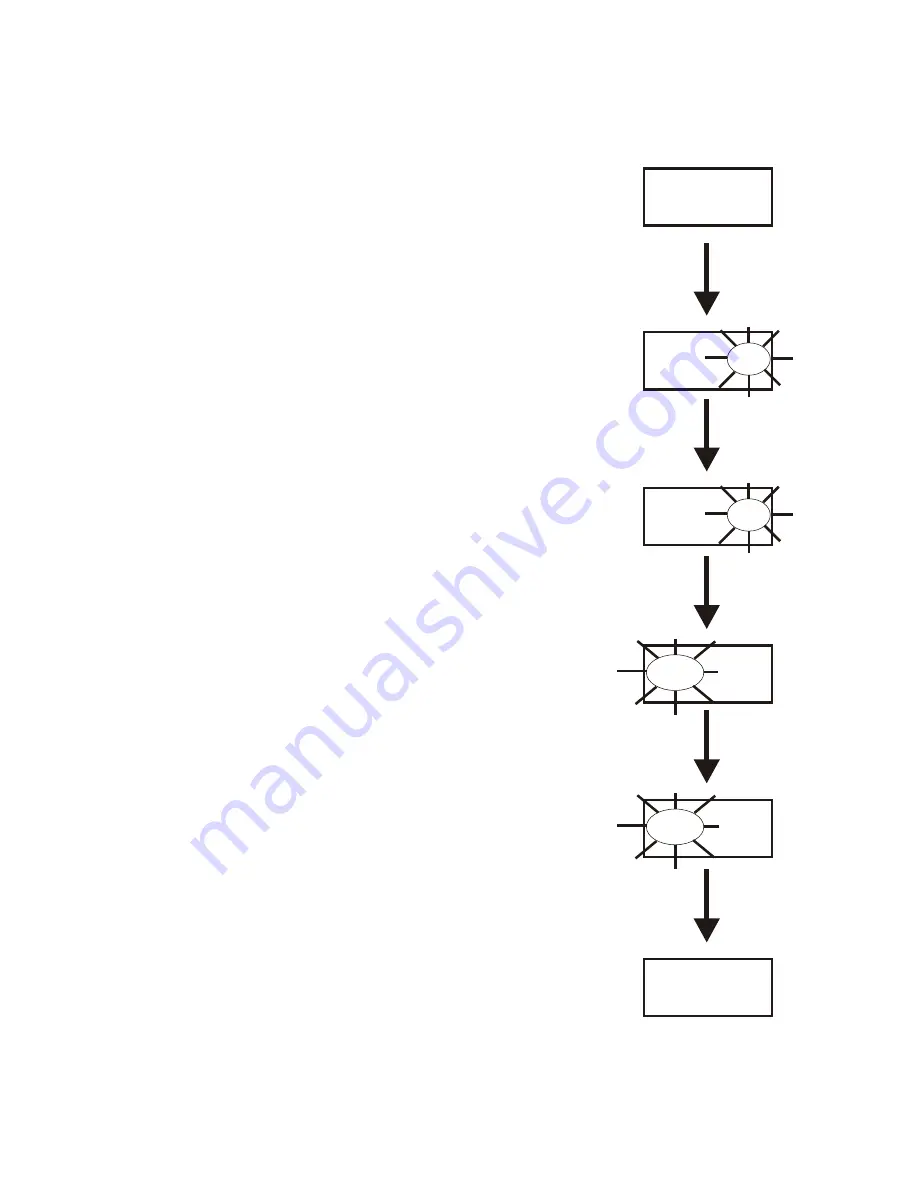
Group / Chan nel Screen

The Group/Chan 

nel screen al 

lows the user to change the

group and se lect from a pre-determined num ber of trans mit
chan nels.

The screen dis played af ter the beltpack pow er-up screens.

Press [SET] to edit the chan 

nel num 

ber. The chan 

nel

num ber will start flash ing.

Use the [UP]/[DOWN] ar row but tons to change the chan -
nel num ber.  

Press [SET] to place the beltpack on the chan nel se lected.  
Once set is pressed, the beltpack trans mit ter will move to
that fre quency and noth ing will be flash ing. Now press
[SET] twice to en ter group edit.

Use the [UP]/[DOWN] ar row but tons to change the group 
num ber. 

Press [SET] to place the beltpack on the group se lected. 
Once set is pressed, the unit re turns to the group/chan nel
dis play with noth ing flash ing.

Pressing [SET] once more will start the ed it ing se quence
over again. Pressing [MENU] dur ing the group edit will
end ed it ing and send the user back at the group/chan nel

screen with out any changes. This ap plies to chan nel ed it -
ing too. 

6-14

03A 


01

CH

03A 


01

GP

03A 


01

CH

03A 


01

GP

CH

03A 


02

GP

CH

03A 


02

GP

CH

05b 


02

GP

CH

05b 


02

GP

[SET]

[UP]/[DOWN]

[SET]

then [SET] twice more

[UP]/[DOWN]

[SET]

END

Group / Chan nel Screen

Summary of Contents for RadioCom BTR-700

Page 1: ...Telex Operating Instructions RadioCom BTR 700 TR 700 Professional Wireless Intercom System ...

Page 2: ......

Page 3: ... years of develop ment work with many of the features developed from customer feedback We hope that your experience with this product is a pleasant one and hope to provide you with a continuing line of RadioCom products well into the future In order to get the most out of your new wireless intercom system please take a few moments to look through this booklet before using the product for the first...

Page 4: ......

Page 5: ... 5 Transmit Switches 4 5 Intercom Switch 4 6 Intercom Interface 4 6 Auxiliary Input Output 4 7 Beltpack Set Up 4 8 Battery Installation 4 8 Antenna Connection 4 9 Transmit Mode 4 9 Headset Connection 4 9 Pre Walk Thru Checklist 5 1 System Operation 6 1 Frequency Plan Overview 6 1 Factory Defined Groups 6 1 User Programmable Groups 6 1 System Quick Start 6 1 Base Station Operation 6 2 Power 6 2 Loc...

Page 6: ...6 ClearScan 6 17 Talk Button Latch on Latch off 6 18 Special Key Sequences 6 18 Lockout 6 18 1st Use Default 6 18 Factory Default 6 18 System Walk Thru 7 1 Trouble Shooting 8 1 Tech Tips 9 1 Frequency Interaction 9 1 Microphone Gain Adjustment 9 1 Battery Information 10 1 Intercom System Specifications 11 1 Accessories and Replacement Parts 12 1 Customer Service Information 13 1 Software License 1...

Page 7: ...m Telex the effective operating range can be extended The high efficiency beltpacks provide 12 14 hours of uninterrupted operation us ing standard alkaline batteries System Features Frequency agile base station and beltpacks No external computer device required to select frequencies Backlit base station LCD allows the user to easily monitor the beltpack s status as well as change base station fre ...

Page 8: ...4 CONNECT RECEIVE 4 LOGIC LOGIC I C T E L E X R T S C L E A R C O M AUXILIARY AUDIO INPUT XLR FEMALE ON OFF ON O M IN INTERCOM OUT 2 WIRE INTERCOM IN RJ11 STYLE 4 WIRE 4 WIRE 2 WIRE MALE FEMALE XLR SELECT LOGIC INTERCOM AUXILIARY AUDIO OUTPUT XLR MALE OUT TRANSMIT MIC GAIN XLR HEADSET 1 4 2 3 LOGIC TALK TALK VOLUME m a r g a i D k c o l B 0 0 7 R T B ...

Page 9: ...to flash red on the loudest speech levels If the gain is too high the LED will be red at normal speech volumes 10 Microphone Gain Adjusts the headset s microphone gain Adjusts so that the overmod light 9 flashes from green to red on loudest speech 11 Talk Button Press to enable the audio path from the local headset LED 9 will turn green when enabled A quick press and release latches button on If t...

Page 10: ...l The connectors are switched to the appropriate intercom configuration via the I C Select Switch 4 Wire An RJ 11 type jack compatible with Ma trix type intercom systems 6 Auxiliary Input Output One 3 pin female XLR input connector and one 3 pin male XLR output connector 7 Power IEC receptacle Accepts 100 240VAC 50 60 Hz 8 Transmit Antenna Female TNC Connector Color band on antenna must match colo...

Page 11: ...pical Line Impedance 200W ClearCom Intercom Input Output Level Adjustable 1 Vrms typical Line Impedance 200W Auxiliary Input Adjustable 2 Vrms typical Auxiliary Output Adjustable 2 Vrms typical into 600W Microphone input sensitivity 9mV Local Headset Output 40mW output into 600W 1 Distortion Transmitter Type Synthesized Transmitter 712 channels Transmit Power 50mW Max High 5 mW Normal Modulation T...

Page 12: ...2 4 Blank ...

Page 13: ...eech levels If the gain is too large the LED will be red during the complete word at normal speech levels 3 Talk Light LED is on when the talk button is active 4 Talk button Press to enable the audio path from the lo cal headset microphone The TALK LED 3 will turn red when enabled A quick press and release latches the talk function unless latching has been disabled in soft ware Holding the button ...

Page 14: ...electret headset microphone is automatically detected by the beltpack and a bias voltage supplied if needed Figure 6 Headset Jack Wiring 7 Battery Latch Press down to enable the battery pack to be released While the latch is held down slide the battery pack about 1 8 inch back toward the latch until it stops Then lift out 8 Receive Antenna Screw type wave replaceable an tenna The receiver antenna ...

Page 15: ...Response 300Hz 8kHz Microphone input sensitivity 7 mV Local Headset Output 40 mW output into 600W 1 distortion Transmitter Type Synthesized 712 channels Transmit Power 50 mW Max auto power reduction Modulation Type FM Deviation 40 kHz 35 kHz Europe RF Frequency Stability 0 005 Modulation Limiter Peak Responding Compressor Radiated Harmonics Spurious Exceeds FCC specifications Receiver Type Dual Co...

Page 16: ...3 4 Blank ...

Page 17: ...anything is damaged or missing Fill out the registration card and return it to Telex to register the unit 4 1 Quantity Description 1 BTR 700 Base Station 1 Operating Instructions 1 Power Cord 2 Antennas one Transmit and one Receive 1 Warranty Card 1 Screwdriver 1 Warning Card 4 Rubber feet Quantity Description 1 TR 700 with Antennas 1 Battery pack 1 Instruction Sheet 1 Screwdriver 1 Warranty Card ...

Page 18: ...re connected di rectly on the back of the unit The antennas can be remoted for better signal path A Telex coax assembly with remote antennas may be required See Accessory section for ordering information NOTE If your base station is to be located in a shielded rack mount enclosure or other poor RF location you must remote the 1 2 wave antennas with coax assemblies See Accessories and Replacement P...

Page 19: ...directly to the Base Station This will detune the antennas which can result in noise or loss of RF signal at the Base Station see Figure 13 4 3 700 FEET 100 FEET Te le x OF F BA T OM T ALK RadioCom TR 700 TM VOL Te le x OFF BA T OM T ALK RadioCom TR 700 TM VOL MIC GAIN TALK O M VOLUME ON O M ON OFF IN OUT AUXILIARY 2 WIRE 4 WIRE SELECT IN OUT PORTABLE STATION CONNECT 1 2 3 4 UP DOWN MENU SET Radio...

Page 20: ...Comä ClearScanTM COPY MIC GAIN TALK O M VOLUME ON O M ON OFF IN OUT AUXILIARY 2 WIRE 4 WIRE SELECT IN OUT PORTABLE STATION CONNECT 1 2 3 4 UP DOWN MENU SET RadioComä ClearScanTM COPY MIC GAIN TALK O M VOLUME ON O M ON OFF IN OUT AUXILIARY 2 WIRE 4 WIRE SELECT IN OUT PORTABLE STATION CONNECT 1 2 3 4 UP DOWN MENU SET RadioComä ClearScanTM COPY MIC GAIN TALK O M VOLUME ON O M ON OFF IN OUT AUXILIARY ...

Page 21: ...f the rear panel The upper switch sets the transmit power level to high or normal The lower switch turns the transmitter on or off Transmit Power Set the power level to normal if using the beltpacks at close to medium distances 200 feet 161m line of sight from the base station Set the power level to high if using the beltpacks at a distance 200 feet 161m line of sight from the base station On Off ...

Page 22: ...iocom and Clear Com intercom systems re quire one cable for intercom This interfacing is done through the I C 3 pin XLR connectors on the rear of the unit RTS TW intercoms also only need to connect one 3 pin cable to one of the two intercom XLR connectors Two channels of audio are carried on one cable for RTS RTS channel 1 is placed on the intercom normally Switch the rear panel I C switch to Clea...

Page 23: ...UAL 400 OUTPUTS J1 J2 CONNECT TO J1 J2 TW INTERCOM SYSTEM COMPONENTS REFER TO OPERATION MANUAL AUDIO COUPLING CM1 CM2 J3 TIP CH1 RING CH2 SLEEVE COM RTS SYSTEMS BURBANK CALIFORNIA MADE IN U S A FUSE 0 5A S8 120 VAC CAUTION FOR CONTINUED PROTECTION AGAINST FIRE REPLACE ONLY WITH SAME TYPE FUSE CHN 1 CHN 1 HEADSET LINE HEADSET LINE HEADSET LINE HEADSET LINE INTERCOM POWER SUPPLY RTS DISTRIBUTION PAN...

Page 24: ...on 4 8 1 Open the battery pack by inserting finger nail and lifting 3 Load new batteries following the polarity as shown in battery case 5 Be sure strap goes under batteries 4 Start loading at the end of the case where the strap is attached to the case 6 Tuck end of strap under door when placing the battery cover back on the case 2 Pull battery strap to remove low or dead batteries WARNING Do not ...

Page 25: ...t mode The rear panel located transmit switch has the following two modes Push to Talk PT TALK Recommended position The transmitter is always on No audio is sent unless the talk switch is pressed Push to Transmit PT TX The transmitter and audio paths are off except when the talk switch is pressed Headset Connection Insert the headset plug into the XLR connector See the head set pinout in the TR 70...

Page 26: ...4 10 Blank ...

Page 27: ...wave antenna to the beltpack Checked frequency range of the antennas with the frequency of the beltpack by correctly matching color codes Base station transmit power switches in the correct po sitions Transmit mode switch on beltpack set correctly Set wired intercom type correctly Connected headsets to base stations if needed and all beltpacks Connected the base station to any auxiliary audio in t...

Page 28: ...5 2 Blank ...

Page 29: ...mable groups and then edited if desired See the BTR 700 Menu Structure and TR 700 Menu Structure in structions in this section for details on how to copy and edit frequencies System Quick Start Follow the list below to quickly get a base station and beltpack s operating When completed the user should have a base station and 1 to 4 beltpacks up and running with full oper ational ability The base st...

Page 30: ...e between 2 wire or 4 wire intercom systems The green LED will indicate the current mode of the intercom channel If the base station is connected to a 2 wire sys tem such as Audiocom Telex RTS TW or Clear Com set the intercom to 2 wire If it is connected to a four wire system such as RTS Matrix set the intercom to 4 wire The selection is retained in non volatile memory so it will come up where las...

Page 31: ...rd level However it is possible for the user to adjust the contrast if desired The contrast control is inter nal to the BTR 700 unit near the front panel The cover must be removed for access to this control Please see Figure 20 for the location Figure 20 LCD Contrast 6 3 V D1101 FRONT BACK R1101 ...

Page 32: ...rScan Result Screen Pg 6 9 MENU S S Group 25u 4 4 R1 R1 Tx Tx Tx 2 2 3 3 On Tx Tx Group 25u 4 4 R1 R1 Ch 01 Ch 02 Ch 03 Ch 04 2 2 3 3 Group 25u 4 4 R1 R1 705 150 565 350 707 850 710 100 715 300 2 2 3 3 Group 25u Freq Edit 4 4 Ch1 Ch1 705 150 565 350 707 850 710 100 715 300 2 2 3 3 2 2 Group 03A OK SET Next TM C60001 C60001 01 05 02 06 03 04 08 no tx On Tx Tx Tx Tx Tx Tx S SB20001 B20001 Other Spec...

Page 33: ...nce the power up screen is displayed it will change to the operating screen after a few seconds Operating Screen Screen is displayed after power up screen System will revert to this screen if no activity is detected on the LCD display buttons after 3 minutes Screen displays current status of the system Beltpack Activity Code Definitions 6 5 Telex RadioCom S S TM C60001 C60001 B20001 B20001 Group 0...

Page 34: ...l number After the last receive channel is decided upon hitting SET will set that channel in the unit and start you over at the beginning of the group channel select screen with nothing flashing Hitting MENU will take you to the group frequency se lect screen NOTE Hitting MENU after activity has oc curred within the screen will return to the group channel select screen with nothing flashing Any ch...

Page 35: ...diting the next channel If you had not hit the arrow keys when the frequency was flashing but instead hit SET you would have skipped to the next frequency to edit After the last receive frequency is decided upon hitting SET will save that last frequency and start you over at the beginning of the group frequency select screen with nothing flashing Pressing MENU will take you to the operating screen...

Page 36: ...ter editing the transmit and the receive channel fre quencies pressing SET will save that last frequency and send you over to the beginning of the group frequency select screen with nothing flashing NOTE Once the end of the displayed channel list is reached the last displayed channel location will scroll to allow the user to edit the re maining channels After action has occurred in the frequency e...

Page 37: ...earching all groups for the ones with the greatest number of re ceiver channels clear of interference ClearScanTM will display the group that has the most in terference free receive channels These clear channels are displayed on the right half of the screen Press SET to place the base station on this group and return to the oper ating screen The first four receive channels displayed will be the on...

Page 38: ...DOWN buttons may be used to select a different user programmable group if desired Pressing SET pastes frequencies chan nels to the group and take the user to the frequency edit screen with Tx flashing 1st Use Default Press MENU while turning on the base station to enter the 1st use default setup screen This places the unit on group 01A with the four receivers set to channels 1 4 of the group Any u...

Page 39: ...e enabled only for as long as the button is held If the talk function is latched on pressing the talk button again will turn it off See the Talk Button Latching Non Latching instructions in Section 6 to learn how to enable disable latching of the talk button Microphone Gain Adjusts the headset s microphone gain Adjust so the TALK OM LED flashes red at the beginning of most words at normal speech l...

Page 40: ...tpack menu structure and refer ences the pages in which further detail of that menu may be found All beltpack features and special key sequences can only be done from the group channel screen Beltpack Feature Enable Disable Menus Talk Button Latching Non Latching 6 18 Other Special Key Sequences Lockout 6 18 1st Use Default 6 18 Factory Default 6 18 NOTE Pressing MENU within a screen after action ...

Page 41: ...reen displayed indicates the beltpack s software version number It is displayed for about one second The 2nd screen displayed indicates the beltpack s channel map frequency plan version number It is displayed for about one second The final screen displayed is the group channel screen 6 13 END S20001 C60001 03A 01 GP CH Power Up Screens ...

Page 42: ... and nothing will be flashing Now press SET twice to enter group edit Use the UP DOWN arrow buttons to change the group number Press SET to place the beltpack on the group selected Once set is pressed the unit returns to the group channel display with nothing flashing Pressing SET once more will start the editing sequence over again Pressing MENU during the group edit will end editing and send the...

Page 43: ... buttons to change the fre quency Press SET to place the beltpack on the frequency se lected If set is held down during that time the group channel is displayed so the user is aware of what transmit channel the unit has been placed Once set is re leased the unit returns to the transmit frequency screen with nothing flashing Pressing SET once more will start the editing sequence over again Pressing...

Page 44: ...lashing and allow the user to change the frequency in 25kHz steps User Programmable Groups Only Use the UP DOWN arrow buttons to change the frequency User Programmable Groups Only Press SET to place the beltpack on the frequency selected If set is held down during that time the group is displayed so the user is aware of what group the unit has been placed Once set is released the unit returns to t...

Page 45: ...ss and hold MENU SET for three seconds to en ter ClearScan The beltpack will now start searching for the clearest groups The group symbol will flash indicat ing the beltpack is scanning for clear groups ClearScan will scan all groups It will then display the 1st group it came to that had the clearest receive channel The UP DOWN buttons may be used to select the next best group and so forth Hit SET...

Page 46: ...group 01A with channel 01 flashing Any user programmed frequencies that had been entered previously are re tained The beltpacks must now be set to different trans mit channels using the UP DOWN buttons Then SET is hit to place the units on those channels If lock out had been activated the beltpack comes up where it was last left regardless of MENU being pressed on power up Factory Default Pressing...

Page 47: ...et to an appro priate level Auxiliary Level IN and OUT are set to an appro priate level if used The system walk thru can detect problem of weak signal strength caused by Poor antenna location Wrong antenna for receiver and or transmitter RF Trouble Spots Operating distance beyond system capability Old or used batteries in the TR 700 Under normal conditions the base station s display will indicate ...

Page 48: ...7 2 Blank ...

Page 49: ...ions using ext speakers Reduce the gain settings on both the beltpacks and the base They may be too high DROPOUTS When moving around the area of use there seems to be locations where the signal swooshes or completely disappears Make sure both antennas on the base and beltpack are connected and follow the location suggestions Change the location of the base unit and antennas or avoid the bad areas ...

Page 50: ...8 2 Blank ...

Page 51: ...ght Figure 23 displays the same gain setting as in Figure 22 but brought into a high noise environment The user s voice now lights the OM indicator all the time he or she speaks due to the higher noise plus the user speaking louder The result on the system is distortion on louder speech The microphone gain must be reduced The same applies to a user with a powerful voice If someone sets the system ...

Page 52: ...9 2 Blank ...

Page 53: ...com mended Nickel Metal Hydride Batteries These batteries can save you money in the long run as they can be recharged Typical battery life is about 70 80 of the length of time alkaline bat teries last Battery Life TR 700 Alkaline 12 14 Hours Nickel Metal Hydride 9 12 Hours WARNING Do not place an alkaline TR battery pack in any battery charger Severe charger and battery pack damage may result 10 1...

Page 54: ...10 2 Blank ...

Page 55: ...4 0 VDC nominal 2 COMMON 1 3 AUDIO PLUS POWER AUDIO PLUS POWER MALE Clear Com Input Impedance 200W Output Level 1 0 Vrms nominal Bridging Impedance 10kW Call Signaling Send 12 3 VDC Receive 4 VDC Minimum Power Voltage 30 0 VDC nominal 2 COMMON 1 3 POWER AUDIO MALE RTS Input Impedance 200W Output Level 0 775 Vrms nominal Bridging Impedance 10kW Call Signaling Send 20kHz 100 Hz 240 mVrms Receive 20k...

Page 56: ...11 2 Blank ...

Page 57: ...ardware and 10 feet 3 meters of coaxial cable with TNC Connectors P N 878896 ALP 450 450 900 MHz Log Periodic Antenna Includes mounting hardware and 10 feet 3 meters coaxial cable with TNC connectors Order No 71147000 Antenna Cables Special low loss antenna cables with TNC Connectors 1 2 Wave Antenna Base Station s 1 2 Wave Antennas Telex Model No Length Order No CXU 10 10 Ft 3 meter 690419 CXU 25...

Page 58: ...12 2 Blank ...

Page 59: ...e unit as follows Check the unit to see that all parts and screws are in place Then wrap it in heavy paper or put it in a plas tic bag If the original carton is not available place the unit in a strong carton that is at least six inches big ger in all three dimensions than the unit Fill the carton equally around the unit with resilient packing material shredded paper foam etc Seal it with gummed p...

Page 60: ...13 2 Blank ...

Page 61: ...ch it was in stalled 2 Restrictions a You may not market distribute or transfer copies of the Software to others or electronically transfer or duplicate the software YOU MAY NOT REVERSE ENGINEER DECOMPILE DISASSEMBLE MODIFY ADAPT TRANSLATE RENT LEASE OR LOAN THE SOFTWARE OR CREATE DERIVATIVE WORKS BASED ON THE SOFTWARE OR ANY ACCOMPANYING WRITTEN MATERIALS b The Software and the accompanying writt...

Page 62: ...14 2 Blank ...

Page 63: ...enna must be installed at or exceeding the mini mum safe distance shown above and in accordance with the requirements of the antenna manufacturer or supplier 5 Base Station Installation The antenna should be fixed mounted on an outdoor permanent structure RF Exposure compliance must be addressed at the time of installation 6 Antenna substitution Do Not substitute any antenna for the one supplied o...

Page 64: ...15 2 Blank ...

Page 65: ...es 3 Repairs and replacement parts are covered under this limited warranty only for the unexpired term of the original lim ited warranty 4 Products purchased from unauthorized dealers are not warranted 5 You must fill out and return the product warranty card to register the purchase date of serialized items A copy of the bill of sale showing the date of purchase must accompany all warranty work TH...

Page 66: ...16 2 Blank ...

Page 67: ......

Page 68: ...TELEX COMMUNICATIONS INC 12000 Portland Ave South Burnsville MN 55337 PN 803290 2 REV C MAY 2003 Made in U S A ...

Reviews: