background image

2. You can now scan for another channel, manually

select a channel or lock the current channel by
using one of the following procedures:

Clear Scan

 – Hold the <SELECT> button until

the decimal point starts to blink (about 3
seconds) then release. The XO-AP will scan all
available channels and then set itself to the
clearest channel available for use

.

Manual Set

 – Press the button <SELECT> to

the XO-AP channel desired. Each press of the
button will increment the channel by one. Once
the desired channel is displayed the XO-AP will
automatically set to that channel.

Lock 

– Press and hold the <SELECT> button

until the decimal point is on solid (about 10
seconds) then release. The XO-AP is now
locked on that RF channel. The only two ways
to unlock it are to reboot the XO-AP or hold the
<SELECT> button down again until the
decimal point turns from solid to off (about 10
seconds).

3. With the XO-AP running, turn on the XO-1

beltpacks one at a time. The following turn on
events should follow:

The battery light will activate immediately.

After 20 seconds;

°

A voice in the headphone will say, “wireless” 
indicating the beltpack is in wireless mode
(as opposed to “wired” mode used for
changing the encryption code, see section 6).

°

The “O” light will lite and communications
will start.

4. Wear the beltpack on the hip. Place them in a

position that allows for greatest visibility to the
XO-AP antenna in the press box.

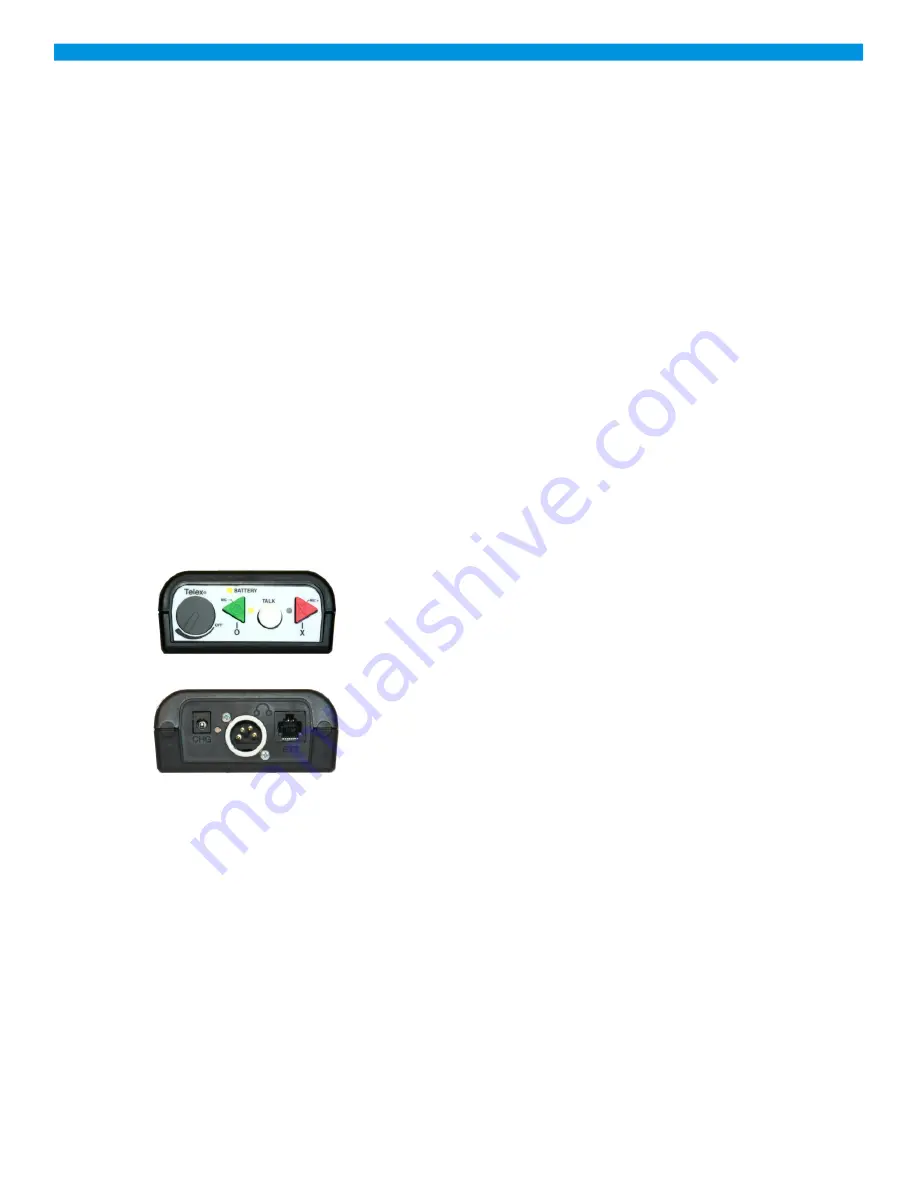
5. XO-1 Top Panel Buttons – The XO-1 has three top

panel buttons:

TALK – This button enables/disables the
beltpack’s microphone.

Enabled

 - The audio channel light(s) are on

solid and sidetone (your own voice heard in
your headphones) can be heard. 

Disabled 

– The audio channel light(s) blink and 

there is no sidetone.

Talk has two modes of operation:

°

Latch

 – Tap the button to enable the

microphone and talk on the currently
selected audio channel(s). Tap again to
disable the microphone.

°

Momentary

 – Press and hold the 

button. The microphone will be enabled
immediately and momentary mode will start
if it is held over a ½ second. In this mode, the
microphone is only active for as long as the
button is held down.

"O" 

– Tap the button to listen or talk to the

offense audio channel. The light next to it will
activate when selected.

"X"

 – Tap the button to listen or talk to the

offense audio channel. The light next to it will
activate when selected.

6. The default for the microphone gain is level four,

which is adequate for most events, however, the
microphone gain can be adjusted up or down if
desired.

Adjusting the XO-1 Microphone Gain

°

Place the headset on.

°

Once the beltpack has finished booting, press 
and hold both the <O> and  the <TALK>
button for 3 seconds. After 3 seconds a voice
prompt will indicate "MIC ADJUST" mode
has been entered.

°

As holding the <TALK> button, press the
and hold the <O> button for less gain, hold
the <X> button for more gain.

5-2

Top View

Bottom View

Figure 5-4

XO-1 Beltpack

Summary of Contents for Legacy XO-1

Page 1: ...XO AP XO 1 Wireless Intercom System Operating Manual Wireless Intercom System R TELEX COMMUNICATIONS INC ...

Page 2: ...ration 5 1 Halftime 5 3 Before the Next Use Charging Instructions 5 3 Long Term Storage 5 3 Li Ion Batteries 5 4 Software Version 5 4 Section 6 Encryption Code 6 1 Encryption Code 6 1 Logging into a Beltpack XO 1 6 1 Beltpack Options 6 2 Enter new password 6 2 Display current encryption key 6 2 Enter new encryption key 6 2 Exit 6 3 Section 7 Trouble Shooting 7 1 Section 8 RF Channels 8 1 RF Channe...

Page 3: ...ween beltpacks The built in base station intelligence called ClearScan automatically selects the best RF Radio Frequency channel for communications on start up The base station also uses an internal rechargeable Li Ion battery that will provide up to 10 hours of uninterrupted operation System Features Easy base station and beltpack setup Uses mature 2 4GHz IEEE 802 11 Wireless LAN Technology Audio...

Page 4: ...conds then release The unit will examine the RF channels available then select the one with the least activity and set the AP on that channel Lock Press and hold the button until the decimal point is on solid about 10 seconds then release The AP will be locked on the channel displayed To unlock press and hold the button again until the decimal point is off Lock makes the currently displayed channe...

Page 5: ...xt to the button will light when selected Also controls headset mic level Mic Press and hold the talk button and O button for 3 seconds A voice prompt will indicate MIC ADJUST mode has been entered Keep the talk button held down The O button can now be use to reduce the microphone gain The X button will raise the microphone gain Listen for voice prompts in headset 6 Charge Jack Used to charge the ...

Page 6: ... Base Station Battery Lithium Ion Rechargeable XO AP Battery Life 10 Hr Typical XO AP Recharge Time 8 Hr Typical XO AP Low Battery Indication 30 minutes of battery life left Typical XO 1 Beltpack Battery Lithium Ion Rechargeable XO 1 Battery Life 8 Hr Typical XO 1 Recharge Time 6 Hr Typical XO 1 Low Battery Indication 15 minutes of battery life left Typical XO AP Base Station Size 6 00 L x 6 40 W ...

Page 7: ...nal power supply into an AC outlet if available If external power is not available then the XO AP can run off internal battery if already charged System Operation 1 Turn on the XO AP by pressing the power switch into the On position The XO AP must be powered up before any beltpacks are turned on The following turn on events should follow The power light on the front panel will activate immediately...

Page 8: ...for greatest visibility to the XO AP antenna in the press box 5 XO 1 Top Panel Buttons The XO 1 has three top panel buttons TALK This button enables disables the beltpack s microphone Enabled The audio channel light s are on solid and sidetone your own voice heard in your headphones can be heard Disabled The audio channel light s blink and there is no sidetone Talk has two modes of operation Latch...

Page 9: ...in a room temperature location The LED on the bottom of the unit indicates the charge status RED Charging GREEN Charging Done After an event the XO AP base station will need to charge for at least 10 14 hours The XO AP may be left on charge indefinitely Long Term Storage Long term storage of the system is defined as no use of the system for 1 month or longer Due to the internal Li Ion batteries of...

Page 10: ...an lose up to 20 capacity if stored for long term right after being fully charged It is also a good idea to charge the XO AP and XO 1 batteries once every 6 months for three hours then take off charge Do not fully charge This helps to maintain the battery s performance and prevent any over discharging Software Version The software version of the base station and beltpack may be seen near the top o...

Page 11: ...osoft Windows 95 98 NT 2000 XP Software Telnet or similar application that lets you communicate to a specified IP Address Most all computers have telnet or a similar program installed on them by default The following instructions use Telnet and Windows 2000 to log into the beltpack Other applications and operating systems will be similar 1 Unplug any current RJ 45 network connections from the comp...

Page 12: ... user to change this XO 1 s password The default from the factory is legacy The user is never allowed to change the login name of telex 2 Display current encryption Key Displays on the screen the current encryption key of the beltpack 3 Enter new encryption key The user must change the encryption key if this option is selected 1 When 3 is selected the phrase Enter new encryption key appears 2 Now ...

Page 13: ...and receive connectors The antenna s cables are labeled as to their connection point Find the source of the interference and shut it down Sources of WiFi interference could be Laptop Desktop computer with its wireless card on or WiFi AP in or near the press box If the interference cannot be found or shut off then press and hold the SELECT button for 3 seconds until the decimal point flashes then r...

Page 14: ...n turned on When the XO 1 beltpack power was turned on the unit s power light came up but the O button light never came up and communication never started Internal battery is nearly exhausted On boot an error was encountered and the unit could not finish boot up Charge the battery Power down the XO 1 wait two seconds then power up again Headphone audio from another beltpack s is loud and distorted...

Page 15: ...e in the FCC regulatory domain When choosing frequency channels for systems in the vicinity of each other you should choose frequency channels that do not overlap e g Channels 1 6 and 11 Section 8 RF Channels 1 2 3 4 5 6 7 8 9 10 11 Channel Numbers 1 2 3 4 5 6 7 8 9 10 11 2 412 2 422 2 432 2 442 2 452 2 462 2 472 2 417 2 427 2 437 2 447 2 457 2 467 Channel Center Frequencies in GHz 22 MHz Channel ...

Page 16: ...4 The XO AP base station complies with FCC radiation exposure limits set forth for an uncontrolled environment The antennas used with this equipment should be installed and operated with a minimum distance of 20cm between the antenna and your body 5 This device and its antenna s must not be co located or operated in conjunction with any other antenna or transmitter To assure continued compliance w...

Page 17: ...ctor PH 2 64437100LG Dual sided w flexible dynamic boom mic 150 ohm earphone 6 1 8M cord and A4F connector HR 1 300534007LG Single sided w flexible dynamic boom mic 150 ohm earphone 5 1 5M cord and A4F connector HR 2 300534000LG Dual sided w flexible dynamic boom mic 150 ohm earphone 5 1 5M cord and A4F connector PH 100 301581007LG Single sided w flexible dynamic boom mic 150 ohm earphone 5 1 5M c...

Page 18: ...l Antenna Mounting bracket for ANT FP Antenna Use for permanent mount of ANT FP Flat Panel Antenna XOB 302054002 Nylon Belt Adjustable 550257 Communications Cable Ethernet CAT 5e Cable 3 FT 532091000 Charger for base and beltpack 100 240 VAC input 12VDC 410mA output 5 5 x 2 5 x 11mm jack 10 2 Section 10 Accessories and Replacement Items Continued ...

Page 19: ...R TELEX COMMUNICATIONS INC 8601 East Cornhusker Highway Lincoln NE 68507 Made in U S A PN 804233 TX Rev D ...

Reviews: