Teletrac FLEET DIRECTOR User Manual Download Page 11

6

Navigation & Messaging User Guide

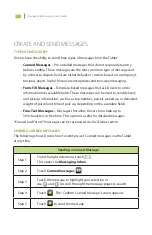
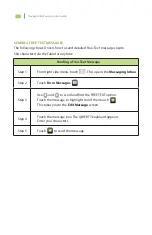
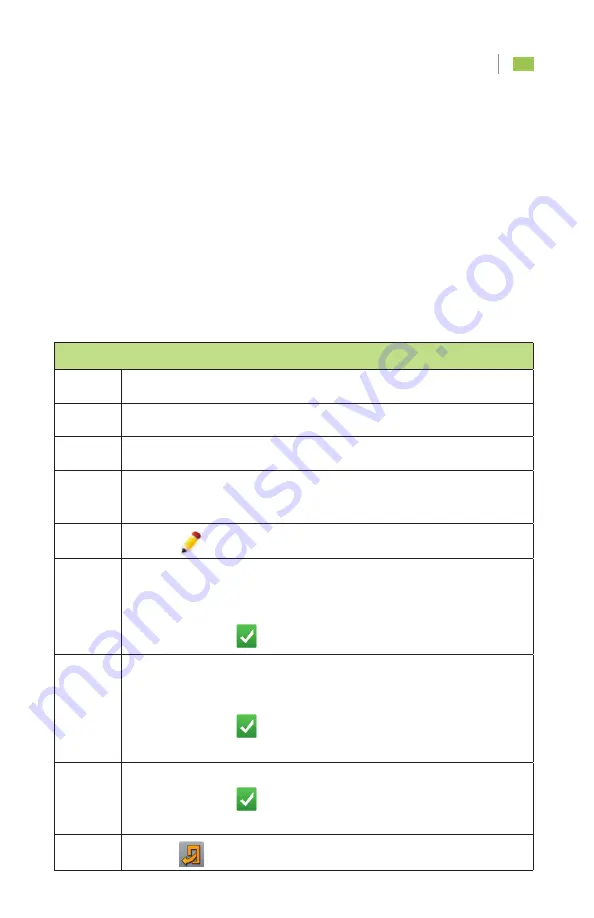
Setting a Home Address

Step 1

Touch Navigation.

Step 2

Touch any location on the map. The Navigation options appear.

Step 3

Touch Navigate To.

Step 4

Touch Home in the Navigate To screen. 
The Home Settings screen appears.

Step 5

Touch 

 to enter your address.

Step 6

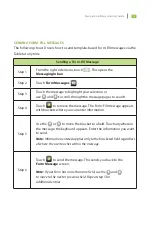
From the City tab, enter the entire city or ZIP code. You may enter 
the first two/three letters/numbers of the city or ZIP and touch 
the orange drop-down arrow (if active) to select from a list. When 
complete, touch 

 .

Step 7

From the Road (street) tab, enter the entire street name. You may 
enter the first two/three letters of the street name and touch the 
orange drop-down arrow (if active) to select from the list. When 
complete, touch 

 .

Note:

 To edit the city, touch the 

City

 tab.

Step 8

From the Road Number tab. Enter the address number. When 
complete, touch 

 .

Note:

 To edit the city or the street, touch the 

City

 or the 

Road

 tab.

Step 9

Touch 

 to return to the Navigate To screen.
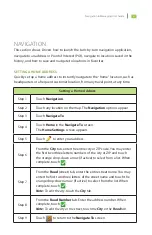
NAVIGATION

This section shows Drivers how to launch the turn-by-turn navigation application, 
navigate to an address or Point of Interest (POI), navigate to locations saved in the 
history, and how to save and navigate to locations in Favorites.

SETTING A HOME ADDRESS

Quickly set up a home address to instantly navigate to the “home” location, such as 
headquarters or a frequent customer location, from any travel point, at any time.

Summary of Contents for FLEET DIRECTOR

Page 1: ...FLEET DIRECTOR TABLET Navigation Messaging User Guide...

Page 2: ......

Page 3: ...c and its affiliates make a genuine effort to ensure the accuracy and quality of these materials However Teletrac Inc and its affiliates make no warranty whatsoever express or implied with respect to...

Page 4: ......

Page 5: ...gating to a Location Stored in History 8 Navigating to a Point on the Map 9 Navigating to GPS Coordinates 10 GPS Coordinates Using Decimal 10 GPS Coordinates Using Degree Minutes and Seconds 11 Adding...

Page 6: ...en received by doing the following n This helpful icon shows numerically on the top right how many messages have been received by the Tablet In addition a beep sound quickly alerts the Driver that new...

Page 7: ...The Message Inbox screen appears The Tablet displays the most recent messages first top to bottom Step 2 Touch any one message to highlight your selection Touch The View Message window appears At this...

Page 8: ...pick up information such as a stop number parcels picked up or delivered weight of parcel and time of pick up depending on the available fields Free Text Messages Messages that allow Drivers to includ...

Page 9: ...Use the or to move the bracket to a field Touch anywhere in the message the keyboard appears Enter the information you want to send Note Information entered applies only to the bracketed field regard...

Page 10: ...Sending a Free Text Message Step 1 From right side menu touch This opens the Messaging Inbox Step 2 Touch Form Messages Step 3 Use and to scroll and find the FREE TEXT option Touch the message to high...

Page 11: ...t two three letters of the street name and touch the orange drop down arrow if active to select from the list When complete touch Note To edit the city touch the City tab Step 8 From the Road Number t...

Page 12: ...ch the orange drop down arrow if active to select from the list When complete touch Note To edit the city touch the City tab Step 7 From the Road Number tab Enter the address number When complete touc...

Page 13: ...een appears At this point touch the middle icon to change the default route settings to one of the following Shortest time No Toll No Highway Shortest way No Highway and No Toll Touch the Vehicle icon...

Page 14: ...When you find the location tap the Tablet screen in the desired place and then touch Go The Launch Navigation screen appears At this point touch the middle icon to change the default route settings t...

Page 15: ...e GPS Coordinates screen appears Step 5 Below the GPS Coordinates header touch the 0 0000 option Step 6 Touch the Latitude bar The numeric keypad appears Enter the value including the decimal When com...

Page 16: ...rom East to West Touch the Degree box The numeric keypad appears Enter the value When complete touch Step 10 Touch the Minutes box The numeric keypad appears Enter the value When complete touch Step 1...

Page 17: ...Touch an address in the History list and then touch the star icon The keyboard appears Step 6 Enter a unique name for this location When complete touch Your entry is saved in Favorites Step 7 Touch t...

Page 18: ...ites The Favorites list appears Step 5 Touch a location in the Favorites list Then touch Go The Launch Navigation screen will appear At this point touch the middle icon to change the default route set...

Page 19: ...ars Step 3 Touch Map Explorer The map shows the remainder of the active route Step 4 Touch to return the Navigation screen Step 5 Touch to return to the map screen Viewing Blocked roads Step 1 Touch N...

Page 20: ...n the map The Navigation screens appears Step 3 Touch Mute Note To unmute touch Mute again Step 4 Touch to return to the map screen STOPPING NAVIGATION Quickly stop any current or ongoing navigation S...

Page 21: ...appears Step 2 Touch the Other Parameters bar A Settings General screen appears Step 3 Adjust settings as required such as vehicle height length weight hazardous cargo and maximum speed ADJUSTING NAV...

Page 22: ...Navigation Messaging User Guide 17 NOTES...

Page 23: ...18 Navigation Messaging User Guide NOTES...

Page 24: ...Navigation Messaging User Guide 19 Help Desk 1 800 ITS HELP Document Number 1560 0603 00 Date February 13 2014...

Reviews: