background image


19


      The  following  phenomena  are  not  necessary  faults,  and  the  following  checks  should  be  performed 

first  before  asking  a  specialized  person  for  repair.  If  the  cause  of  fault  cannot  be  found  and  corrected 

with this guideline, remove the power plug from the socket and have a specialized person to repair it. 


Symptom 

Inspection 

No picture nor sound 

Is the fuse or breaker in the house OK? 
Is the power supply plug inserted? Is it in good contact? 
Is the system of the TV correct? 

No picture but the sound is OK 

Adjust brightness and contrast. 

Picture is shown but the sound 

is not normal 

Press the sound system button to select other sound system 

Normal picture but no sound 

Press the V (+) or Mute button several times. 

Only picture with snow and 

noise 

Adjust the indoor or outdoor antenna. 
Connect a proper antenna, and readjust the channel tuning with the Fine Tune. 

No colour 

Is a colour program being broadcasted? 
Are the hue and system correct? 
Readjust the channel tuning with the Fine Tune. 

Small dots, lines or strips on 

the picture 

They  are  usually  caused  by  interference  from  cars,  neon  lights  and  electrical 
hair dryers. 
Adjust the antenna to minimize the interference. 

Ghost 

Usually  caused  by  reflection  from  hills  or  high  buildings  nearby.  Change  the 
antenna direction or height. Better use outdoor antenna with good directivity 

Colour stain 

If  colour  stain  appears  after  changing  the  angle  of  the  TV  set,  turn  its  main 
power switch off and wait for at least 15 minutes before turning it on again. 

Afterglow when turned off 

It is normal to have an afterglow on the screen for 1-3 seconds after the power 
to the TV set is cut off, and it will not affect the CRT. 


Note: The design and structure are subject to change without notice. 

Do  not  attempt  to  repair  or  refit  the  television  by  yourself,  or  it  may  cause  a  fire  or 
electric shock


Guide to simple trouble-shooting 

Miscellany 


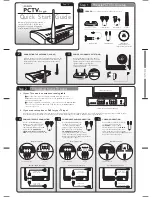
Summary of Contents for TTV-299

Page 1: ...MODEL TTV 299 FULL ON SCREEN DISPLAY 228 PROGRAM MEMORY WITH INFRARED REMOTE CONTROL OWNER S MANUAL ...

Page 2: ... Sleep time auto volume limit setting 15 Set sleep Timer Set automatic volume limit Selection of blue background and black stretch 16 Technical operation Single button hopping program sequence 17 VI Connection with Other Devices Connect CD VCD DVD or other sound picture and audio or video output devices 18 VII Miscellaneous Guide to simple trouble shooting 19 Specification 20 Packing 20 Contents D...

Page 3: ...ment In cleaning dust be sure to remove the power supply plug from its socket first Do not clean the housing directly with liquid detergent use a damp cloth Be sure to remove the power supply plug from its socket and remove the antenna plug during a thunderstorm or when it will not be used for long time to avoid components being damaged by lightning 7 If you use an indoor antenna do not let it tou...

Page 4: ...screen or colour distortion If the TV set is moved while on turned or affected by a magnetic object nearby turn off the power supply and wait for at least 1 hour to turn it on again to ensure that the automatic demagnetizing circuit will work normally again to eliminate the effect of magnet on colour and resume the vivid pictures To ensure best reception use outdoor antenna or cable antenna CATV T...

Page 5: ...ol will not be used for long time or if the batteries are flat please take the batteries out to prevent leaking Never throw the battery into fire and properly dispose of the used batteries Take care not to drop wet or dismantle the remote control 1 Remove the sliding cover from the remote control 2 Load two Size AAA batteries into the chamber with the poles of batters in line with the marks Instal...

Page 6: ...the picture tube behind the cover 1 Main power switch 2 Remote control sensor 3 Power indicator 4 Program number up and down 5 Volume up and down 6 Menu button 7 TV AV button 8 AV socket 9 Antenna input and AV IN OUT terminals Control Location Television Front Panel Input Output Terminals ...

Page 7: ...rect Program number buttons 13 Standby button 14 Screen display button 15 Colour system button 16 I II button The button is non functional 17 Effect button The button is non functional 18 Timing button 19 Program number Up Down button 20 Menu button 21 Picture button 22 Sound button 23 Program back view button Names and Functions of Controls Remote control 1 2 3 4 5 6 7 8 9 10 11 12 13 14 15 16 17...

Page 8: ...ressing the P button Note To ensure normal operation at all times never turn the television on and off frequently Wait for at least 5 seconds before turning it on again 3 Selecting the button on the remote control will place the Internet section of the Television in standby mode press the button again to turn it on again 4 If you want to completely turn off the power supply please press the main p...

Page 9: ...or sound of a channel is not normal it may be an incorrect setting of colour or sound system and it can be adjusted as described below press the MENU button 3 times consecutively so that the screen will display the following menu or select the FEATURE button If the picture colour is not normal Press P P to select COLOUR it turns from white to green then press V V to select the correct colour syste...

Page 10: ...ed programs has exceeded the maximum Program number to be stored the auto searching will stop automatically If the number of searched programs does not exceed the maximum Program number to be stored at the end of auto search all the Program numbers not stored with program will be set as SKIP ON At the end of auto search the Program number will jump automatically to the first Program number 2 Progr...

Page 11: ...The television will store the program automatically 3 Fine tuning You can first use P P or direct program number on remote control to select the program number you want to fine tune Once the channel is selected press MENU button until you enter the TUNING menu Move the cursor to FREQ FINE by pressing the P P button it turns from white to green and then use V V begin fine tuning By pressing V butto...

Page 12: ...er that Program Number is in purple when you use P P button to select a program that Program Number will be skipped over If you want to restore the skipped Program Number perform the following operation 1 Use the Direct Program Number selection button to select the Program Number you want to restore then press MENU or TUNING to display and enter TUNING menu or first press MENU or TUNING menu to di...

Page 13: ...n display Pressing the CALL button can also close the displayed menu Note 1 Pressing the CALL button in AV mode will enable inquiry of current video status and colour systems 2 When the channel is changed the Program Number is displayed at the left top of the screen for about 5 seconds 2 Selectable picture Selecting the picture mode Press the PP button to select your desired picture quality Pressi...

Page 14: ... button to display the SOUND menu on the screen Press P P to select the item you want to adjust then press V V to adjust the effect Choose VOLUME to adjust sound volume Choose BALANCE to adjust sound balance At the end of operation all the adjusted values will be automatically saved NOTE The TREBLE BASS EFFECT items are displayed only when this TV model provides the adjustable functions of treble ...

Page 15: ...ton or direct Program Number selection button to set Min after completing then press V button to return the function option If the CLOCK item hasn t been set the colour of the TIME ON PROGRAM TIMER OFF items are gray and won t be selected 2 Select CLOCK option it turns from white to green set hour at 18 set Min at 28 3 Select TIMER ON option it turns from white to green set hour as 19 set Min as 0...

Page 16: ... cancel the set off time press the standby button to turn the TV set off then press any number button or Program Number UP Down button to turn the television on again or press V V continuously until SLEEP TIMER 0 is displayed on the screen 2 Selecting auto volume limit Similarly in FEATURE menu press P P to select AVL option it turns from Basic operation Setting the sleep Time screen display langu...

Page 17: ...tus and show even noise spots under TV status and have no delay off the TV function Single button hopping With this function you can alternate between the channel you are currently watching and the channel you were previously watching Operation method In TV mode press the button in the TV section of the remote controller and you can jump from the current program to the one previously watched For e...

Page 18: ...or V V to select one of the Program Numbers to be exchanged such as 1 then choose PROG 2 press the number button or V V to select another desired Program Number such as 9 Now choose SWAP option and press V V button you can exchange Program Numbers 1 and 9 The characters YES will turn into red SWAPPED and flashes once Logical digit game The TV set has one logical digit game you can press the GAME b...

Page 19: ... output devices Connect with Other Devices Video television VCD DVD game set or other sound and picture output devices RF output To antenna input Video output To video input Audio output To audio input To video input Video output Video television CD satellite receiver or other sound and picture output devices ...

Page 20: ...ing with the Fine Tune No colour Is a colour program being broadcasted Are the hue and system correct Readjust the channel tuning with the Fine Tune Small dots lines or strips on the picture They are usually caused by interference from cars neon lights and electrical hair dryers Adjust the antenna to minimize the interference Ghost Usually caused by reflection from hills or high buildings nearby C...

Page 21: ...0V 270V 50Hz 60Hz CRT 74cm measured diagonally I O interface RF antenna 75Ω co axial Audio Video AV 2 AV stereo Sound output 5W 2 Loudspeaker 16Ω 8W 2 Description Quantity Packaging case 1 Upper polystyrene 1 Lower polystyrene 1 Owner s Manual 1 Remote control 1 Battery 2 Warranty Card 1 Specification Miscellaneous Packing list ...

Page 22: ...21 ...

Reviews: