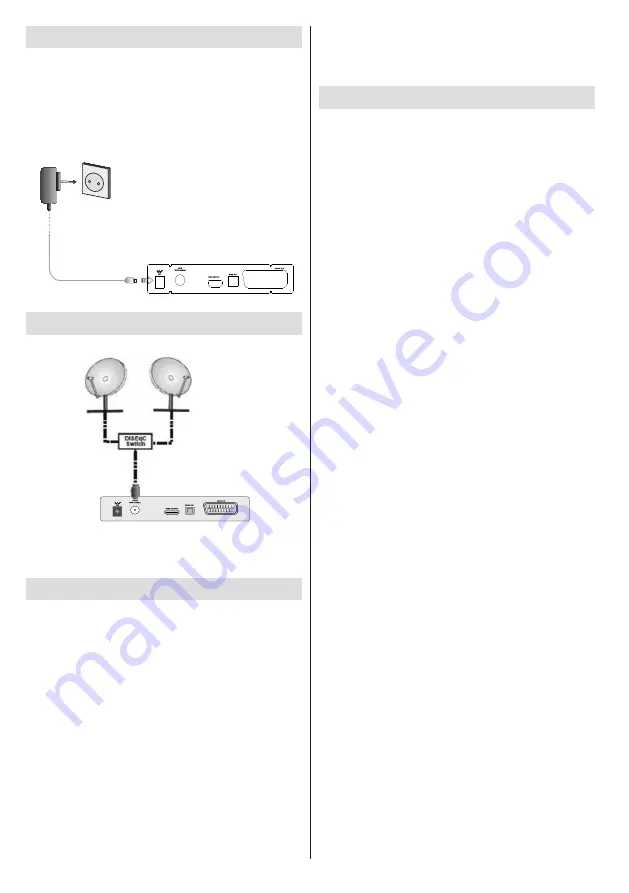
Telefunken TF-RS9200 Manual Download Page 9

- 8 -

Power Connection

IMPORTANT: The set-top box is designed to 

operate on 12 V DC. For this, an adaptor is used 

which gives 12 V voltage. Connect this adaptor to 

a system that supplies 220-240V AC, 50Hz.

• After unpacking, allow the set-top box to reach the 

ambient room temperature before you connect the 

set to the mains.

AC Adaptor

To POWER INPUT

DC12V Terminal

LNB Connection

Note:

 If there is a problem with the LNB connection, a 

warning OSD will be displayed on the screen. Please 

check and fix LNB connection.

Power On-Off

Be sure that you put through all the cable connections. 

After plugging in the AC adaptor for the set-top-box to 

the mains supply, a red LED will be seen on the front 

panel (Standby mode). When the set-top-box is first 

powered up please wait for a while before activating 

the receiver since booting of software will take some 

time. Then, you can turn on your digital set-top box by 

pressing the standby button on the remote control. You 

will see that the LED on the front panel will change to 

green (Power on mode).

If the box is switched into the Standby mode using the 

Standby/On

 button on the remote, it won’t be able to 

turned on again for a short time.

Auto Power Down: 

This box will automatically be switched from active 

mode into standby mode, after less than three hours in 

active mode, following the last user interaction and/or 

a channel change with an alert message two minutes 

before going to standby mode. The Automatic power-

down will be set as default  and the user will be able to 

change Automatic power down to on or off in the menu

USB Disk Connection

• You  can  connect  a  USB  hard  disk  drive  or  USB 

memory stick to your box by using the USB input . This 

feature allows you to play files stored in a USB drive.
• 2.5” and 3.5” inch (hdd with external power supply) 

external hard disk drives are supported.

IMPORTANT !

•  You  may  back  up  your  files  before  making  any 

connections to the box in order to avoid any possible 

data loss. Note that manufacturer will not be 

responsible for any file damage or dataloss.
• It is possible that certain types of USB devices (e.g. 

MP3 Players) or USB hard disk drives/memory sticks 

may not be compatible with this device.
IMPORTANT:  The  device  may  not  support  all 

disk  formats.  If  you  connect  a  USB  disk  with  an 

unsupported format, then you will be asked to format 

the content. See the section, “Format Disk” in

the following pages for more information on disk 

formatting. Note that ALL the data stored on the 

USB disk will be lost and then the disk format will be 

converted to FAT32 in such a case.

USB Disk Connection

• Plug your USB device to the USB input of the box. 

Note: Plug or unplug your USB disk while the box is 

switched off.
Note: If you are going to connect a USB hard disk drive 

to the box, USB connection cable used between the 

disk drive and the box should have a USB logo and 

should be as short as possible.
Note: While formatting a USB hard disk that has 1TB 

(Tera Byte) or more file capacity, you can experience 

problems with the formatting process. In such a 

case, you should format the disk with your personal 

computer and the formatted disk type is recommended 
as FAT32.

CAUTION ! 

•  Quickly  plugging  and  unplugging  USB  devices, 

is  a  very  hazardous  operation.  Especially,  do  not 

repeatedly  quickly  plug  and  unplug  the  drive. This 

may cause physical damage to the USB player and 

especially the USB device itself.

Summary of Contents for TF-RS9200

Page 1: ...DIGITAL HD SATELLITE RECEIVER TF RS9200 TF RS9200...

Page 2: ...8 USB Disk Connection 8 USB Disk Connection 8 Menu Interface First Time Installation 9 Electronic Programme Guide EPG 10 Changing Channels 10 Adjusting the Volume 10 Volume Up Down 10 Mute 10 On Scree...

Page 3: ...support Digital audio output optic Teletext function support DVB Resetting to factory settings option Selectable satellite configurations Presets ASTRA HOTBIRD EUTELSAT 16B TURKSAT 2A 3A etc plus use...

Page 4: ...a place subject to direct sun light excessive dust or mechanical shock or in a location near heat sources The device should be placed on a solid and safe base Do not place the apparatus on a soft sur...

Page 5: ...th the supply wiring Hazardous Live Terminal The marked terminal s is are hazardous live under normal operating conditions Caution See Operating Instructions The marked area s contain s user replaceab...

Page 6: ...s a list of favourite channels 13 Coloured buttons 14 Displays the audio language setup menu 15 Fast backward 16 No Function 17 Pause 18 Play 19 Stop 20 Fast forward 21 Displays the subtitle setup men...

Page 7: ...on cable 6 SPDIF Audio Out You can use this connector to output the digital audio to an external device See your audio system instruction book for further information 7 SCART VIDEO OUTPUT TV SCART con...

Page 8: ...ote control it is probable that the batteries are exhausted If so you can still use the local buttons of the receiver You can replace batteries after they are exhausted 1 2 3 Note Remove the batteries...

Page 9: ...n You can connect a USB hard disk drive or USB memory stick to your box by using the USB input This feature allows you to play files stored in a USB drive 2 5 and 3 5 inch hdd with external power supp...

Page 10: ...with and pressing OK Then Country Time Zone Setting TV type Display Format and HD output resolution selections screen will be shown Do your selections using buttons and press OK to continue After pres...

Page 11: ...a DiSEqC switch select this antenna type After selecting DiSEqC switch another menu screen will be displayed You can set four DiSEqC options if available A message will appear asking you whether to l...

Page 12: ...Electronic Programme Guide EPG You can view the electronic programme guide EPG to view information about available programmes Press GUIDE button to view the EPG menu screen Press or buttons to navigat...

Page 13: ...ff and on again until you change volume again The audio volume adjustment for the receiver is independent of the volume control on your TV set IMPORTANT You should be careful that both volume controls...

Page 14: ...ess the OK button to display Channel List or you can press the OK button during watching programme and get to the Channel List directly Navigating the Entire Channel List Press or button for selecting...

Page 15: ...menu Select the channel to be locked by highlighting it and select Lock option by pressing or button Press OK button Afterwards a dialog OSD asking for the password will be displayed Enter the passwo...

Page 16: ...the Channels in the Channel List Press or button to select the channel that should be deleted Press or button to select the Delete item on Channel List menu Press the OK button to delete the highlight...

Page 17: ...the current character i e b character becomes a by and c by Pressing numeric buttons 0 9 replaces the highlighted character with the characters printed above the button one by one as the button is pr...

Page 18: ...er frequency the signal level and quality will be reflected in the signal strength bars Signal Level and Signal Quality bars at the bottom of the menu Signal Level bar shows the strength of the satell...

Page 19: ...s Satellite List Use or button to select Satellite List and then press OK button to see listed satellites on your set top box You can use Up Down or RED GREEN buttons to navigate in Satellite List men...

Page 20: ...broadcasts are displayed correctly Highlight the TV Type line in the Configuration menu and use the keys to select 4 3 if you have a standard TV set connected or 16 9 if it is a widescreen TV This fu...

Page 21: ...delay Note This function will be available while using Optical Audio out only Receiver Upgrade To ensure that your STB always has the most up to date information Please ensure that after use it is set...

Page 22: ...rs INSTALLATION Installation menu is locked So the user can t add channels Changes will be updated after exiting Configuration Menu Maturity Rating If this option is set TV gets the maturity informati...

Page 23: ...nd changed after this process Please activate Standby Search setting in order to enable your TV for automatically updating the broadcast frequency of the broadcaster broadcast definition and similar c...

Page 24: ...ic video and picture files from a USB memory stick Note Some USB compliant devices may not be supported Note If the USB stick is not recognized after power off on or First Time Installation first plug...

Page 25: ...y files Pauses the playback Stop button Stop the playing file LANG Sets subtitle or audio YELLOW Sets subtitle time correction BLUE Sets subtitle size Rewind button Goes backward Fast Forward button G...

Page 26: ...down Slideshow Options Select USB device option from the main media browser screen Select PHOTOS option using the Up or Down buttons press OK button and all available PHOTO files will be displayed Pr...

Page 27: ...Pause playing file Stop button Stop the playing file LANG Sorts files INFO Activates loop shuffle mode BLUE Changes media type Green To move up Red To move down Previous Next buttons Jumps to previous...

Page 28: ...e is entered via the Left Right and the numeric buttons Start Starting time is entered via the Left Right and the numeric buttons End Ending time is entered via the Left Right and the numeric buttons...

Page 29: ...be displayed showing the number of possible audio languages for TV and tracks for radio programs available You can navigate using or buttons and select with OK button If an audio language supports Do...

Page 30: ...ange 16 bit resolution Mpeg 1 Mpeg 2 Layer I II MP3 AC 3 LNB POWER SUPPLY Vertical 13 14 Volt Horizontal 17 18 Volt Max Output Current 300mA Short circuit protected 22 kHz Tone Frequency 22KHz 2 KHz A...

Page 31: ...ng to standby You see the on screen error message related with LNB short circuit protection mode The dish installation is not correct or cable connections have been made incorrect Check the connection...

Page 32: ...e environment and human health which could otherwise be caused by inappropriate waste handling of this product For more detailed information about recycling of this product please contact your local c...

Reviews: