background image

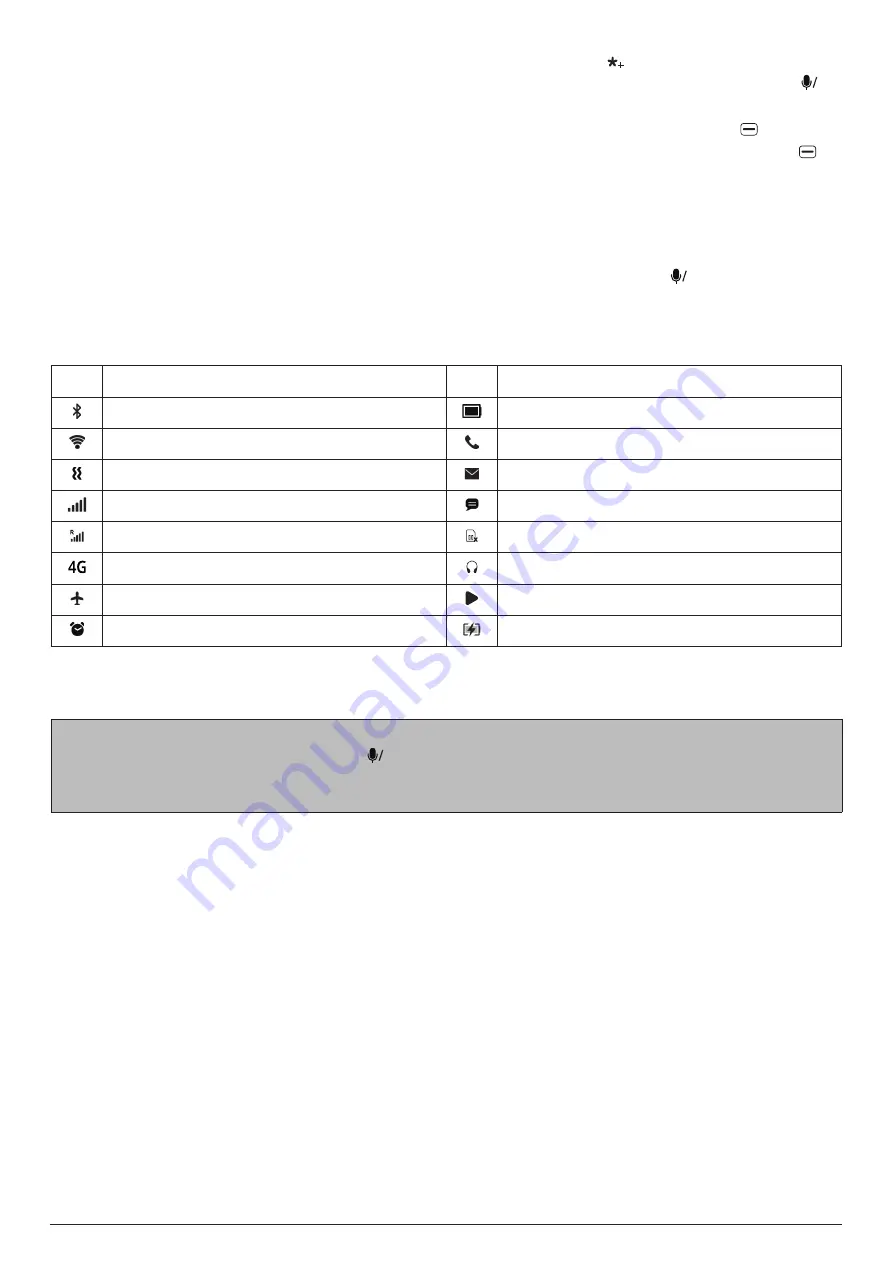
STATUS BAR ICONS 

9


ƒ

To enter a symbol (including punctuation mark) or emoji, press the   key to display the symbol/

emoji table, press the navigation keys to highlight the desired symbol/emoji, and press 

OK

Alternatively, press the key associated with the desired symbol/emoji when the symbol/emoji table 

is visible. To view the next page of the symbol/emoji table, press the 

right soft key 

. To toggle 

between symbols and emojis when the symbol/emoji table is visible, press the 

left soft key 

6.2 

Carousel launcher

The carousel launcher allows quick access to a preset list of five frequently used apps (WhatsApp, 

Facebook, Voice Assistant, Maps, and YouTube).

To access an app using the carousel launcher, press the left navigation key from the home screen, 

press the up or down navigation key to select an app from the list, and press 

OK

.

7. STATUS BAR ICONS

ICON

STATUS

ICON

STATUS

Bluetooth

®

 active

Battery (full charge)

Wi-Fi

®

 active

Missed call

Vibrate mode

New email

Cellular network signal strength (full)

New message

Cellular network signal strength (roaming)

No micro-SIM card inserted

4G data service

Headset connected

Airplane mode

Recorder/Radio/Media player active

Alarm set and on

Battery (charging)

8. PERSONALISING YOUR PHONE

Tips:


ƒ

To open the 

App List 

(

MENU

), press 

OK

 from the home screen.


ƒ

After opening the 

Settings 

app, press the left or right navigation key to view different categories 

of settings (

Network & Connectivity

, 

Personalisation

, etc.).

8.1 

Language

To change the language, follow the steps below:

Go to 

MENU

 > 

Settings

 > 

Personalisation

 > 

Language

 > 

Language (current language name)

, 

and then


select the desired language.

8.2 Date and time

By default, your phone automatically synchronizes its date and time with those of a time server. So, 

in most cases, there is no need for you to manually set or adjust its date and time.

If you want to manually adjust your phone's date and time, follow the steps below:

1. Go to 

MENU

 > 

Settings

 > 

Personalisation

 > 

Date & Time

.

2. Select 

Auto Sync

 and then select 

Off

.

3. Select 

Date

, and set and save a date.

4. Select 

Time

, and set and save a time.

5. Select a new time zone if needed.

Summary of Contents for S740

Page 1: ...MOBILE PHONE S740 INSTRUCTION MANUAL ...

Page 2: ...ode 7 5 4 Home screen 8 6 USEFUL TIPS 8 6 1 Entering and editing text 8 6 2 Carousel launcher 9 7 STATUS BAR ICONS 9 8 PERSONALISING YOUR PHONE 9 8 1 Language 9 8 2 Date and time 9 8 3 Sounds 10 8 4 Display 10 8 5 Quick settings 10 9 VOICE ASSISTANT 10 10 CONTACTS 11 10 1 Contact list 11 10 2 Adding a contact 11 10 3 Searching for a contact 11 10 4 Editing the contact 11 10 5 Deleting contacts 12 ...

Page 3: ...ount 21 18 WI FI CONNECTION 21 19 CLOCK 22 20 MEDIA 22 20 1 Camera and video 22 20 2 Gallery 23 20 3 Video 23 20 4 Music 24 20 5 FM Radio 24 20 6 File manager 24 21 BROWSING THE WEB 25 22 CALENDAR 25 22 1 General tips 25 22 2 Adding an event to the calendar 26 22 3 Viewing and changing a calendar event 26 22 4 Changing calendar settings 26 23 STORE 27 23 1 General tips 27 23 2 Searching for an app...

Page 4: ...ng 33 Wireless Emergency Alerts WEA 34 Cell broadcast message 34 31 2 Personalisation 34 Sound 34 Display 34 Search 34 Notices 35 Date Time 35 Language 35 Input methods 35 Answer Mode 35 31 3 Privacy Security 35 Screen Lock 35 App Permissions 35 Do Not Track 35 Browsing Privacy 35 About KaiOS 36 31 4 Storage 36 Clean Up Storage 36 USB Storage 36 Default Media Location 36 Media internal 36 Applicat...

Page 5: ...ions for electronic devices 39 32 8 Precautions for use in potentially explosive atmospheres 39 32 9 Safety and general use in vehicles 39 32 10 Aircraft safety 40 32 11 Battery use 40 32 12 Power adaptor 40 32 13 Precautions 40 33 CLEANING INSTRUCTIONS 41 34 TECHNICAL DATA 42 Specific Absorption Rate SAR 42 35 DISPOSAL INSTRUCTIONS 43 Recycling of electrical and electronic equipment 43 Battery re...

Page 6: ...oice Assistant Facebook WhatsApp video player camera FM radio web browser and more This phone meets the 2G 3G and 4G standards and has been certified by all relevant organisations worldwide Please note that the contents of this instruction manual are subject to change without prior notice 1 SCOPE OF DELIVERY Please make sure all of the following items are included in the box If anything is missing...

Page 7: ...CONTROL ELEMENTS 2 2 CONTROL ELEMENTS ...

Page 8: ...national prefix Symbols 10 0 Space key 11 key Input method Ring mode ring or vibrate only 12 M2 direct memory key 13 End call Return Power key 14 Right soft key 15 Receiver 16 Wrist strap attachment point 17 Volume keys up and down 18 Rear camera 19 SOS button 20 Speaker 21 LED indicators missed calls new messages alarm ringing battery charging 22 Headset jack 23 Micro USB port 24 Charging cradle ...

Page 9: ...e screen The following are the common use cases Press to open Notices e g notifications for received messages from the home screen Press to add a new event contact or message Press to cancel the current action or return to the previous screen Right soft key Press to select the item displayed in the lower right corner of the screen The following are the common use cases Press to open Contacts from ...

Page 10: ... the home screen 4 GETTING STARTED The topics in this section will help you prepare your phone battery micro SIM card microSD card required for camera multimedia functions and charger WARNINGS Your device and its accessories are not toys They may contain small parts Keep them out of the reach of small children Do not let children use the device and or play with the device and accessories without s...

Page 11: ... SIM card into the card slot slide it in with the gold coloured contacts facing down and the bevelled edge pointing at the right side To insert a microSD card with a fingernail slide the metal cover to the right to unlock and pull it up Put a microSD card into the card slot Finally close the metal cover and slide it to the left to lock it WARNING Do not bend or scratch your micro SIM card Avoid ex...

Page 12: ...e sure you have charged its battery To power on your phone long press until the main screen turns on If passwords are required to unlock the phone and or micro SIM card enter them correctly using the keypad Once unlocked the phone shows you the home screen To power off your phone long press and then select Power Off from the list of options 5 2 Set up wizard When your phone is turned on for the fi...

Page 13: ... edit mode the default input method is English letter Press the key to cycle through Abc abc ABC 123 and Predictive input modes For normal text input press a number key 2 9 repeatedly until the desired character is displayed If the character you want is entered by the same key as the previous character press that key after the little line below the previous character disappears To enter a space pr...

Page 14: ... New email Cellular network signal strength full New message Cellular network signal strength roaming No micro SIM card inserted 4G data service Headset connected Airplane mode Recorder Radio Media player active Alarm set and on Battery charging 8 PERSONALISING YOUR PHONE Tips To open the App List MENU press OK from the home screen After opening the Settings app press the left or right navigation ...

Page 15: ...reen Brightness levels 10 40 70 and 100 2 Turn on or off the Aeroplane Mode 3 Enable or disable Wi Fi 4 Enable or disable Cellular Data 5 Enable or disable Bluetooth 6 Open the Clock app 7 Toggle between Ring Vibrate and Silent modes 8 Adjust the volume for Ringtone Alerts by pressing the left or right navigation key Note To perform all the above actions except the last one confirm by pressing OK ...

Page 16: ...ield to another To view the available options for the current input field or to add other details e g birthday picture and ringtone press the right soft key 4 Press OK to save the new contact Tip None of the input fields on the New Contact screen is mandatory As long as you have provided at least one detail e g mobile phone of the contact you are allowed to save the contact 10 3 Searching for a co...

Page 17: ... View and change the SOS settings For more info see 11 SOS on page 14 Set Speed Dial View and change the speed dial settings For more info see 12 3 Speed dial on page 15 Favorite contacts View and change your favorite contacts You can add up to 5 contacts stored in your phone memory as your favorite contacts for quicker access to them via the Contacts app Once you have added at least one favorite ...

Page 18: ... to your account and connected your phone to the internet After you choose this option follow the onscreen instructions to complete the import Note You should use Import contacts with care Importing contacts that already exist in your contact list will create duplicates in the list Export contacts Export part or all of your contacts to the Memory card microSD card or a Bluetooth device Export to t...

Page 19: ...hone is on and press and hold the SOS button on the back of your phone for 5 seconds Your phone will start calling your emergency contacts one by one starting from the first one until a call is answered or you press to deactivate the SOS function Your phone will send an SOS message to each contact it calls For each contact it calls your phone will keep calling for up to 10 seconds before trying th...

Page 20: ... list and press OK to assign its phone number Method 2 You can use this method to assign a speed dial phone number to a number key 2 9 M1 or M2 with no speed dial phone number assigned 1 Return to the home screen 2 Short press M1 or M2 or press and hold a number key 2 9 3 Press the right soft key when the confirmation appears 4 Choose a contact from the contact list and press OK to assign its phon...

Page 21: ...s for your message if needed You can press to remove receivers 4 Press key to access the message input field 5 Enter your message using the keypad or Voice Assistant 6 If needed press the right soft key to add a subject or attachment s to your message 7 Press the left soft key to send your message When adding an attachment to a message you can select the attachment from Gallery select a picture fr...

Page 22: ...right soft key When you are on the Messages home screen you can delete one or more conversations by pressing the right soft key selecting Select thread selecting the conversations you want to delete from the list and pressing the right soft key twice 14 4 Changing messaging settings To view and change the messaging settings go to MENU Messages press the right soft key and select Settings You can c...

Page 23: ...ite and send an email follow the steps below 1 From an email account inbox press the left soft key to compose a new email 2 Enter the recipient s email address in the To field or press the right soft key to add a contact s email address If you add more than one email address separate each address with a space or comma 3 To add a CC BCC field or add an attachment to the email highlight the Subject ...

Page 24: ...ake voice calls with WhatsApp you must add a contact Note that you can add only those contacts who have already registered their phone numbers on WhatsApp To add a contact when no contact appears on the Chats tab of the WhatsApp home screen follow the steps below 1 From the Chats tab of the WhatsApp home screen press OK 2 Select Phone memory or SIM memory 3 Enter the new contact s name and phone n...

Page 25: ...ing WhatsApp voice call you can 1 Press the left soft key to answer the call 2 Press the right soft key to decline the call 17 FACEBOOK You can use Facebook to connect with your family friends and others around the world You must connect your phone to the internet to use Facebook on your phone To open Facebook press the left navigation key from the home screen press the up navigation key to select...

Page 26: ...ht soft key to continue 4 Press the navigation key to hover the cursor over the Log In button and press OK 18 WI FI CONNECTION Wi Fi provides wireless internet access over distances of up to 100 meters To use your phone s Wi Fi you need access to a wireless access point or hot spot The availability and range of the Wi Fi signal depend on a number of factors including obstructions and interference ...

Page 27: ...rms go to MENU Clock Alarm Options Settings Snooze 20 MEDIA 20 1 Camera and video You can use the Camera app to take and share photos and videos Your phone comes with a 3 megapixel rear camera and a 2 megapixel front camera that let you capture sharp photos and videos To open the Camera app use either of the following methods Press the Camera key from the home screen Go to MENU Camera Tips Press t...

Page 28: ...options for the highlighted picture and the picture list press the right soft key The available options include Delete Edit Add to Remove from favourites Share Select Multiple File Info and Sort and Group e g by date and time To view the highlighted picture in full screen mode press OK When viewing a picture in full screen mode you can press the right soft key to view all the available options inc...

Page 29: ...to the audio player press this key again Press the right soft key to view the available options Volume Shuffle on off Repeat all one off Share and Save as ringtong Notes If you press to minimize the Music app while an audio file is playing your phone will keep playing the audio in the background To stop the playing you must manually pause the audio in the app The Music app s audio player will show...

Page 30: ...to view the available options or the left soft key to return to the home screen of the web browser To exit the web browser while viewing a web page press the right soft key and select Quit browser or long press To minimize the web browser while viewing a web page press one or more times The web browser will show you your last viewed web page when you reopen the app later 22 CALENDAR You can use th...

Page 31: ... place and press OK and highlight an event from the list if there is more than one event for that hour 3 Press OK to view the event details 4 If needed press the right soft key to edit the event or the left soft key to delete it 5 While viewing the event details press to exit and return to the previous view 22 4 Changing calendar settings To view and change the calendar settings go to MENU Calenda...

Page 32: ...o start the search If there are apps that match the keyword they will be listed below the search bar 5 Press the down or up navigation key to highlight an app in the list and press OK to view its details 6 To start a new search press to return to the search results page press the up navigation key to highlight the search bar modify your keyword and follow the same instructions above Tip To more ea...

Page 33: ...t using the default name List x press the right soft key directly 3 Press the left soft key enter apples in the Task Name field and press the right soft key to save the item 4 Repeat Step 3 above to add beer and cookies to the shopping list Tips To check or uncheck an item in a to do list highlight it and press OK To edit or delete an item in a to do list highlight it press the right soft key and ...

Page 34: ...e and enter a new one Tip After you have selected a measurement unit type such as Length from the Unit Converter home screen you can change the unit for either input field by pressing OK and selecting a different unit such as km from the list 25 MEMORY CLEANER You can use the Memory Cleaner app to automatically remove unnecessary files e g temporary files created by the web browser from your phone...

Page 35: ...nd career daily as well as the love match index of each constellation Note Use this app like a notebook to take notes QR Reader This app automatically recognizes a QR code and takes you where you need to go 27 GEOLOCATION Your phone uses GPS and additional supplemental information such as Wi Fi and mobile networks to approximate your location Location data may be used by KaiOS and service provider...

Page 36: ... is requested every time the phone screen turns on When the screen is locked the user is only allowed to make emergency calls or use the camera To turn on the screen lock follow the steps below 1 Go to MENU Settings Privacy Security Screen Lock 2 Select Screen Lock off and then select On 3 Enter a new passcode 4 digits twice 4 Select Create After the screen lock is turned on you can turn it off or...

Page 37: ...le Option Description Carrier Display the network operator of the SIM card if has been inserted Data Connection Turn this on to allow apps to use the mobile network when needed Turn this off to avoid incurring charges for data use on your mobile network particularly if you do not have a mobile data agreement Data Roaming Turn data roaming on or off When abroad this will allow the use of mobile dat...

Page 38: ...iption Call Waiting Enable disable call waiting Caller ID Set how your phone number is displayed when making a call Call Forwarding Set how your calls are forwarded when you are busy a call is unanswered or you are unreachable Call Barring Set call barring on incoming and outgoing calls Fixed dialling numbers Restrict numbers from being dialed on this phone Emergency numbers are not affected by th...

Page 39: ...ther or traffic conditions in a particular region For available channels and relevant channel settings contact your network operator Notes Not all network operators provide the cell broadcast messaging function in their networks Cell broadcast messages cannot be received when your phone is roaming 31 2 Personalisation Sound Volume Adjust the volume for Media Ringtones Alerts and Alarm separately T...

Page 40: ...ct the input languages to use when entering text You can select multiple input languages and switch between them by pressing and holding the key while in a text input field Note Whenever you switch to a different input language the input mode will be switched to Abc Answer Mode Turn Flip open to answer on or off When this is on you can answer an incoming call by opening the flip opening cover 31 3...

Page 41: ...s Contacts Camera and other apps Media external View the amount of external microSD card storage space used by each type of media file 31 5 Device Device Information You can use this menu to access important phone information and update or reset your phone The following options are available Option Description Phone Number View your phone number If no SIM card is inserted this is not visible Model...

Page 42: ...n Off TTY Select a TTY mode Full VCO or HCO to turn it on or select Off to turn it off Hearing Aid Compatibility HAC Turn Hearing Aid Compatibility HAC On Off 31 6 Account KaiOS Account You can use this menu to set up sign in to and manage your KaiOS account Anti Theft You can use this menu to enable or disable the Anti Theft function This menu is enabled only after you have signed in to your KaiO...

Page 43: ...emble the mobile phone or battery Do not store the phone with flammable or explosive products Do not charge the mobile phone without the battery 32 2 Network services and costs This mobile phone is approved for use on the GSM 850 900 1800 1900 MHz 3G BAND 1 8 4G BAND 1 3 7 8 20 B38 networks To use the device you should subscribe to the services of a mobile service provider The use of such services...

Page 44: ... distract your attention and cause an accident Set your headset at a moderate level and do not hold your device near your ear when the loudspeaker is turned on 32 7 Precautions for electronic devices Some electronic devices are susceptible to electromagnetic interferences from mobile phones if inadequately shielded such as the electronic system of vehicles consult the manufacturers of devices befo...

Page 45: ...al battery or a battery approved by the manufacturer Using any unauthorized battery can affect the performance of your device or cause a risk of explosion etc Keep the battery out of reach of children WARNING If the battery is damaged do not discard it In case of a leak and the battery fluid comes in contact with the eyes or skin wash thoroughly with clear water and consult a doctor 32 12 Power ad...

Page 46: ...RUCTIONS Disconnect the power adaptor from electrical outlet and switch phone off before cleaning Use damp or anti static cloth for cleaning Do not use dry cloth or conductive fabrics Do not use chemical or abrasive cleaners This phone and its accessories including power adaptor are not waterproof Do not clean this phone under running water or immerse it in water or any other liquids Clean chargin...

Page 47: ...7 dB Bluetooth under mode Class 2 6 4 dBm under mode BEL 20 dBm This BT has two modes Power adapter Model name ES007 U050100XOE Output current 1 0 A Input voltage AC 100 240 V Output power 5 0 W Input AC frequency 50 60 Hz Average active efficiency 75 88 Output voltage 5 0 V DC No load power consumption 0 1 W Specific Absorption Rate SAR This device complies with international safety standards for...

Page 48: ...e you have purchased the product Battery recycling This symbol on the battery indicates that at the end of life the battery should not be discarded with other household waste Separate the battery from other types of waste and recycle it via the local system of free waste collection of batteries in order to preserve the natural resources and encourage the reuse of materials 36 WARRANTY AND AFTER SA...

Reviews: