


- 78 -
This television is designed to be environment friendly.
To reduce energy consumption, you can follow these
steps
If you set the
to
,
or
the TV will reduce the energy
consumption accordingly. If you like to set the
to a xed value set as
and adjust
the
(located under the
setting) manually using Left or Right buttons on the
remote. Set as
to turn this setting off.
Available
options may differ depending
on the selected
in the
menu.
The
settings can be found in the
menu. Note that some picture
settings will be unavailable to be changed.
If pressed Right button while
option is selected or
Left button while
option is selected,
message will be displayed
on the screen. Select
and press
OK
to turn
the screen off immediately. If you don t press any
button, the screen will be off in 15 seconds. Press
any button on the remote or on the TV to turn the
screen on again.
Note: Screen Off
option is not available if the Mode is set
to
.
When the TV is not in use, please switch off or
disconnect the TV from the mains plug. This will also
reduce energy consumption.
Remote controlled colour TV
Fully integrated digital terrestrial/cable/satellite TV
(DVB-T-T2/C/S-S2)
Fransat Installation Option
HDMI inputs to connect other devices with HDMI
sockets
USB input
OSD menu system
Scart socket for external devices (such as DVD
Players, PVR, video games, etc.)
Stereo sound system
Teletext
Headphone connection
Automatic programming system
Manual tuning
Automatic power down after up to eight hours.
Sleep timer
Child lock
Automatic sound mute when no transmission.
NTSC playback
AVL (Automatic Volume Limiting)
PLL (Frequency Search)
PC input
Game Mode (Optional)
Picture off function
Programme recording
Programme timeshifting
802.11 a/b/g/n WIFI Support via USB dongle
Audio Video Sharing
HbbTV
Remote Control
Batteries 2 x AAA
Instruction Book
DC 12 V Input Power Adaptor
Car Plug
If the TV does not receive any input signal (e.g. from
an aerial or HDMI source) for 3 minutes, it will go
into standby. When you next switch-on, the following
message will be displayed
Press
OK
to continue.
If the TV is on and it isn t being operated for a while
it will go into standby. When you next switch-on, the
following message will be displayed.
Press
OK
to continue.
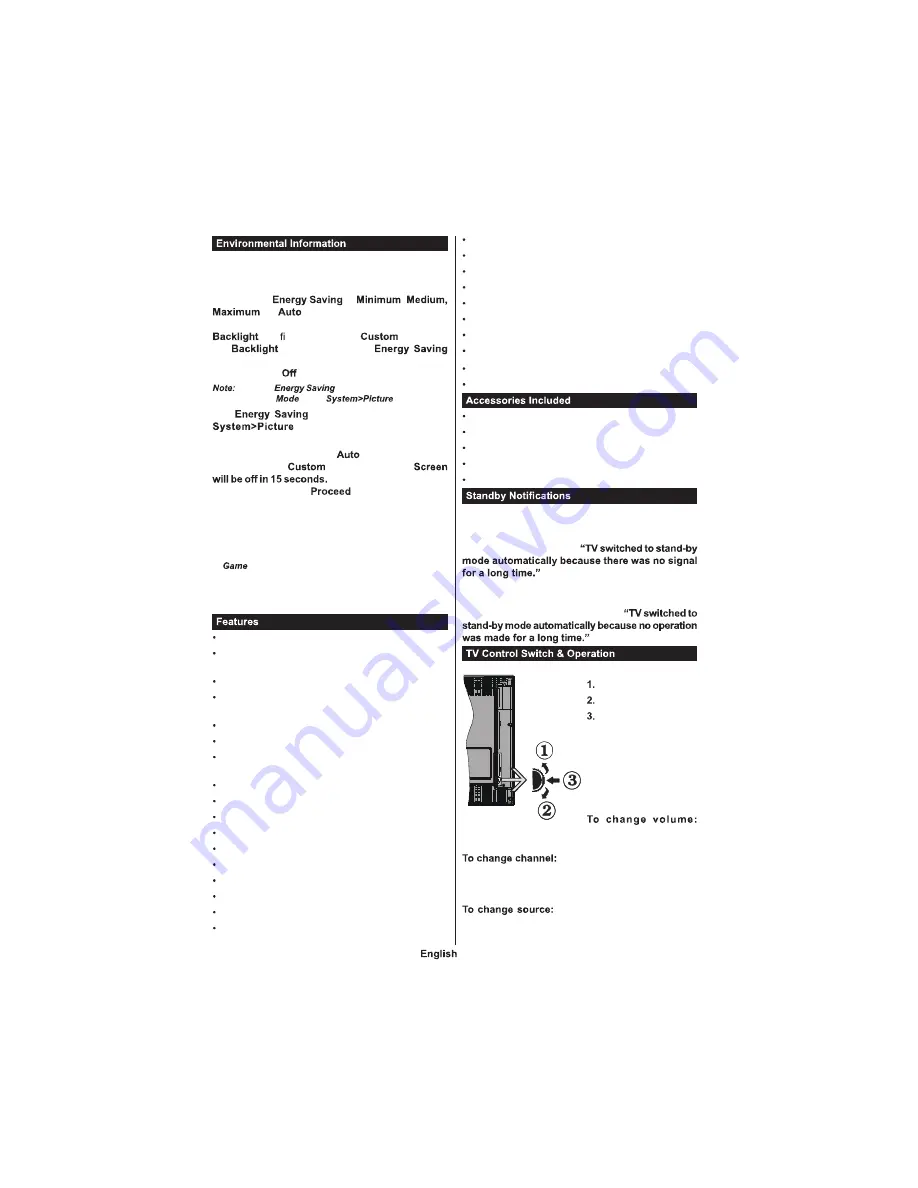
Up direction
Down direction
Vo l u m e / I n f o /
Sources List selection
and Standby-On switch
T h e C on t r ol bu t t on
allows you to control the
Volume / Programme /
Source and Standby-On
functions of the TV.
Increase the volume by pushing the button up.
Decrease the volume by pushing the button down.
Press the middle of the button,
the information banner will appear on the screen.
Scroll through the stored channels by pushing the
button up or down.
Press the middle of the button
twice(for the second time in total), the source list will
Summary of Contents for TSV20D
Page 1: ......
Page 36: ...111 A B Sizes mm W H 75 75 C es D th X min mm 5 max mm 8 E M4...
Page 38: ......
Page 39: ......
Page 40: ......


