background image

How to Guide 

           Audio Loudness Monitoring 

4     

www.tektronix.com\wfm8000


www.tektronix.com\wfm7100


www.tektronix.com\wfm5200


How to Configure the Audio Loudness Monitoring 


1.  Select one of the tiles (1,2,3,4) and press the 

Audio

 button 

2. Select 

FULL

 to make the display full screen, pressing 

FULL

 again will toggle back to 

FlexVu™. 
On WFM/WVR5200 series use the Thumbnail button to cycle through the tiles and push 
and hold the Thumbnail button to toggle between Full and four tile modes. 

3.  Press and hold the 

Audio

 button to display the menu. 

4.  Move up and down the menu using the Arrow Keys or General Knob to the 

Loudness 

Meter

 menu. 

5.  Enter the sub menu by pressing 

SEL

 and navigate to the 

Program

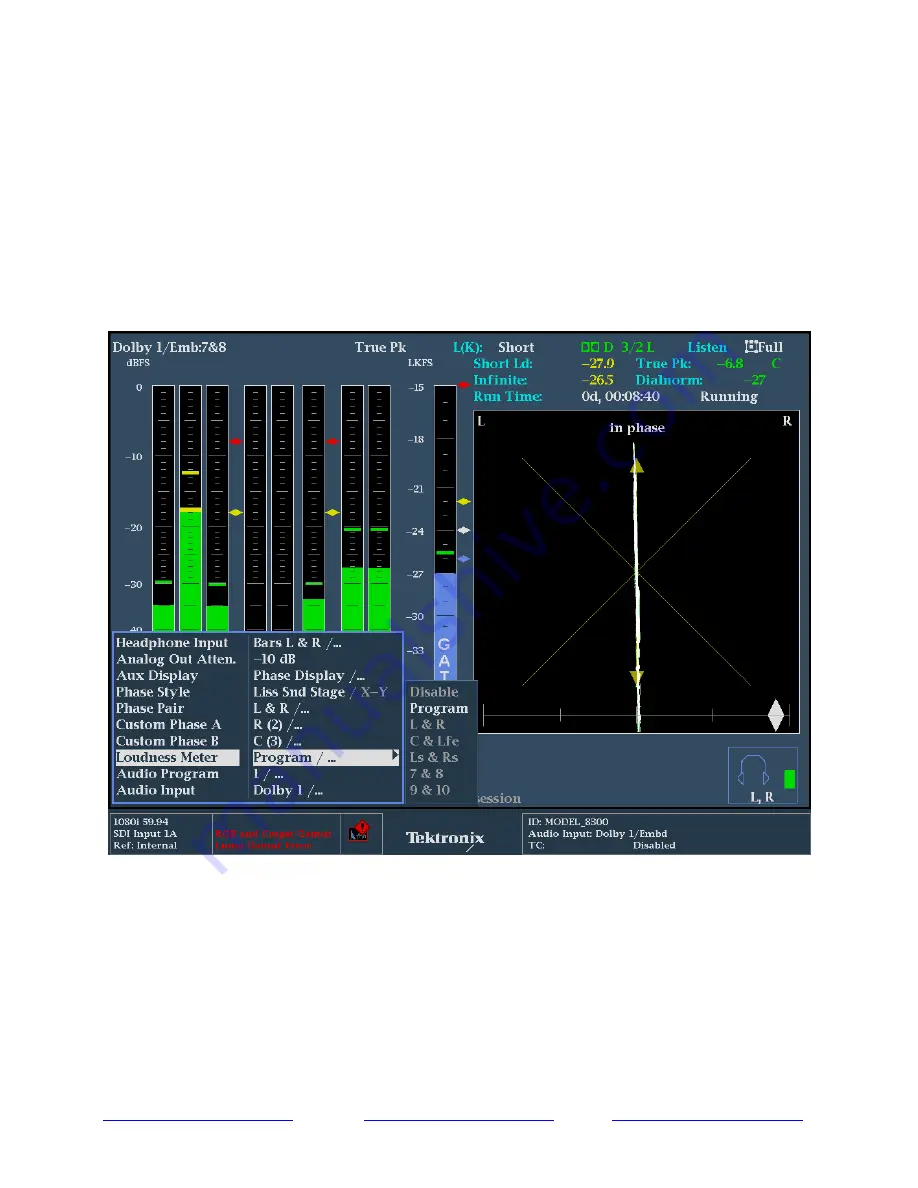
 selection. (Figure 1) 


     Figure 1.   

Audio Display with Audio Loudness Meter. 

Summary of Contents for WFM5200 & WVR5200

Page 1: ...How to Guide Audio Loudness Monitoring WFM8300 8200 WVR8300 8200 WFM6120 7020 7120 WVR6020 7020 7120 WFM5200 WVR5200 ...

Page 2: ...ion Version 6 1 4 also supports Dolby Digital Plus when the DPE or DDP option is installed within the instrument WFM8300 8200 WVR8300 8200 Version 2 5 x This release version 2 5 x adds support for Audio Loudness measurements to the ITU R BS 1770 standard with support for ATSC A 85 recommended practice and EBU R128 Version 2 5 x also supports Dolby Digital Plus when the DPE or DDP option is install...

Page 3: ...ge loudness for the various programs they are transmitting Loudness is a subjective measurement and is primarily a psychological correlation with the physical intensity of the audio signal Different people will perceive the loudness of the signal differently and therefore a variety of techniques have been used to characterize the overall loudness of the signal The ITU R BS 1770 standard algorithms...

Page 4: ...ssing FULL again will toggle back to FlexVu On WFM WVR5200 series use the Thumbnail button to cycle through the tiles and push and hold the Thumbnail button to toggle between Full and four tile modes 3 Press and hold the Audio button to display the menu 4 Move up and down the menu using the Arrow Keys or General Knob to the Loudness Meter menu 5 Enter the sub menu by pressing SEL and navigate to t...

Page 5: ... the Loudness measurements within the Loudness Settings menu To simplify the operation of the instrument Loudness Presets are available to quickly configure the unit to the appropriate standard recommendations 1 Press the Config button to enter the configuration menu 2 Move up and down the menu using the Arrow Keys or General Knob to the Loudness Settings menu 3 Press SEL to enter the sub menu and...

Page 6: ...pressing the HELP button on the front of the instrument Elements of Audio Display with Loudness Measurements Figure 3 Audio Tile Display 1 Loudness Meter is enabled from within the Audio Tile menu and can be selected to show the Loudness for the program a channel pair or disabled and not displayed within the audio tile The Program Loudness PL is a summation of a number of audio channels The channe...

Page 7: ...applied then some measurement results may be excluded from the loudness measurements 4 Dialnorm An AC 3 metadata parameter numerically equal to the absolute value of the Dialog Level carried in the AC 3 bit stream Valid values are 1 31 The value of 0 is reserved The values of 1 to 31 are interpreted as 1 to 31 This display shows the current metadata value decode from the Dolby stream or from the S...

Page 8: ...udio channel is included in the Loudness summation Whereas a White channel label indicates that the audio channel is not included in the Loudness summation The summation of the number of channels can be configured by the user within the Loudness Settings menu 8 Audio Program number Specifies the audio program currently being used for the program loudness Within the Config menu the audio program ca...

Page 9: ...les and push and hold the Thumbnail button to toggle between Full and four tile modes 3 Press and hold the Audio button to display the menu 4 Move up and down the menu using the Arrow Keys or General Knob to the Aux Display menu 5 Enter the sub menu by pressing SEL and navigate to the Loudness selection Figure 4 Figure 4 Loudness Readouts within Audio Display Figure 4 provides large number readout...

Page 10: ... full screen pressing FULL again will toggle back to FlexVu On WFM WVR5200 series use the Thumbnail button to cycle through the tiles and push and hold the Thumbnail button to toggle between Full and four tile modes 3 Press and hold the Status button to display the menu 4 Move up and down the menu using the Arrow Keys or General Knob to the Display Type menu 5 Enter the sub menu by pressing SEL an...

Page 11: ...TU R BS 1771 For audio loudness measurements a calculation for each channel and channel pairs is shown in the audio session display along with the Program Loudness for the short and infinite duration The Program Loudness measurement is based on a summation of a number of the audio channels and the duration of the measurement The information on the number of channels summed together is provided wit...

Page 12: ... Configure the Loudness Session Display 1 Select one of the tiles 1 2 3 4 and press the Status button 2 Select FULL to make the display full screen pressing FULL again will toggle back to FlexVu On WFM WVR5200 series use the Thumbnail button to cycle through the tiles and push and hold the Thumbnail button to toggle between Full and four tile modes 3 Press and hold the Status button to display the...

Page 13: ...ilable within the instrument A trend chart Figure 6 that shows a graph of the loudness measurements for the last 90 or 180 seconds and a bar chart that shows the maximum and minimum loudness value during each bar period and can show the loudness variations from 7 5 minutes to 30 hours instrument Figure 7 Figure 6 Loudness Session Trend Chart 90 Seconds ...

Page 14: ...rting can be temporarily muted Graph Scale The horizontal scale of the chart can be changed from 0 90 and 180 seconds trend chart to 7 5 minute to a 30 hour bar chart Graph Gain The vertical gain of the chart can be changed between 0 60 8 40 and 12 36dB Save History to USB Allows downloading of all loudness session data to a memory stick inserted into the front of the waveform monitor Alternativel...

Page 15: ...oudness Session chart continue to accumulate until you manually restart the data collection or cycle the power With the Loudness Session displayed and selected as the active tile Bright Blue border around tile Press and hold the STATUS button to display the STATUS pop up menu Scroll to History Reset and press SEL to reset the session Figure 7 Loudness Session Bar Chart six hour duration ...

Page 16: ... based on duration of audio session 5 Dialnorm is the metadata value that is present either within the Dolby data stream or carried as an Ancillary data packet per SMPTE2020 6 True Peak is the maximum true peak value recorded by the audio meters More detailed information on the true peak level of each channel is displayed within the audio session 7 Max Value The maximum Loudness value recorded wit...

Page 17: ...sfer of the file 5 The Loudness Session data will be automatically stored in a folder using the Instrument name InstrumentName LoudnessHist Within this folder a file will be created of the Loudness History using the Instrument Name Date and Time of the instrument as the file name 6 Once the data is saved to the memory stick please remember to Unmount the device which can be done under the Main but...

Page 18: ...ed between the PC and instrument a Tektronix Remote Interface web page should be displayed 10 Select View Loudness History text html from this web page Figure 8 Depending on your network connection speed and the length of the Loudness History this download process can take several minutes 11 The file can be saved to your PC using the web browser application Figure 8 Tektronix Remote Interface Once...

Page 19: ...or General Knob to select the Loudness Settings menu Figure 9 3 Press SEL to enter sub menus and scroll up and down to select the desired function The following information is provided on each function available within the Loudness Settings menu This information is also available by pressing Help button on the instrument or browsing the On line documentation when connected to the instrument via a ...

Page 20: ... 85 This preset loads a configuration in compliance with ATSC A 85 and configures the following settings Loudness Filter Measure LKFS BS 1770 Momentary Integration Time IEC 62672 125ms Average Integration Time 10 seconds Channel Weighting ITU R BS 1770 Custom Mask Press SEL Target Loudness 24LKFS Target Loudness High 2LU Target Loudness Low 2LU Gating Type Disabled Safety Gating Level 99LKFS Relat...

Page 21: ... in compliance with IEC 61672 and configures the following settings Loudness Filter Measure Leq A Momentary Integration Time IEC 62672 125ms Average Integration Time 10 seconds Channel Weighting Custom Custom Mask Press SEL Target Loudness 24dBFS Target Loudness High 2dB Target Loudness Low 2dB Gating Type Disabled Safety Gating Level 99dBFS Relative Gate level 0dB Loud A D Conversion 20dBFS ARIB ...

Page 22: ...isplaying the loudness ballistic The Program or Channel Pair audio loudness bar displays Loudness measurements and readings in the Audio Display Audio Session Display Audio Loudness Display and Dolby Status Displays The Audio Loudness Session display The currently selected filter is shown within the Audio Display above the Loudness Bar or within the Surround Sound display Momentary Integ Time Aver...

Page 23: ...when the signal level decreases Loudness F has a 0 125 second time constant IEC62672S This time weighted function applies to the audio level meters and affects how slowly the bars rise when the signal level increases and fall when the signal level decreases Loudness S has a 1 second time constant EBU R 128M This measurement applies the M Momentary ballistic per EBU R 128 with a 400ms integration t...

Page 24: ...am Loud The loudness level threshold for all channels used by the Loudness measurement above which the loudness value triggers an alarm condition This alarm will trigger an in bar audio message of Too Loud Program Quiet The loudness level threshold for all channels used by the Loudness measurement below which the loudness value triggers an alarm condition This alarm will trigger an in bar audio me...

Page 25: ...ed within the loudness measurement The default limits is 99LKFS and is user selectable This value is used when Gating type is set to Safety Only Relative Gate Level The loudness level set for Relative Gating measurements When the difference between the current measurement and the overall measurement exceed the relative threshold Then these loudness measurement values will not be included in the ov...

Page 26: ...0 References WFM WVR8000 Series Waveform Monitors WFM WVR7200 Series Waveform Monitors WFM6000 7000 Series Waveform Monitors WVR6000 7000 Series Waveform Monitors WFM WVR5200 Series Waveform Monitors Data Sheets Fact Sheets and additional product materials can be found www tektronix com video_test signal_monitors html ...

Page 27: ...How to Guide Audio Loudness Monitoring 27 www tektronix com wfm8000 www tektronix com wfm7100 www tektronix com wfm5200 ...

Page 28: ...a 65 6356 3900 Austria 00800 2255 4835 Balkans Israel and other ISE Countries 41 52 675 3777 Belgium 00800 2255 4835 Brazil 55 11 3759 7600 Canada 1 800 833 9200 Central East Europe Ukraine and the Baltics 41 52 675 3777 Central Europe Greece 41 52 675 3777 Denmark 45 80 88 1401 Finland 41 52 675 3777 France 00800 2255 4835 Germany 00800 2255 4835 Hong Kong 400 820 5835 India 000 800 650 1835 Ital...

Reviews: