29
Dial Test Indicator
Inspection procedure
Lathe Spindle Inspection
Inspect the lathe spindle itself first before inspecting the chuck runout. The runout of
the chuck could be caused a misaligned spindle.
Note:
The tolerances specified below is only applicable to NOVA lathes. Lathes from other
manufacturers may have different tolerance standards therefore it is the best to
contact the lathe manufacturer to confirm the spindle tolerances.
Test
Number
Method
Image
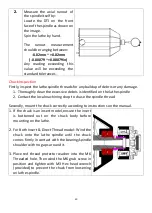
1.
Measure the radial runout of
the spindle itself by:
Locate the DTI on the register
part of the spindle as shown on
the image
Spin the lathe by hand
The runout measurement
should be ranging between:
-0.02mm ~ +0.02mm
(-0.00079” ~ +0.00079in)
Any reading exceeding this
value will be exceeding the
standard tolerances.


