background image

Abatidores de temperatura | Manual de uso y mantenimiento | ES

107

6.2  ESQUEMA

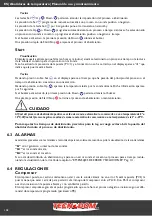
Al encender el aparato, el termostato hace un lamp-test rápido de 5 segundos y luego se pone en “Operativo”.

Stand-by

 Visualización

El display muestra ‘---’.

 Teclas

El termostato puede activarse a través de una pressión de la tecla Set   por 4 segundos. 

Se pone en modo Stop.

Impostación de los programas a tiempo y con sonda al corazón

Stop

 Visualización

El display muestra el tiempo (en horas y minutos) si está seleccionado un proceso a tiempo o la lectura de la 
sonda al corazón para un proceso con la sonda.
El punto decimal arriba del segundo display indica la elección de un proceso negativo.

Summary of Contents for Attila 10 TRAYS

Page 1: ...TURA BLAST CHILLERS CELLULES DE REFROIDISSEMENT SCHNELLKÜHLER ABATIDORES DETEMPERATURA ارة ر الح درجة مربدات AR MANUALE D USO E MANUTENZIONE USER AND MAINTENANCE MANUAL NOTICE DÉ UTILIZATION BEDIENUNGS UND WARTUNGSANLEITUNG MANUAL DE USO Tecnodom S p A Via Isonzo n 3 5 35010 Vigodarzere Padova Italy ...

Page 2: ...to positivo si ha il passaggio automatico in conservazione ad una temperatura da 0 a 3 C Al termine della fase di abbattimento negativo si ha il passaggio automatico in conservazione ad una temperatura da 22 a 25 C Per rispettare i tempi di abbattimento previsti per legge mentre è in corso un ciclo di abbattimento è vivamente sconsigliato aprire la porta dell Abbattitore Quando si sostituiscono de...

Page 3: ...6 3 ALLARMI Pag 20 6 4 REGOLAZIONI Pag 21 7 MANUTENZIONE GESTIONE RIFIUTI SMALTIMENTO MATERIALI Pag 22 7 1 CONTROLLI PERIODICI Pag 22 7 2 SOSTITUZIONE MOTOVENTILATORE Pag 22 7 3 SOSTITUZIONE COMPRESSORE GAS REFRIGERANTE Pag 22 7 4 SMALTIMENTO MATERIALI E GESTIONE RIFIUTI Pag 22 7 5 ORDINARE LE PARTI DI RICAMBIO Pag 23 8 MESSAGGI DI ERRORE E SOLUZIONI Pag 23 DICHIARAZIONE DI CONFORMITA Pag 133 DECL...

Page 4: ... per compiere in modo corretto e sicuro tutte le operazioni di installazione messa in funzione smontaggio e smaltimento dell apparecchio Questo manuale d uso e manutenzione contiene tutte le informazioni necessarie per una buona gestione dell impianto con particolare attenzione alla sicurezza CONSERVAZIONE DEL MANUALE Il manuale d uso e manutenzione deve essere conservato integro ed in luogo sicur...

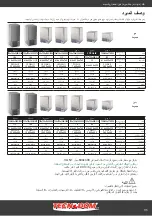
Page 5: ...50x770 790 750x750x890 910 750x750x1260 1280 750x750x1260 1280 750x750x1260 1280 750x750x1850 1870 750x750x2080 2100 PESO NETTO kg 51 60 76 77 77 104 119 DIMENSIONI CAMERA WxDxH mm 616x430x270 616x430x390 616x430xx760 616x430x760 616x430x760 616x430x1110 616x430x1340 CAPACITA TG 3 GN1 1 3 600x400 5 GN1 1 5 600x400 7 GN1 1 7 600x400 10 GN1 1 10 600x400 10 GN1 1 10 600x400 15 GN1 1 15 600x400 20 GN1...

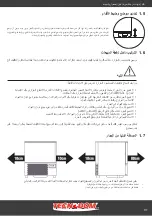
Page 6: ...ENSIONI PESI Kg Le operazioni di scarico carico Abbattitore devono essere eseguite con transpallet o carrello elevatore che sia condotto da personale specializzato ed abilitato Si declina ogni responsabilità per la non osservanza delle norme di sicurezza vigenti in materia Prima di iniziare le operazioni di scarico posizionamento ed installazione dell Abbattitore di Temperatura all interno del pun...

Page 7: ...pio formazione di condensa etc ATTENZIONE In modo da permettere un buon funzionamento dell Abbattitore di Temperatura prestare attenzione alle seguenti indicazioni Non posizionare l Abbattitore con esposizione diretta ai raggi solari ed a tutte le altre forme di irraggiamento quali illuminazione ad incandescenza ad alta intensità forni di cottura o corpi radianti tipo radiatori per riscaldamento N...

Page 8: ...Abbattitore con possibile deterioramento dei prodotti esposti e con maggior consumo di energia Se l Abbattitore con unità condensatrice incorporata e venisse inclinato si consiglia di attendere almeno 8 ore prima di procedere all avviamento in modo che l olio presente nel compressore defluisca al suo interno e tutti i suoi componenti né risultino lubrificati nuovamente successivamente si potrà pro...

Page 9: ...bile dal tecnico in caso di manutenzione 4 È necessario che la sezione del cavo di alimentazione sia adeguata alla potenza assorbita dal gruppo 5 È obbligatorio a termine di legge la messa a terra dell impianto pertanto è necessario collegarlo ad un efficiente impianto di messa a terra Se il cavo di alimentazione è danneg giato esso deve essere sostituito dal costruttore o dal suo servizio assiste...

Page 10: ...e con unità ferma togliendo tensione sia all apparecchio refrigerato che all unità condensatrice 3 1 PULIZIA CAMERA DELL ABBATTITORE La manutenzione dell Abbattitore deve includere almeno una pulizia periodica giornaliera della zona di carico per prevenire lo sviluppo e l accumulo di batteri ATTENZIONE È indispensabile tenere pulito giornalmente l Abbattitore per prevenire lo sviluppo e l accumulo...

Page 11: ...otto detergente informatevi presso il vostro fornitore di fiducia sul detergente neutro privo di cloro per evitare corrosioni sull acciaio In caso di graffi sulle superfici è necessario levigarle con lana di ACCIAIO INOX finissima o spugnette abrasive di materiale sintetico fibroso strofinando nel senso della satinatura Si raccomanda per la pulizia dell ACCIAIO INOX non usare mai pagliette di ferr...

Page 12: ...MANUALE Lo sbrinamento dell Abbattitore avviene in modo manuale e può essere eseguito con porta aperta o con porta chiusa in quest ultimo caso il tempo di sbrinamento sarà maggiore ATTENZIONE Dopo che l Abbattitore ha terminato il ciclo di abbattimento si deve togliere il tappo di scarico dell acqua della piletta in questo modo si farà defluire l acqua di condensa all interno della va schetta La p...

Page 13: ...le acustico l Abbattitore passerà in modalità conservazione vedere posizione sonda spillone TIPO DI ABBATTIMENTO TIPO DI CICLO TIPO DI PRODOTTO CARICO PRODOTTO CICLOAL CUORE DEL PRODOTTO POSITIVO A piena velocità Per tutti gli alimenti densi o di grosse pezzature max 4 kg per teglia 3 C MAX 90 min NEGATIVO A piena velocità Per tutti gli alimenti densi o di grosse pezzature 3 kg Fino a 18 C 240 min...

Page 14: ... a ridosso dell evaporatore Ripartire in spazi uguali la distanza fra teglia e teglia CONSERVAZIONE PRODOTTO COTTO ED ABBATTUTO Il prodotto cotto ed abbattuto può essere conservato in frigorifero mantenendo le qualità orga nolettiche fino a 5 giorni da quello di trattamento È importante rispettare la catena del freddo mantenendo durante la conservazione una temperatura costante compresa tra 0 C 4 ...

Page 15: ...iano riportate con caratteri indelebili come segue il contenuto il giorno di preparazione la data di scadenza assegnata ATTENZIONE Alimenti già scongelati non possono essere ricongelati 4 3 PROCEDURE PER L AVVIAMENTO DELL ABBATTITORE CICLO DI ABBATTIMENTO CON SONDA SPILLONE 1 Premere l interruttore verde 2 Premere il tasto SET per selezionare le temperature standard 3 C o 18 C 3 Premere Start Stop...

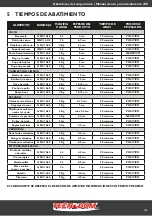
Page 16: ...Temperatura 30 C LATTICINI Formaggi 4 6 6 Burro 8 12 15 CARNI E POLLAME Manzo 9 12 18 Vitello 6 12 18 Agnello 6 12 18 Maiale 4 12 15 Pollame 5 9 12 18 Conigli oche 4 6 Anatre tacchini 4 6 Selvaggina 6 10 12 12 PESCE Magro 6 8 12 15 Grasso anguilla sgombro salmone aringa 3 4 7 8 8 9 Crostacei 3 4 12 17 Molluschi 2 3 10 12 VERDURE e FRUTTA Ortaggi 12 18 24 Frutta 12 18 24 PASTICCERIA DESSERT Dolci 2...

Page 17: ... minuti POSITIVO Roast beef GN1 1 h40 4 Kg 10 15 cm 80 minuti POSITIVO PESCE Cernia al forno intera GN1 1 h40 3 Kg 5 10 cm 90 minuti POSITIVO Cicale di mare GN1 1 h40 2 Kg 3 cm 25 minuti POSITIVO Cozze sottovuoto GN1 1 h60 2 Kg max 3 4 cm 20 minuti POSITIVO Insalata di pesce GN1 1 h40 4 Kg 3 4 cm 30 minuti NEGATIVO Polipo bollito GN1 1 h60 5 Kg 60 minuti POSITIVO Seppie in umido GN1 1 h60 4 Kg 4 5...

Page 18: ...imento negativo o surgelazione Fine abbattimento con sonda al cuore o a tempo Conservazione Sbrinamento manuale senza resistenza senza gas caldo Tramite una serie di parametri è possibile escludere alcune funzioni o cambiarne altre All utente finale cuoco è permesso la selezione del tipo di abbattimento e l impostazione del tempo se non è stata selezionata la sonda al cuore Posizione pannello di c...

Page 19: ...e effettua un lamp test di 5 secondi dopo di che si pone in Operativo Stand by Visualizzazione Il display visualizza Tasti Il pannello di controllo si pone in modalità Stand by se a cicli di abbattimento fermi viene premuto il tasto SET per 4 secondi Impostazione programmi a tempo e con sonda al cuore ...

Page 20: ...mpare dr ad indicare che la porta è aperta Tasti Durante il programma Sonda al cuore ed il programma Tempo premendo il tasto SET si visualizza il tempo trascorso da inizio ciclo Premendo Up viene visualizzata la temperatura letta dalla sonda camera Tale visualizzazionepermane per 5 sec Se è attivo il buzzer la prima pressione di Down permette di tacitare il buzzer Una pressione semplice di Start S...

Page 21: ... indicati 0 1 10 10 n P1 Presenza Porta 0 Porta assente 1 Porta presente 0 1 1 1 n P2 Ventilatore in abbattimento 0 in parallelo al compressore 1 sempre accesi 0 1 1 1 n P3 Abilitazione sonda al cuore 0 1 1 1 n P4 Abilitazione abbattimento negativo 0 1 1 1 n P5 Abilita Sbrinamento 0 1 1 1 n P6 Ferma utenze a porta aperta 0 Compressore Ventole 1 Ventole 0 1 1 1 n P7 Configurazione RL2 0 Sbrinamento...

Page 22: ...nsatore dell unità refrigerante 7 2 SOSTITUZIONE MOTOVENTILATORE Se il mobile è dotato di motoventilatore e si necessita sostituirlo togliere la tensione di alimentazione verificare la targhetta dati tecnici del motoventilatore e sostituirlo con uno di identica potenza voltaggio e frequenza 7 3 SOSTITUZIONE COMPRESSORE GAS REFRIGERANTE Nel caso di danneggiamento e o sostituzione del compressore re...

Page 23: ...rollare di aver caricato il prodotto nel modo corretto e non eccessivamente Alleggerire il carico delle vaschette o teglie Controllare che la ventola interna della cella giri Contattare l assistenza Assicurasi che la temperatura del laboratorio non sia eccessivamen te alta e con alto tasso di umidità Contattare l assistenza Mancato mantenimento dell alimento alla fine del ciclo di abbattimento Con...

Page 24: ... conservation program is set automatically at the temperature of 22 to 25 C In order to respect the chilling and freezing time provided by law while a cycle is in progress it is strongly advised against opening the door of the device When parts are being replaced and when removal of the plug is foreseen and removal of the plug is clearly indicated it must be such that an operator may check from an...

Page 25: ... 42 6 4 REGULATIONS Pag 43 7 MAINTANANCE GARBAGE MANAGEMENT DISPOSAL OF MATERIALS Pag 44 7 1 PERIODICAL CHECKS Pag 44 7 2 SUBSTITUTION OFTHE FAN MOTOR Pag 44 7 3 SUBSTITUTION OFTHE COMPRESSOR Refrigerated gas Pag 44 7 4 GARBAGE DISPOSAL Pag 44 7 5 REQUESTING SPARE PARTS Pag 45 8 MESSAGES OF ERROR AND SOLUTIONS Pag 45 DICHIARAZIONE DI CONFORMITA Pag 133 DECLARATION OF CONFORMITY DECLARATION DE CONF...

Page 26: ...qualified technician to conduct all installation procedures connections use and maintenance of the system in a safely manner and correctly This user and maintenance manual contains all the information required for handling the unit with particular attention to safety MANUAL PRESERVATION It is advisable to use the manual with care and in such a way as not to compromise its contents Under no circums...

Page 27: ...1260 1280 750x750x1850 1870 750x750x2080 2100 NETWEIGHT kg 51 60 76 77 77 104 119 CHAMBER DIMENSIONS WxDxH mm 616x430x270 616x430x390 616x430xx760 616x430x760 616x430x760 616x430x1110 616x430x1340 CAPACITY TG 3 GN1 1 3 600x400 5 GN1 1 5 600x400 7 GN1 1 7 600x400 10 GN1 1 10 600x400 10 GN1 1 10 600x400 15 GN1 1 15 600x400 20 GN1 1 20 600x400 SPACE BETWEEN TRAYS cm 7 7 10 5 7 7 7 7 BLAST CHILLING PE...

Page 28: ... any liability for failing to comply with safety rules currently in force Before starting the unloading positioning and installation procedures of the blast chiller freezer inside the shop kitchen according to the model of the blast chiller freezer please read carefully the information showed in the di mensions and weights list APPENDICE 2 Pag 136 The manufacturer declines any responsibilities due...

Page 29: ... not place the blast chiller freezer close to external exits into draught such as doors win dows air vent or air conditioning fans Do not obstruct the blast chiller freezer air inlet Do not place any kind of material on the blast chiller Keep clear the whole blast chiller freezer perimeter in order to allow a proper air circulation Do no place the blast chiller freezer into an high relative humidi...

Page 30: ...t functioning of the item and an easy maintenance 2 ELECTRICAL CONNECTION AND EARTHING 2 1 ELECTRICAL POWER SUPPLY The installation and the electrical connections must be carried out in conformity with the elec trical rules in force These operations must be carried out by qualified staff The company declines any responsibilities originated from the no observance of the above rules in force See the...

Page 31: ...ller be sure that Your hands must be dry The surface of the blast chiller must be dry The floor and the electrical socket must be dry Furthermore be sure that The build in condensing unit blast chiller must be carried only in upright position If it had leaned we recommend to wait at least 8 hours before proceeding with the start so that the oil will flow in all the components lubricating them agai...

Page 32: ...ic acid vinegar bleach or other products that might scratch or grind We recommend to clean the device at least once a month when it used for deep frozen products Attention during the cleaning operations it is recommended to use work gloves 3 2 CLEANINGTHE PROBE The maintenance of the blast chiller must include at least one daily cleaning of the temperature core probe It is essential to keep daily ...

Page 33: ... built in condensing unit is placed in the lower side of the blast chiller Do not use water splashes Attention during the cleaning operations it is recommended to use work gloves ATTENTION The operations of ordinary and extraordinary maintenance are described on the chapter 5 MAINTANANCE GARBAGE MANAGEMENT DISPOSAL OF MATERIALS Pag 34 4 RECOMMENDATIONS AND WARNINGS ATTENTION This professional equi...

Page 34: ... the requested temperature depends on different factors such as The shape the type the thickness and the material in which the food to be chilled is contained The usage of lids above the containers The physical features of the product density water and fat contents The temperature condition of the food to be chilled The setting of the time for the positive chilling and negative blasting must be se...

Page 35: ... air in the blast chiller Do not obstruct the blast chiller freezer air inlets inside the device HEART OF THE PRODUCT For a correct function of the Blast Chiller it is necessary that the products contained inside are well placed in the middle in order to allow a good circulation of the air in the Blast Chiller ATTENTION Children must be kept away from the Blast Chiller LOADING OFTHE FOOD The food ...

Page 36: ...zen can be preserved in the fridge keeping the organoleptic quali ties up to several months from the date of treatment It is important to respect the cold chain maintain ing during the conservation a stead temperature from 0 to 4 C according to the kind of the food Using the vacuum technique the conservation time can be raised until about 15 days The food which is subject to negative cycle can be ...

Page 37: ... end of the cycle when the buzzer starts to ring the machine passes automatically into the conser vation phase 5 To stop the cycle press START STOP BLASTING CYCLE ATTIME 1 Push the green button 2 Push the button SET to select the temperature 3 c or 18 c 3 Afterwards push the button UP DW to set the requested time for the blasting cycle 4 Push the button START to start the cycle 5 At the end of the...

Page 38: ...reezing 30 C DAIRY PRODUCTS Cheese 4 6 6 Butter 8 12 15 POULTRY AND MEAT Beef 9 12 18 Veal 6 12 18 Lamb 6 12 18 Pork 4 12 15 Poultry 5 9 12 18 Rabbit goose 4 6 Duck turkey 4 6 Game 6 10 12 12 FISH Lean 6 8 12 15 Fat eel mackerel salmon herring 3 4 7 8 8 9 Shellfish with pincers 3 4 12 17 Shellfish 2 3 10 12 VEGETABLES AND FRUITS Vegetables 12 18 24 Fruits 12 18 24 PASTRY Cakes 2 4 8 12 PRE COOKED ...

Page 39: ... 5 Kg 4 5 cm 30 minutes POSITIVE Roast beef GN1 1 h40 4 Kg 10 15 cm 80 minutes POSITIVE FISH Grouper GN1 1 h40 3 Kg 5 10 cm 90 minutes POSITIVE Sea cicada GN1 1 h40 2 Kg 3 cm 25 minutes POSITIVE Vacuum packed moules GN1 1 h60 2 Kg max 3 4 cm 20 minutes POSITIVE Fish salad GN1 1 h40 4 Kg 3 4 cm 30 minutes NEGATIVE Boiled polyp GN1 1 h60 5 Kg 60 minutes POSITIVE Humid cuttle fish GN1 1 h60 4 Kg 4 5 ...

Page 40: ...zing or cooling Negative blast freezing or deep freezing Hearth probe or time blast freezing Conservation Manual defrosting without heater or hot gas Thanks to some parameters is possible to erase some functions or change others The final user the cook can select the type of cycle and the chilling time when the core probe is not selected Control panel position ...

Page 41: ...s lamp test when the control stats after that it places in Operative position Stand by Display The display shows Keys The front panel stops in stand by functions if the button SET is pressing for 4seconds when the blasting cycles have been stopped TIME AND CORE PROBE PROGRAMM SETTING ...

Page 42: ...ng the SET key the display shows the time passed from the starting of the cycle or the time of the time cycle in order to reach the cycle temperature if it is in conservation modality Pressing Up the temperature recorded by the room probe is shown This data lasts 5 seconds If the buzzer is on pressing Down to turn it off Press Start Stop to start the cycle ATTENTION At the end of the positive proc...

Page 43: ...bsent 1 door present 0 1 1 1 n P2 Fan during the process 0 together with the compressor 1 always on 0 1 1 1 n P3 Permit to enter the core probe function 0 1 1 1 n P4 Permit to enter the negative process 0 1 1 1 n P5 Permit to enter the defrosting 0 1 1 1 n P6 Stopping functions when the door is open 0 compressor fans 1 fans 0 1 1 1 n P7 Configuration RL2 0 defrosting I fan defrosting 0 1 1 1 n P8 ...

Page 44: ... refrigerating gas leaks and the complete refrigerating system works properly the maintenance state of the electrical system is completely safe the door gaskets and the door itself close properly the condenser of refrigerating unit is clean 7 2 SUBSTITUTION OFTHE FAN MOTOR If the device is provided with a fan motor and it is necessary to remove it it is important to taking off the tension verify t...

Page 45: ... 15 min to melt the ice Check if the product is loaded correctly and does not exceed Lighten the load of trays and grills Check if the internal fan is spinning Contact the assistance Ensure that the laboratory temperature is not too high and with high percentage of humidity Contact the assistance Failed conservation of the food at the end of the blasting cycle Contact the assistance DR The door is...

Page 46: ...évus pour la loi pendant un cycle ne pas ouvrir la porte du meuble Quand on remplace des pièces et si on prévoit de débrancher la fiche il doit être clairement indiqué que le débranchement de la fiche doit être effectué de manière à ce qu un opérateur puisse vérifier de n importe que endroit d où il accède que la fiche reste débranchée Toutes les interventions d entretien de nettoyage et de répara...

Page 47: ...LAGES Pag 65 7 MANUTENTION GESTION DE DÉCHETS ELIMINATION DES MATERIAUXPag 66 7 1 CONTROLES PERIODIQUES Pag 66 7 2 REMPLACEMENT DU MOTEURVENTILATEUR Pag 66 7 3 REMPLACEMENT D UN COMPRESSEUR gaz réfrigérant Pag 66 7 4 ELIMINATION DE MATERIAUX ET GESTION DES DECHETS Pag 66 7 5 COMMANDER LES PIECES DETACHEES Pag 66 8 MESSAGES D ERREUR ET SOLUTIONS Pag 67 DICHIARAZIONE DI CONFORMITA Pag 133 DECLARATIO...

Page 48: ... fourni avec la documentation correspondant à la réalisation Toutes les instructions contenues dans ce document doivent servir soit à l opérateur soit au technicien qualifié pour pouvoir faire d une façon sûre et correcte toutes les opérations d installation de mise en marche d utili sation et de manutention du meuble Le manuel d usage et de manutention contient toutes les informations nécessaires...

Page 49: ...EAUX 10 NIVEAUX 10 NIVEAUX P 15 NIVEAUX 20 NIVEAUX DIMENSIONS WxDxH mm 750x750x770 790 750x750x890 910 750x750x1260 1280 750x750x1260 1280 750x750x1260 1280 750x750x1850 1870 750x750x2080 2100 POIDS NET kg 51 60 76 77 77 104 119 CHAMBRE DIMENSIONS WxDxH mm 616x430x270 616x430x390 616x430xx760 616x430x760 616x430x760 616x430x1110 616x430x1340 CAPACITÉ TG 3 GN1 1 3 600x400 5 GN1 1 5 600x400 7 GN1 1 ...

Page 50: ...n personnel spécialisé et certifié Le producteur décline toute responsabilité en cas de non observation des normes de sécurité en vigueur Avant de commencer toute opération de déchargement positionnement et installation de la cellule de re froidissement dans les locaux de vente selon le modèle de cellule consulter avec attention les informations reportées dans le tableau dimensions et poids Pour p...

Page 51: ...ellule à exposition directe aux rayons solaires ainsi qu à tout autre forme de rayonnement tels que illumination à incandescence à haute intensité fours à cuisson ou corps radians du type chauffage Ne pas positionner la cellule près d ouvertures vers l extérieur en courant d air comme portes et fenêtres ou au contact direct avec des flux d air provenant de ventilateurs bouches d air et ventilo con...

Page 52: ...étério ration des produits exposés et d une augmentation de consommation d énergie Si la cellule avec unité de condensation in corporée est inclinée durant son déplacement il est conseillé d attendre au moins huit heures avant de procéder à la mise en route afin de permettre à l huile présente dans le compresseur de circuler dans tout les composants de manière à ce que ceux ci soit lubrifiés de no...

Page 53: ...n de la fiche Le disjoncteur doit être placé près de la cellule pour qu il puisse être bien visible par le technicien en cas de manutention 4 Il est nécessaire que la section du cordon d alimentation soit adéquate à la puissance absorbée par le groupe 5 Il est obligatoire par la loi de connecter le système à une mise à terre efficace mise à terre 6 Si le câble d alimentation est endommagé celui ci...

Page 54: ...aramètres de fonctionnement consulter les instructions d utilisation du ca dre de contrôle électronique jointes à ce manuel 3 NETTOYAGE Tout nettoyage doit être effectué seulement quand la cellule est a l arrêt veuillez couper le cou rant ainsi que l alimentation de la cellule 3 1 NETTOYAGE DE LA CHAMBRE DE LA CELLULE La manutention de la cellule doit inclure un nettoyage des grilles et ou bacs de...

Page 55: ...el produit détergent renseignez vous chez votre fournisseur sur le détergent neutre sans chlore pour éviter les corrosions sur l acier En cas de rayures sur les surfaces il est nécessaire de les lisser avec de la laine d acier fine inoxydable ou des éponges de matériau fibreux synthétique en frottant dans le sens du satinage Important pour le nettoyage de l ACIER INOX n utiliser jamais les pailles...

Page 56: ...ec la porte ouverte ou fermée dans ce dernier cas le temps de dégivrage sera majeur ATTENTION Après avoir terminé le cycle de réduction retirez le bouchon de l écoulement de l eau du dégorge ment de cette façon l eau de condensat ira à l intérieur du bac Le dégorgement sert aussi pour faire écouler tout les liquides du produit A chaque fin du cycle vérifiez le niveau de l eau et si nécessaire vide...

Page 57: ...EFROIDISSEMENT TYPE DE CYCLE TYPE DE PRODUIT CAPACITÉ DE CHARGEMENT PRODUIT ÉPAISSEUR CYCLEAU COEUR DU PRODUIT POSITIF À pleine vitesse Pour tout aliment dense ou de gros poids max 4 kg par étagère 50 mm 3 C MAX 90 min NÉGATIF À pleine vitesse Pour tout aliment dense ou de gros poids 3 kg 40 mm Jusqu à 18 C 240 minutes Vitesse réduite Produits délicats légumes crème desserts à la cuil lère produit...

Page 58: ...r ganoleptique jusqu à 5 jours de celui du traitement Il est très important de respecter la chaine du froid en maintenant pendant la conservation une température constante entre 0 C 4 C selon le produit En utilisant la technique du sous vide le temps de conservation peut être augmenté jusqu à 15 jours CONSERVATION DU PRODUIT CUIT ET CONGELÉ Le produit cuit et congelé peut être conservé au réfrigér...

Page 59: ...n vert 2 appuyez sur le bouton SET pour sélectionner les températures standard 3 C ou 18 C 3 après appuyez sur le bouton Start Stop pour commencer le cycle 4 quand le cycle est terminé quand l alarme commence à sonner la mini cellule passe automatiquement en phase de conservation 4 quand le cycle est terminé quand l alarme commence à sonner la mini cellule passe automatiquement en phase de conserv...

Page 60: ...e 30 C PRODUITS LAITIERS Fromage 4 6 6 Beurre 8 12 15 VIANDES ETVOLAILLES Boeuf 9 12 18 Veau 6 12 18 Agneau 6 12 18 Porc 4 12 15 Volaille 5 9 12 18 Lapin Oie 4 6 Canard Dinde 4 6 Viande Sauvage 6 10 12 12 POISSON Maigre 6 8 12 15 Gras anguille maquereau saumon hareng 3 4 7 8 8 9 Crustacé 3 4 12 17 Mollusque 2 3 10 12 LÉGUMES ET FRUITS Légumes 12 18 24 Fruits 12 18 24 PÂTISSERIE DESSERT Gâteaux 2 4...

Page 61: ...POSITIF Roast beef GN1 1 h40 4 Kg 10 15 cm 80 minuti POSITIF POISSONS mérou au four entier GN1 1 h40 3 Kg 5 10 cm 90 minuti POSITIF cigales de mer GN1 1 h40 2 Kg 3 cm 25 minuti POSITIF moules sous vide GN1 1 h60 2 Kg max 3 4 cm 20 minuti POSITIF salade de poisson GN1 1 h40 4 Kg 3 4 cm 30 minuti NEGATIF Poulpe bouilli GN1 1 h60 5 Kg 60 minuti POSITIF Seiches compote GN1 1 h60 4 Kg 4 5 cm 60 minuti ...

Page 62: ... réduction négative ou surgélation Arrêt de la réduction avec sonde à cœur ou à temps Conservation Dégivrage manuel Pour une série de paramètres il est possible d exclure quelques fonctions ou en changer quelques unes L utilisateur final cuisinier est autorisé à modifier la sélection du type de refroidissement et le temps si la sonde n a pas été sélectionnée à cœur Position du panneau de contrôle ...

Page 63: ...leur effectue une lampe test de 5 secondes après qu il se soit mis en marche Stand by Visualisation L affichage indique Touches Le contrôleur peut être activé par une pression de la touche Set pendant 4 sec Il se positionne en mode Stop Programmation programmes à temps et avec sonde à cœur ...

Page 64: ...panneau de contrôle détecte que la porte est ouverte il s affichera dr qui indique que la porte est restée ouverte Touches Si vous maintenez la touche Set enfoncée sur l affichage il apparaîtra le temps écoulé depuis la mise en route du cycle ou le temps de refroidissement rapide s il est en mode conservation Si vous maintenez la touche Up enfoncée s affichera la température intérieure de la cellu...

Page 65: ...pendant sec Indiqué 0 1 10 10 n P1 Présence de Porte 0 Porte absente I Porte Présente 0 1 1 1 n P2 Ventilation en refroidissement rapide 0 en parallèle avec le compresseur I toujours actif 0 1 1 1 n P3 Fonctionnement de la sonde à cœur 0 1 1 1 n P4 Fonctionnement refroidissement rapide négatif 0 1 1 1 n P5 Dégivrage 0 1 1 1 n P6 Arrêt Porte ouverte 0 Compresseur Ventilateur I Ventilateur 0 1 1 1 n...

Page 66: ... REMPLACEMENT DU MOTEURVENTILATEUR Si le meuble est équipé avec le moteur ventilateur et qu il faut le remplacer enlevez la tension de l alimentation vérifiez la table avec les fiches techniques du moteur ventilateur et substituez cette pièce avec une pièce de même puissance voltage et fréquence 7 3 REMPLACEMENT D UN COMPRESSEUR gaz réfrigérant En cas de dommage et ou remplacement du compresseur r...

Page 67: ...ar la glace Laissez la porte ouverte pour au moins 15 minutes pour faire dissoudre la glace formée vérifiez d avoir chargé le produit correctement et pas excessivement Rendre plus léger le chargement des bacs ou grilles Vérifiez que le ventilateur interne de la chambre tourne Contacter l assistance Assurez vous que la température du laboratoire ne soit pas excessivement haute et avec taux d humidi...

Page 68: ...uhalten sollte dieTür des Schnel lkühlers bei ablaufendem Schnellkühlzyklus auf keinen Fall geöffnet werden Beim Austausch vonTeilen und wenn das Ziehen des Steckers vorgesehen ist muss klar angegeben sein dass dies der Fall sein muss und der Betreiber muss von jedem Punkt aus auf den er Zugang hat prüfen können ob der Stecker getrennt bleibt Alle Wartungsarbeiten reinigung und Reparaturen müssen ...

Page 69: ...3 ALARME Pag 85 6 4 EINSTELLUNGEN Pag 86 7 WARTUNG ABFÄLLE MATERIALENTSORGUNG Pag 87 7 1 REGELMÄSSIGE KONTROLLEN Pag 87 7 2 AUSTAUSCH DES MOTORLÜFTERS Pag 87 7 3 AUSTAUSCH DESVERDICHTERS Wechsel des Kältemittels Pag 87 7 4 MATERIALENTSORGUNG UND ABFÄLLE Pag 87 7 5 ERSATZTEILBESTELLUNG Pag 88 8 FEHLERMELDUNGEN UND LÖSUNGEN Pag 88 DICHIARAZIONE DI CONFORMITA Pag 133 DECLARATION OF CONFORMITY DECLARA...

Page 70: ...ebnahme Ausbau und Stilllegung des Geräts korrekt und sicher ausgeführt werden können In dieser Bedienungs undWartungsanleitung sind alle für den ordnungsgemäßen Gerätebetrieb dienlichen Informationen und Sicherheitshinweise enthalten AUFBEWAHRUNG DER ANLEITUNG Die Bedienungs und Wartungsanleitung ist in einwandfreiem Zustand und an einem sicheren Ort vor Feuchtigkeit und Wärme geschützt für die g...

Page 71: ...ÄLTER 10 BEHÄLTER P 15 BEHÄLTER 20 BEHÄLTER ABMESSUNGEN LxBxH mm 750x750x770 790 750x750x890 910 750x750x1260 1280 750x750x1260 1280 750x750x1260 1280 750x750x1850 1870 750x750x2080 2100 NETTOGEWICHT kg 51 60 76 77 77 104 119 INNENRAUMGRÖSSE LxBxH mm 616x430x270 616x430x390 616x430xx760 616x430x760 616x430x760 616x430x1110 616x430x1340 KAPAZITÄT TG 3 GN1 1 3 600x400 5 GN1 1 5 600x400 7 GN1 1 7 600...

Page 72: ...zuladen und zu befördern Bei Nicht beachtung der einschlägigen Sicherheitsvorschriften wird keinerlei Haftung übernommen Bevor Sie den Schnellkühler abladen aufstellen und in derVerkaufsstel le installieren sollten Sie die modellspezifischen Daten in der Tabelle mit den Längen und Gewichtsangaben aufmerksam überprüfen Der Hersteller übernimmt keinerlei Haftung bei Nichtbeachtung der geltenden Sich...

Page 73: ...llkühler nicht in der Nähe von Öffnungen nach außen mit Luftdurchzug auf wie zum Beispiel Türen und Fenster oder direkt in den Luftstrom vonVentilatoren Belüftungsdüsen und Gebläsekonvektoren von Klimaanlagen Verstopfen Sie nicht die Lüftungsöffnungen des Schnellkühlers Legen Sie kein Material auf den Schnellkühler Kartons oder dergleichen und belassen Sie rundum einen genügenden Freiraum für eine...

Page 74: ...lose Wartung der Einheit zu gewährleisten 2 ELEKTRISCHER ANSCHLUSS UND ERDUNG 2 1 STROMVERSORGUNG Installation und elektrische Anschlüsse sind fachmännisch und nach den einschlägigenVorschriften des Elektrosektors auszuführen Diese Arbeiten haben durch qualifiziertes Fachpersonal nach Vorgabe der geltenden Gesetzesbestimmungen zu erfolgen Der Hersteller übernimmt keinerlei Haftung bei Nichtbeachtu...

Page 75: ...er einen Adapter ist verboten 2 2 EINSCHALTEN DES SCHNELLKÜHLERS ACHTUNG Das erstmalige Einschalten des Schnellkühlers ist von Fachpersonal vorzunehmen Beachten Sie vor dem Einschalten dass Ihre Hände nicht feucht oder nass sind Die Oberflächen des Schnellkühlers trocken sind Der Boden trocken ist Stellen Sie darüber hinaus sicher dass Der Schnellkühler mit eingebauter Kondensationseinheit unbedin...

Page 76: ...lkühlers schließt mindestens eine regelmäßige tägliche Reinigung desTempera turfühlers mit ein Die tägliche Reinigung des Innenraum Temperaturfühlers des Schnellkühlers ist unerlässlich Der Fühler sollte mit sauberem Wasser und einer desinfizierenden Lösung abgespült werden Anweisungen und Reinigungsprodukte sind mit denen des vorigenAbschnitts identisch 3 3 REINIGUNG DES KONDENSATORS IM KÄLTEAGGR...

Page 77: ...estgelegte Grenzen die bezüglich dem Gesundheitsschutz und der Sicherheit am Arbeitsplatz angemessen geschult und ausgebildet sind unter normalen psychophysischen Bedingungen verwendet und gereinigt werden Die professionelle Ausrüstung kann auch von Auszubildenden in Projekten mit dualer Ausbildung unter derVoraussetzung einer strengen Aufsicht seitensTutoren im oben genannten Erwachsenenalter gem...

Page 78: ...t dem schnell zu kühlenden Produkt Verwendung von Deckeln auf den Behältern Die physikalischen Eigenschaften des Produkts wie Dichte und Wasser sowie Fettgehalt Die Temperaturbedingungen der schnell zu kühlenden Speise Die Einstellung der positiven Schnellkühl bzw der Schockfrostzeit hat je nach Art und Gewicht des behandelten Produkts zu erfolgen AUSWAHL DER SCHNELLKÜHLUNG Sie können zwischen zwe...

Page 79: ...n 3 C bei positiver Schnellkühlung bzw der Temperatur von 18 C beim Schockfrosten un terbrochen werden PRODUKTKERN EINLEGEN DES PRODUKTS Die zu kühlenden Produkte dürfen nicht übereinander gestapelt werden ABSTAND ZWISCHEN DEN SCHALEN Für eine ausreichende Luftzirkulation im Innenraum des Schnellkühlers ist ein Mindestabstand von 70 mm zwischen den Schalen notwendig POSITION DER BLECHE Für eine ei...

Page 80: ...eine Konservierungstemperatur von oder unter 20 C einzuhalten ACHTUNG Lassen Sie gegarten und schnell zu kühlenden Produkte nicht auf Umgebungstemperatur Vermeiden Sie Feuchtigkeitsverluste um den Geschmack des Produkts nicht zu beeinträchtigen Das schnellgekühlte Produkt muss mit einer Lebensmittelfolie oder besser noch vakuumverpackt geschützt und mit einem Klebeetikett unlöschbar mit folgenden ...

Page 81: ...ur 30 C MOLKEREIPRODUKTE Käse 4 6 6 Butter 8 12 15 FLEISCH UND GEFLÜGEL Kalb 9 12 18 Rind 6 12 18 Lamm 6 12 18 Schwein 4 12 15 Geflügel 5 9 12 18 Kaninchen Gans 4 6 Ente Pute 4 6 Wild 6 10 12 12 FISCH Magerer Fisch 6 8 12 15 Fetter Fisch Aal Makrele Lachs Hering 3 4 7 8 8 9 Schalentiere 3 4 12 17 Weichtiere 2 3 10 12 GEMÜSE und OBST Gemüse 12 18 24 Obst 12 18 24 GEBÄCK NACHSPEISEN Kuchen 2 4 8 12 ...

Page 82: ...en POSITIV FISCH Ganzer Zackenbarsch im Ofen GN1 1 h40 3 Kg 5 10 cm 90 minuten POSITIV Bärenkrebse GN1 1 h40 2 Kg 3 cm 25 minuten POSITIV Vakuumverpackte Miesmuscheln GN1 1 h60 2 Kg max 3 4 cm 20 minuten POSITIV Fischsalat GN1 1 h40 4 Kg 3 4 cm 30 minuten NEGATIV GekochterTintenfisch GN1 1 h60 5 Kg 60 minuten POSITIV Geschmorte Tintenfische GN1 1 h60 4 Kg 4 5 cm 60 minuten POSITIV GEMÜSE Möhren in...

Page 83: ...ühlung oder Gefrieren Ende der Schnellkühlung mit Kerntemperaturfühler oder Timer Konservierung Manuelles Abtauen ohne Widerstand ohne Heißgas Eine Reihe von Parametern ermöglicht es Ihnen einige Funktionen auszuschließen oder zu ändern Der Endanwender Koch kann die gewünschte Schnellkühlung und bei nicht ausgewähltem Kerntemperaturfühler ebenfalls die Kühlzeit einstellen Einbauposition der fronts...

Page 84: ...e einen 5 Sekunden langen Lampentest aus und schaltet dann auf Betriebsbereitschaft Stand by Anzeige Am Display erscheint Tasten Die Bedienungsblende schaltet auf Standby wenn bei ausgeschalteten Schnellkühlzyklen die Taste SET 4 Sekunden lang gedrückt wird Einstellung der Programme mitTimer und Kerntemperaturfühler ...

Page 85: ... Türzustand geöffnet Tasten Durch Drücken derTaste SET wird am Display während der Programme Kerntemperaturfühler und Timer die nach dem Zyklusstart verstrichene Zeit angezeigt Mit der Taste Up wird die vom Innenraumfühler gemessene Temperatur angezeigt Diese Anzeige verbleibt für die Dauer von 5 Sekunden Der ggf eingeschaltete Summer wird durch einmaliges Drücken der Taste Down stummgeschaltet Be...

Page 86: ...ei Schnellkühlung 0 Parallelbetrieb zumVerdichter 1 stets eingeschaltet 0 1 1 1 n P3 Freigabe des Kerntemperaturfühlers 0 1 1 1 n P4 Freigabe der negativen Schnellkühlung 0 1 1 1 n P5 Freigabe der Abtaufunktion 0 1 1 1 n P6 StopptVerbraucher bei geöffneterTür 0 Verdichter Lüfter 1 Lüfter 0 1 1 1 n P7 Konfiguration RL2 0 Abtauen 1 Lüfter Abtauen 0 1 1 1 n P8 Regelhysterese 1 20 3 3 C P9 Verdichters...

Page 87: ...sationseinheit 7 2 AUSTAUSCH DES MOTORLÜFTERS Zum Austausch des Motorlüfters bei den damit ausgestatteten Schnellkühlern sollten Sie die Spannungsversor gung unterbrechen amTypenschild die technischen Daten von Leistung Spannung und Frequenz überprüfen und einen gleichwertigen neuen Motorlüfter einbauen 7 3 AUSTAUSCH DESVERDICHTERS Wechsel des Kältemittels Bei Beschädigung bzw Austausch des Verdic...

Page 88: ... den Anschluss sämtlicher Drähte an die Klemmenleiste Fehler des Kerntemperaturfühlers Einen ggf gelösten Draht in die Klemme einführen und verschrauben Er3 Überprüfen Sie den Anschluss sämtlicher Drähte an die Klemmenleiste Fehler des Kondensator Einen ggf gelösten Draht in die Klemme einführen und verschrauben Zu lange Schnellkühlzeiten Überprüfen Sie ob der Verdampfer durch Eis verstopft ist La...

Page 89: ...halen oder Roester 10TP Kapazität 3 Schalen oder Roester 15TS Kapazität 5 Schalen oder Roester 20TS Kapazität 3 Schalen oder Roester k zusätzliche Konfiguration die EUT Optionen SW Ohne Aggregat elektrische Abtauung CW Mit Aggregat elektrische Abtauung SX Ohne Aggregat Heißgasdefrostbetrieb CX Mit Aggregat Heißgasdefrostbetrieb SY Ohne Aggregat Abtau Stopp CY Con gruppo frigo Abtau Stopp z zusätzl...

Page 90: ... equipo profesional puede ser utilizado y limpiado solo por sujetos mayores de edad 18 años en Europa u otros límites definidos por el compendio normativo local que tenga condiciones psico físicas normales y adecuadamente adiestrados y formados en materia de protección de la salud y seguridad en los lugares de trabajo El equipo profesional puede ser utilizado por pasantes en los proyectos de alter...

Page 91: ...Pag 106 6 2 ESQUEMA Pag 107 6 3 ALARMAS Pag 108 6 4 REGULACIONES Pag 108 7 MANUTENCION Pag 110 7 1 CONTROLES PERIODICOS Pag 110 7 2 SUSTITUCION DEL MOTOVENTILADOR Pag 110 7 3 SUSTITUCIÓN DE COMPRESOR GAS REFRIGERANTE Pag 110 7 4 MATERIAL DE ELIMINACIÓN Pag 110 7 5 PEDIR LOS RECAMBIOS Pag 110 8 MENSAJES DE ERRORY SOLUCIONES Pag 111 DICHIARAZIONE DI CONFORMITA Pag 133 DECLARATION OF CONFORMITY DECLA...

Page 92: ...manutentor para hacer de manera segura y correcta todas las operaciones de instalación puesta en marcha desmontaje y eliminación del aparato Tal manual de uso y manutención contiene todas las informaciones necesarias para una correcta gestión del producto con particular atención a la seguridad CONSERVACIÓN DEL MANUAL El manual de uso y manutención tiene que conservarse intacto y en un lugar seguro...

Page 93: ...770 790 750x750x890 910 750x750x1260 1280 750x750x1260 1280 750x750x1260 1280 750x750x1850 1870 750x750x2080 2100 PESO NETO kg 51 60 76 77 77 104 119 DIMENCIONES CÁMARA WxDxH mm 616x430x270 616x430x390 616x430xx760 616x430x760 616x430x760 616x430x1110 616x430x1340 CAPACIDAD TG 3 GN1 1 3 600x400 5 GN1 1 5 600x400 7 GN1 1 7 600x400 10 GN1 1 10 600x400 10 GN1 1 10 600x400 15 GN1 1 15 600x400 20 GN1 1...

Page 94: ...transpal let o carro elevador que sea conducido por personal especializado El productor no puede tomar responsabilidades sobre el no respeto de las normas de seguridad vigentes Antes de empezar la descarga colocación e instalación del abatidor al interior de la tienda según el tipo de modelo del abatidor lea atentamente los datos en la tabla dimenciones peso que se encontra a la fin de este manual...

Page 95: ...uncionamiento tales como la condensación etc CUIDADO Para permitir el buen funcionamiento del abatidor preste atención a las siguientes indicaciones No coloque sus muebles con la exposición directa al sol y a todas las otras formas de radiación como la iluminación incandescente de alta intensidad hornos o tipo de cuerpo de calefacción por radia ción para la calefacción No coloque el abatidor cerca...

Page 96: ...rigeración del condensador puede reducir el rendimiento del aparato con el posible deterioro de los productos expuestos y con mayor consumo energético Si el abatidor equipado con una unidad se pone inclinado se aconseja esperar al menos ocho horas antes de empezar para que el aceite en el compresor fluya en él y todos sus componentes se lubrican de nuevo Solamente después se puede encender el apar...

Page 97: ...el aparato de manera que se puede ver claramente por el técnico para el mantenimiento Es necesario que la sección del cable de alimentación está adaptado a la potencia absorbida por el grupo Es obligatorio por ley para la puesta a tierra de la instalación por lo que debe conectarlo a una toma de tierra eficiente Si el cable de alimentación está estropeado tiene que ser sustituido por el fabricante...

Page 98: ... ponen los alimentos para evitar la formación de baterios CUIDADO Es muy importante efectuar una limpieza diario de la zona de carga para evitar el desarrollo y la acu mulación de bacterias No usar chorro de agua para limpiar el interior del aparato porque los componentes eléctricos pueden sufrir daños No utilice herramientas de metal duro para quitar el hielo Para la limpieza utilizar sólo agua t...

Page 99: ... lana de acero inox muy sutil o con esponjas pequeñas y abrasívas de material sintético fibroso siguiendo la línea del satinado Se recomenda para la limpieza del acero inox no utilizar nunca sponjas de hierro y tampoco dejarlas sobre las superficies porque los polvos de hierro muy pequeños podrían quedar sobre las superficies y causar la formacción de orín por contaminación comprometiendo la higie...

Page 100: ...miento manual es decir hacer soltar el hielo apagando el aparato y dejando la puerta abierta o cerrada en este último caso el tiempo de desescarchamiento es mayor CUIDADO Después de haber terminado el proceso de abatimiento hay que quitar el tapón de descarga del agua de esta manera el agua de condensación va al interno de la cubeta Dicho sistema sirve tam bién para hacer pasar los eventuales líqu...

Page 101: ...s o de grandes dimensiones max 4 kg por bandeja 50 mm 3 C MAX 90 minutos NEGATIVO A completa velocidad Para todos los alimentos densos o de grandes dimensiones 3 kg 40 mm Fino a 18 C 240 minutos A velocidad reducidas Productos delica dos verduras cre mas postres con la cuchara productos de pequeñas dimensiones MESURACION DE LATEMPERATURA AL CORAZON DEL PRODUCTO Cuando el espesor del producto lo pe...

Page 102: ...porador Mantener igual distancias entre las bandejas CONSERVACION DEL PRODUCTO COCIDOY ABATIDO El producto cocido y abatido puede mantenerse en el frigorífico conservando las calidades orga nolecticas hasta 5 días después del proceso CONSERVACIÓN DEL PRODUCTO COCIDOY CONGELADO El producto cocido y congelado puede conservarse en el frigorífico conservando las calidades organolecticas por meses desp...

Page 103: ...stán las siguientes indicaciones que no se pueden borrar il contenuto El contenido El día de preparación La fecha de vencimiento CUIDADO Los alimentos ya descongelados no se pueden congelar otra vez 4 3 PROCEDIMIENTO PARA LA PUESTA EN MARCHA DEL ABATIDOR CICLO DE ABATIMIENTO CON SONDA A AGUJóN 1 Apriete el interruptor verde 2 Apriete la tecla SET para elegir las temperaturas e standar 3 C o 18 C 3...

Page 104: ...NGELACION 30 C PRODUCTOS LACTEOS Quesos 4 6 6 Mantequilla 8 12 15 CARNESY GALLINERíA Vaca 9 12 18 Ternero 6 12 18 Cordero 6 12 18 Cerdo 4 12 15 Gallinería 5 9 12 18 Conejos ánsares 4 6 Anades pavos comunes 4 6 Caza 6 10 12 12 PESCADO Flaco 6 8 12 15 Gordo anguila escombro salmón arenque 3 4 7 8 8 9 Crustáceos 3 4 12 17 Moluscos 2 3 10 12 VERDURASY FRUTAS Verduras 12 18 24 Frutas 12 18 24 PASTELERI...

Page 105: ...Roast beef GN1 1 h40 4 Kg 10 15 cm 80 minutos POSITIVO PESCADO Cherna entera al horno GN1 1 h40 3 Kg 5 10 cm 90 minutos POSITIVO Cigarras de mar GN1 1 h40 2 Kg 3 cm 25 minutos POSITIVO Mejillones confeccio nados al vacío GN1 1 h60 2 Kg max 3 4 cm 20 minutos POSITIVO Ensalada de pescado GN1 1 h40 4 Kg 3 4 cm 30 minutos NEGATIVO Pólipo hervido GN1 1 h60 5 Kg 60 minutos POSITIVO Sepias hervidas GN1 1...

Page 106: ...ceso negativo o congelación final de proceso con sonda al corazón o a tiempo conservación dedescarchamiento manual sin resistencia sin gas caliente A través de un listado de parámetros es posible excluir algunas funciones o cambiar otras Al usuario final cocinero se permite seleccionar el tipo de proceso y la impostacióm del tiempo si no se ha seleccionado la sonda al corazón Posición del cuadro f...

Page 107: ...s El termostato puede activarse a través de una pressión de la tecla Set por 4 segundos Se pone en modo Stop Impostación de los programas a tiempo y con sonda al corazón Stop Visualización El display muestra el tiempo en horas y minutos si está seleccionado un proceso a tiempo o la lectura de la sonda al corazón para un proceso con la sonda El punto decimal arriba del segundo display indica la ele...

Page 108: ...segundos Si el buzzer está activado la primera presión de Down permite silenciar el buzzer Una simple presión de Start Stop termina el proceso de abatimiento o mantenimiento CUIDADO Al final del proceso de abatimiento positivo se actúa de manera automática la conservación a una temperatura de 0 a 3 C Al final del proceso negativo se actúa de manera automática la conservación a una temperatura de 2...

Page 109: ... estar abierta la puerta 0 compresor ventilación 1 ventilación 0 1 1 1 n P7 Configuración RL2 0 desescarchamiento 1 ventilación desescarchamiento 0 1 1 1 n P8 Histéresis de regulación 1 20 3 3 C P9 Protección compresor off on idóneo también a reset 0 99 2 2 min P10 Protección compresor On off 0 99 3 3 min P11 Duración desescarchamiento 0 99 10 10 min P12 Duración goteo 0 99 3 3 min P13 Set sonda a...

Page 110: ...ubstituirlo hay que quitar la tensión de alimentación ave riguar la tarjeta con los datos técnicos del motoventilador y sustituirlo con uno de igual potencia voltaje y frecuencia 7 3 SUSTITUCIÓN DE COMPRESOR GAS REFRIGERANTE En caso de daños y o sustitución del compresor hay que recuperar el gas refrigerante y el aceite sin dispersarse en el medio ambiente 7 4 MATERIAL DE ELIMINACIÓN Plástico y se...

Page 111: ... y no excesiva Separar las cubata de manera más ligeras Averiguar que la ventilación interna de la cámara gire Contacte a la asistencia Asegúrese que la temperatura del la habitación no sea excesivamente alta y con alto porcentaje de humedad Contacte a la asistencia Faltado mantenimento del alimento al final del ciclo de abatimiento Contacte a la asistencia DR Puerta Abierta Puerta Abierta Comprue...

Page 112: ...ة عقلية بحالة يتمتعون الذين المحلي القانون خالصة من مقررة أخرى حدود أو أوروبا العمل أماكن في والسالمة الصحة حماية مجال في ومثقفين مناسب بشكل ومدربين طبيعية انتبه عة ِّ ن ص ُ م ال الشركة فنيي يد على فقط التبريد ووحدة هاز ً الج تركيب عملية تتم أن يجب الشأن هذا في براء ُ خ أشخاص ِبل ق من أو المؤهلين انتبه عة ِّ ن ص ُ م ال الشركة فنيي يد على فقط التبريد ووحدة هاز ً الج تركيب عملية تتم أن يجب الشأن هذا...

Page 113: ...7 2 Pag 131 التبريد غاز المكبس استبدال 7 3 Pag 131 النفايات وإدارة الخامات من التخلص 7 4 Pag 132 الغيار قطع طلب 7 5 PAG 132 الحلول و الخطأ رسائل 8 DICHIARAZIONE DI CONFORMITA Pag 133 DECLARATION OF CONFORMITY DECLARATION DE CONFORMITÈ KONFORMITÄTSERKLÄRUNG APPENDICE 1 Pag 134 TARGHETTA IDENTIFICAZIONE PRODOTTO PRODUCT IDENTIFICATION PLATE ETIQUETTE D IDENTIFICATION DU PRODUIT DAS PRODUKT TYPENSCHI...

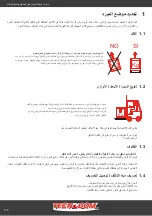
Page 114: ...والصيانة االستخدام دليل يحتوي وتصريفه المنتج وتفكيك والتشغيل التركيب عمليات بكل وآمن صحيح بشكل للقيام الصيانة عامل أو و األمان عوامل إلى خاص اهتمام إيالء مع للجهاز الجيدة لإلدارة الالزمة المعلومات كافة على الدليل حفظ إلى ملكيته انقلت لو حتى المنتج حياة طوال والحرارة الرطوبة من وحمايته آمن مكان وفي سليما والصيانة االستخدام دليل يبقى أن يجب لتسهيل الجهاز من بالقرب حفظه ويجب صحيح نحو على األجهزة تدوي...

Page 115: ... صينية 15 صينية 20 األبعاد عرض عمق ارتفاع مم 750x750x770 790 5TEGLIE 750x750x1260 1280 750x750x1260 1280 750x750x1260 1280 750x750x1850 1870 750x750x2080 2100 الصايف الوزن كج 82 750x750x890 910 111 112 117 166 184 الغرفة أبعاد عرض عمق ارتفاع مم 616x430x270 92 616x430xx760 616x430x760 616x430x760 616x430x1110 616x430x1340 السعة صينية 3 GN1 1 3 600x400 616x430x390 7 GN1 1 7 600x400 10 GN1 1 10 600x4...

Page 116: ...لة بواسطة تنفيذها يجب املربد تحميل تفريغ عمليات الصدد هذا يف السارية السالمة بأنظمة التقيد عدم عن مسؤولية أية نخيل ونحن جداول يف الواردة املعلومات بدقة اجع ر البيع نقطة داخل الرسيع املربد وتركيب املواقع تحديد يف البدء قبل املربد وموديل نوع حسب ان ز واألو األطوال بها المعمول السالمة لمعايير االمتثال عدم حالة في مسئوليتها الصانعة الشركة تخلي السابق الفصل إلى الرجوع يرجى المعلومات من لمزيد المبرد وصف...

Page 117: ...سخانات مثل للحرارة المشعة واألجسام الطهي أفران الكثافة عالية الحرارية الهواء تيارات مع مباشرة بمالمسة أو والنوافذ األبواب مثل هوائية تيارات بها التي الخارجية الفتحات من بالقرب المبرد تضع ال الهواء وتكييف التهوية وستائر وفتحات المراوح من القادمة المبرد في الهواء مآخذ تسد ال الهواء دوران يمنع شيء أي من خاليا للمبرد الكامل المحيط واترك وخالفه العلب مثل نوع أي من مواد أية تضع ال التكثف يتكون فقد الرطو...

Page 118: ... أن يجب الكهربية والتوصيالت التثبيت الكهربائية القواعد مع االمتثال عدم عن ناشئة مسؤولية أية الشركة تخلي بها المعمول للقوانين ووفقا المؤهلون الموظفون العمل الصدد هذا في السارية الدليل هذا نهاية يف يقع الذي للمربد الكهربايئ التخطيطي الرسم انظر جميع تجفيف مع المؤذية غير المحايدة والمنظفات الدافئ الماء باستخدام للمبرد وكاملة دقيقة تنظيف عملية بتنفيذ قم كهربيا المبرد توصيل قبل المبرد تنظيف قسم بعناية ا...

Page 119: ...هيدي تبريد تحتاج سوف ذلك وبعد بالتنظيف الخاص الفصل انظر المبرد غرفة داخل بتنظيف قم تبريده المبرد الطعام إدخال قبل سلبيا أو إيجابية سواء التبريد دورة بدء قبل الدليل بهذا الملحقة التحكم لوحة تعليمات راجع التشغيل معايير لضبط 3 3 التنظيف التكثيف وحدة أو التبريد وحدة من سواء الجهد إزالة طريق عن إما متوقفة والوحدة التنظيف عمليات جميع إجراء يجب 3 1 3 المبرد غرفة تنظيف البكتيريا وتراكم نمو لمنع التحميل لم...

Page 120: ...ية العامة نظافتها ومستوى المعالجة المنتجات سمية عدم ضمان هي تآكلها إلى تؤدي وبالتالي الطبقة هذه على تؤثر أو تدمر أن يمكن الصلب تآكل لتجنب الكلور من الخالية المحايدة المنظفات عن به الموثوق الخاص المورد من معلومات اطلب للتنظيف منتج أي استخدام قبل اتجاه في الفرك مع األلياف من تخليقية مادة من خشنة واسفنجات اينوكس صلب بصوف صقلها الضروري األسطح على خدوش حدوث حالة في النقشة مما الصدأ تسبب األسطح على الصغ...

Page 121: ...األسطح على مطلقا ساخنة أجسام أو منتجات أو ساخنة أواني وضع تجنب 4 1 4 اليدوية الثلج إذابة أكبر الثلج إزالة وقت يكون األخيرة الحالة في مغلقا أو مفتوحا والباب تنفيذه ويمكن يدويا المبرد في الثلج تذويب يحدث انتبه أي تدفق في البالوعة تساهم كما الحوض داخل التكثف ماء يتدفق بحيث البالوعة صرف غطاء إزالة يجب التبريد دورة من المبرد ينتهي أن بعد المنتج من تصريف مياة الحوض بتفريغ قم األمر لزم وإذا الماء مستوى ر...

Page 122: ...ولة املنتج املنتج قلب يف دورة إيجايب رسعة بأقىص الكبرية القطع أو الكثيفة لألغذية كجم 4 أقىص حد للصينية مئوية درجة 3 أقىص حد 90 سلبي رسعة بأقىص الكبرية القطع أو الكثيفة لألغذية كجم 3 0 مئوية درجة 18 حتى دقيقة 240 منخفضة برسعة حساسة منتجات حلوى والكرميات الخرض بامللعقة صغرية بقطع منتجات املنتج قلب يف ارة ر الح درجة قياس ارة ر الح درجة بدقة تعرف أن بغية ارة ر الح درجة مسبار قضيب ً ا دامئ استخدم بذلك ...

Page 123: ...مع الثالجة في تخزينها يمكن والمبردة المطبوخة المنتجات للغذاء وفقا مئوية درجات 4 إلى مئوية درجة 0 بين تتراوح ثابتة حرارة درجة على التخزين أثناء بالحفاظ البرودة سلسلة احترام المهم ومن يوما 15 حوالي إلى تصل لمدة زيادته يمكن االحتفاظ زمن فإن الهواء تفريغ تقنية باستخدام واملجمدة املطبوخة املنتجات تخزين المعالجة لحظة من شهور عدة إلى تصل ملمسية عضوية جودة على الحفاظ مع الثالجة في والمجمدة المطبوخة المنتج...

Page 124: ...ONE مبسبار الرسيع التربيد دورة 1 1 األخضر المفتاح على اضغط 2 2 مئوية درجة 18 أو مئوية درجة 3 القياسية الحرارة درجات الختيار SET زر اضغط 3 3 الدورة لبدء Start Stop اضغط 4 4 إلى ً ا تلقائي المبرد يتحول الرنين يبدأ عندما الدورة انتهاء بعد 5 5 الحفظ مرحلة 6 6 Start Stop على اضغط الدورة لقطع بالوقت التربيد دورة 7 7 األخضر المفتاح على اضغط 8 8 مئوية درجة 18 أو مئوية درجة 3 القياسية الحرارة درجات الختيار...

Page 125: ...30 األلبان منتجات أجبان 4 6 6 زبدة 8 12 15 والدواجن اللحوم بقرة 9 12 18 بتلو 6 12 18 ضان 6 12 18 أليف خنزير 4 12 15 دواجن 9 5 12 18 أوز انب ر أ 6 4 رومي ديك بط 6 4 برية طيور 10 6 12 12 سمك صغري 8 6 12 15 والسلمون واملاكريل البحر ثعبان كبري الرنجة 4 3 8 7 9 8 قرشيات 4 3 12 17 رخويات 3 2 10 12 والفواكه الخرضوات العشبية الخرضوات 12 18 24 الفاكهة 12 18 24 الحلوى املعجنات حلويات 4 2 8 12 املطبوخة نصف ا...

Page 126: ... 5 4 دقيقة 30 إيجايب املحمر البقر لحم h40 1 GN1 كجم 4 سم 15 10 دقيقة 80 إيجايب سمك بالفرن كامل قرش سمك h40 1 GN1 كجم 3 سم 10 5 دقيقة 90 إيجايب قريدس h40 1 GN1 كجم 2 سم 3 دقيقة 25 إيجايب بالتفريغ معبأ البحر بلح h60 1 GN1 كجم 2 سم 4 3 أقىص حد دقيقة 20 إيجايب األسامك سلطة h40 1 GN1 كجم 4 مم 4 3 دقيقة 30 سلبي املسلوق األخطبوط h60 1 GN1 كجم 5 دقيقة 60 إيجايب املطهى الصبيدج h60 1 GN1 كجم 4 سم 5 4 دقيقة ...

Page 127: ... اإليجابي التبريد التجميد أ السلبي التبريد بالوقت أو المنتج قلب في االستشعار بأداة التبريد نهاية الحفظ ساخن غاز ودون مقاومة دون الثلج تذويب دليل أخرى تغيير أو الميزات بعض استبعاد يمكنك المعايير من مجموعة خالل من االستشعار مسبار بتحديد تقم لم إذا الوقت وإعداد التبريد نوع باختيار له يسمح قد الطباخ النهائي للمستخدم األمامية التحكم لوحة موضع ...

Page 128: ...يذ مرحلة في يصبح ذلك بعد ثوان 5 لمدة اختبار بوميض المراقب يقوم التشغيل بدء عند االستعداد وضع عرض العرض شاشة نظهر المفاتيح ثوان 4 لمدة SET زر على اضغط متوقفة التبريد دورات كان إذا االستعداد وضع في التحكم لوحة وضع يتم االستشعار بمسبار والتبريد بالوقت التبريد برنامجي إعدادات ...

Page 129: ...نامج خالل ثواني 5 لمدة العرض يستمرهذا المسبار قراءها التي الحرارة درجة عرض يتم Up على بالضغط الصافرة بإسكات يسمح Down على األول الضغط فإن نشطا اإلنذار رنين كانت إذا الحفظ السريع المبرد دور تشغيل تنهي أو تبدأ Start Stop على البسيطة الضغطه انتبه مئوية درجة 3 إلى صفر بين ما حرارة درجة على الحفظ مرحلة إلى السريع االنتقال على نحصل اإليجالي السريع التبريد مرحلة نهاية وبعد مئوية درجة 3 إلى بين ما حرارة د...

Page 130: ...6 اوح ر م 1 اوح ر م مكبس 0 مفتوح والباب افق ر امل توقف 0 1 1 1 n P7 تذويب اوح ر م 1 تذويب RL2 0 تكوين 0 1 1 1 n P8 الضبط تباطؤ 1 20 3 3 C P9 التعيني إعادة يف أيضا صالحة Off On املكبس حامية 0 99 2 2 min P10 On On املكبس حامية 0 99 3 3 min P11 الثلج تذويب مدة 0 99 10 10 min P12 ات ر القط نزف مدة 0 99 3 3 min P13 اإليجايب التربيد عىل املسبار تعيني 50 99 3 3 C P14 السلبي التربيد عىل املسبار تعيني 50 9...

Page 131: ...كنت بمروحة مجهزا المتحرك كان إذا والتردد والجهد القوة بنفس بواحدة واستبدلها 7 3 7 التبريد غاز المكبس استبدال البيئة في إضاعته دون الزيت التبريد غازات استرجع المكبس استبدال أو و تلف حدوث حالة في 7 4 7 النفايات وإدارة الخامات من التخلص اإللكترونية والمراقبة المصابيح مثل الجهاز منها يتكون التي واإللكترونية الكهربائية المعدات بشكل األخرى الكهربائية والتحهيزات والمكابس الكهربائية والمحركات الكهربائية و...

Page 132: ...رت ف بالثلج مسدود غري املبخر أن من تحقق األقل عىل دقيقة 15 ملدة ً ا مفتوح الباب اترك املتكون الثلج غطاء لتذويب بك الخاص املنتج بتحميل قمت أنك من تحقق اط ر إف دون صحيح بشكل األوعية أو الصواين حمولة بتخفيف قم تدور الخلية داخل املروحة أن من تحقق الفني بالدعم اتصل مرتفعة ليست املخترب ارة ر ح درجة أن من تأكد الرطوبة نسبة ارتفاع مع للغاية الفني بالدعم اتصل دورة نهاية عند األغذية عىل املحافظة عدم التربيد...

Page 133: ...FORMITY DECLARATION DE CONFORMITÈ KONFORMITÄTSERKLÄRUNG FARE RIFERIMENTO ALLA DICHIARAZIONE CE CHE ACCOMPAGNA IL PRODOTTO VEUILLEZ VOUS REPORTER À LA DÉCLARATION JOINTE AU PRODUIT REFERTO CE DECLARATION ACCOMPANYINGTHE PRODUCT BEACHTEN SIE DIE DEM PRODUKT BEILIEGENDE CE ERKLÄRUNG F A C S I M I L E ...

Page 134: ...efines all the technical data of the cabinet as showed on the table in the next page L étiquette définit toutes les donnes techniques sur le produit selon la tabelle page suivante Die Platte definiert die Produkt technischen Daten wie in der Legende auf der nächsten Seite beschrieben Dicha tarjeta define todos los datos técnicos del producto como se describe en la leyenda en la página siguiente A ...

Page 135: ...از حمولة جم 10 Pot elettrica illuminazione Watt Top lighting total Electrical power Puissance total de la lumière Elektrische Leistung von licht Potencia electrica de iluminacion الكهربائية القوة لإلضاءة 11 Resistenza acqua di condensa Watt Electric heater condensation water Résistance eau Condensat Resistenz gegen Wasser Kondensation Resistencia agua Condensado ماء مقاومة التكثيف واط 12 Resistenz...

Page 136: ...ci Manuale d uso e manutenzione 136 APPENDICE 2 MISURE D INGOMBRO E PESI PACKAGING DIMENSIONS AND WEIGHT ENCOMBREMENT ET POIDS PESOSY MEDIDAS واألوزان األبعاد 3Teglie Trays GN 1 1 o 600x400 cm 5Teglie Trays GN 1 1 o or 600x400 cm ...

Page 137: ...Appendici Manuale d uso e manutenzione IT EN F DE ES ARABIC 137 7Teglie Trays GN 1 1 o or 600x400 cm 10Teglie Trays GN 1 1 o or 600x400 cm ...

Page 138: ...IT EN F DE ES ARABIC Appendici Manuale d uso e manutenzione 138 15Teglie Trays GN 1 1 o or 600x400 cm 20Teglie Trays GN 1 1 o or 600x400 cm ...

Page 139: ...TREZZATURA CON GAS FLUORURATI AD EFFETTO SERRA EQUIPMENT WITH FLUORINATED GREENHOUSE GASES ÉQUIPEMENT AVEC GAZ À EFFET DE SERRE FLUORÉ AUSRÜSTUNG MIT FLUORIERTENTREIBHAUSGASEN EQUIPO CON GASES FLUORADOS CON EFECTO INVERNADERO EQUIPAMENTO COM GASES FLUORADOS COM EFEITO DE ESTUFA الحراري لالحتباس بة ِّ ب مس بالفلور عة َّ ب مش بغازات أداة CARICA GAS GAS LOAD kg CARICA GAS GAS LOAD kg GWP 3 985 GWP 2 ...

Page 140: ...RUTTORE MAGNETOTERMICO WBC1433 SCHEDA CONTROLLO K1 RELÈ ALIMENTAZIONE RESISTEN ZA COMPRESSORE S1 BIPOLAR SWITCH C COMPRESSOR ML TB M1 M2 CONDENSER FAN MOTOR M3 FAN MOTOR ADDITIONAL CONDENSER M4 FAN MOTOR ON CONDENSER AND COMPRESSOR COOLING V1 V2 V3 FAN MOTOR ON EVAPORATOR RP1 INTERNAL HEATER ON DOOR FRAME PLASTIC KC RELAY FOR COMPRESSOR SUPPLY KVE RELAY FOR EVAPORETOR FANS SUPPLY MC OPEN DOOR SWIT...

Page 141: ... PER VENTOLA INTERNA DA 1 MICROFARAD R2 RESISTENZA INTERNA COMPRESSORE PR PRESSOSTATO HP F1 INTERRUTTORE MAGNETOTERMICO WBC1433 SCHEDA CONTROLLO K1 RELÈ ALIMENTAZIONE RESISTENZA COMPRESSORE S1 BIPOLAR SWITCH C COMPRESSOR ML TB M1 M2 CONDENSER FAN MOTOR M3 FAN MOTOR ADDITIONAL CONDENSER M4 FAN MOTOR ON CONDENSER AND COMPRESSOR COOLING V1 V2 V3 FAN MOTOR ON EVAPORATOR RP1 INTERNAL HEATER ON DOOR FRA...

Page 142: ... PER VENTOLA INTERNA DA 1 MICROFARAD R2 RESISTENZA INTERNA COMPRESSORE PR PRESSOSTATO HP F1 INTERRUTTORE MAGNETOTERMICO WBC1433 SCHEDA CONTROLLO K1 RELÈ ALIMENTAZIONE RESISTEN ZA COMPRESSORE S1 BIPOLAR SWITCH C COMPRESSOR ML TB M1 M2 CONDENSER FAN MOTOR M3 FAN MOTOR ADDITIONAL CONDENSER M4 FAN MOTOR ON CONDENSER AND COMPRESSOR COOLING V1 V2 V3 FAN MOTOR ON EVAPORATOR RP1 INTERNAL HEATER ON DOOR FR...

Page 143: ...R VENTOLA INTERNA DA 1 MICROFARAD R2 RESISTENZA INTERNA COMPRESSORE PR PRESSOSTATO HP F1 INTERRUTTORE MAGNETOTERMICO WBC1433 SCHEDA CONTROLLO K1 RELÈ ALIMENTAZIONE RESISTEN ZA COMPRESSORE S1 BIPOLAR SWITCH C COMPRESSOR ML TB M1 M2 CONDENSER FAN MOTOR M3 FAN MOTOR ADDITIONAL CONDENSER M4 FAN MOTOR ON CONDENSER AND COMPRESSOR COOLING V1 V2 V3 FAN MOTOR ON EVAPORATOR RP1 INTERNAL HEATER ON DOOR FRAME...

Page 144: ...odification Le Constructeur seréserveledroitdemodifiermodèles caractéristiques etprixsanspréavis Touteslesdonnéessontfourniesàtitreindicatifetn engagentenrienleConstructeur Seuleslesdonnéesfigurant sur la confirmation de commande font office de preuve et engagement Änderungen und Irrtümer vorbehalten Abbildungen können ähnlich sein und vom tatsächlich gelieferten Produkt abweichen Den Hersteller b...

Reviews: