background image

06

Cabling

Mains plug

Mains socket

240V mains supply

Isolation
pull switch

Please note:  All electrical installation should be carried out by a fully 
qualified Electrician and all fire and safety regulations should be obeyed.

The TV requires a 13amp socket 
outlet connected to a 240V mains 
supply via a readily accessible 
isolation switch mounted in close 
proximity to the unit.  Both the 
socket and pull switch must 
conform to the latest safety 
specification and be protected via 
and RCCD device or similar.  This 
socket must be fitted in a dry area 
away from any moisture.

The cabling and adaptor plug 
supplied with this TV must not be 
cut, shortened, lengthened, etc. 
as this could potentially damage 
the unit.

TV Aerial:

Take a 75Ω feed from your present television aerial or distribution 
system and connect this to the COAX connection at the back of the 
unit.  The signal level fed to the set must be at least 60dB/1millivolt 
or the picture may be noisy.  A TV Distribution Amplifier may be 
required if you are in an area of weak signal or if other televisions 
are already being fed from the same aerial.  If in doubt, consult a 
qualified aerial technician.

Cleaning:

To clean the front screen use only a soft damp cloth.  Under no 
circumstances are abrasive cleaners to be used.  Failure to 
observe this warning will invalidate your guarantee.  

23

Electronic programs guide(EPG)


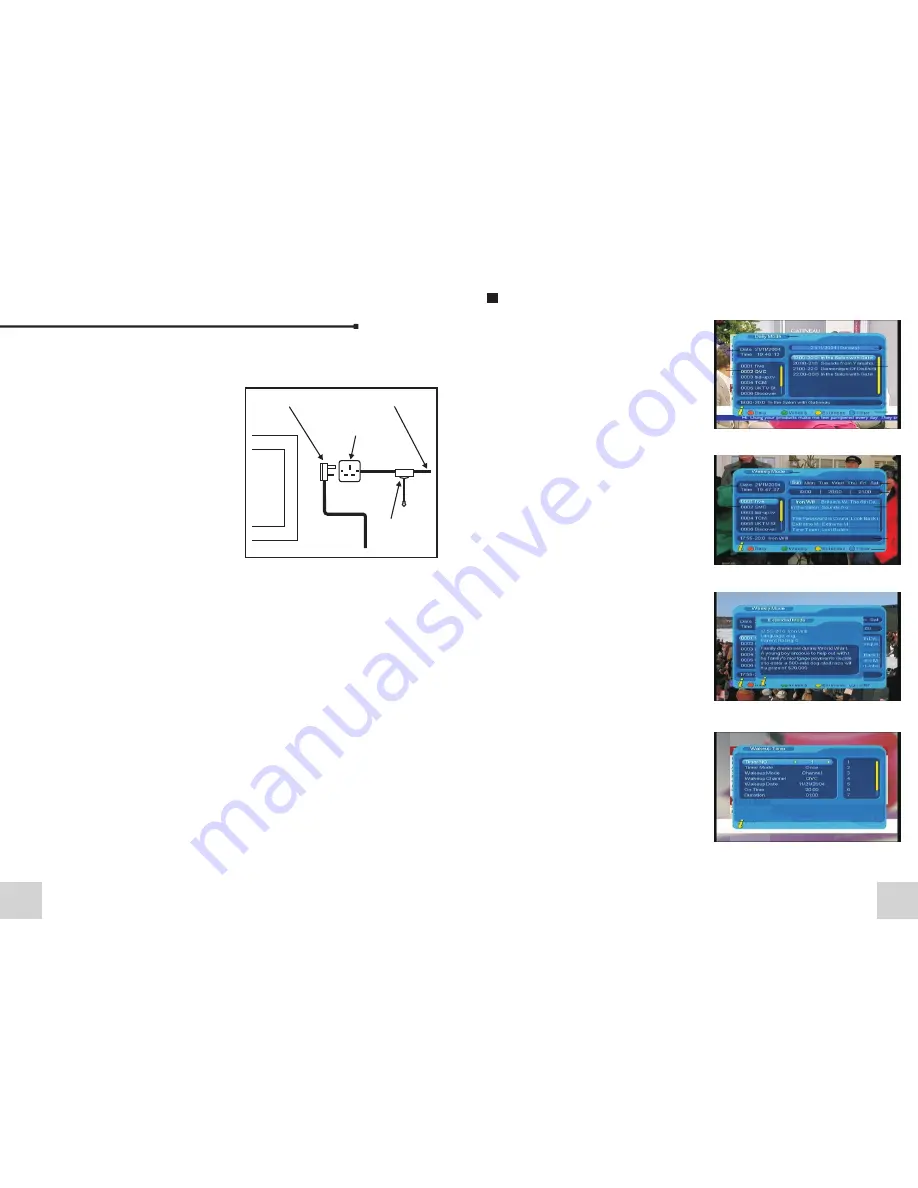
(1) You can press key “EPG” on the remote 
control to enter into the EPG page to know 
more about the programs to be played. As 
shown in the figure below:

Enter into EPG menu default enter Daily Mode, 
menu under this mode contain 7 parts, As 
shown in the figure above:
[1].Tab 1 shows the Title.
[2].Tab 2 shows time and date list.
[3].Tab 3 shows particular date list.
[4].Tab 4 shows program list, press 
“UP/DOWN” to switch between programs.
[5].Tab 5 shows the time range and program 
information, press “F.R & F.F” circularly to 
choose to browse the time range and program 
information on basis of days of every week.
[6].Tab 6 shows the detailed program 
information in Tab 5.
[7].Tab 7 shows hint information for keys, 
corresponding to the four colors on the remote 
controller: replace with colors RED, GREEN, 
YELLOW, BLUE.
[8].Press “LEFT/RIGHT” to switch between Tab 
4 and Tab 5.
(2)Press “GREEN” key to enter into Weekly 
Mode to display the programs and program 
information in different time ranges of the 
current program list within one week.
[1].Press F.R & F.F key to switch between 
Sunday ---Saturday in Tab 3.
[2].Press UP/DOWN key to move upward and 
downward to switch between the different 
programs in Tab 5.
[3].Press LEFT/RIGHT key to choose to view 
the program information in different time 
ranges in Tab 6.
(3)When the cursor stops on Tab 5 in Figure 3.6 
Tab 6 in Figure 3.7, press the “YELLOW” key to 
choose the detailed information corresponding 
to the current program.
(4)When the cursor stops in Tab 5 of Figure 3.6 
and Tab 6 of Figure 3.7, press the “BLUE” key 
to enter Wakeup Timer menu to book programs
 Press “EXIT” to exit from EPG.


Summary of Contents for TVIF1900

Page 1: ...User Manual TVIF1900 Water Proof TV www techvision co uk...

Page 2: ...06 Remote Control 07 09 MENU Adjust Settings 10 11 DVB T function 12 23 FM Radio Player 24 Bluetooth 25 Cable Schematic 26 Trouble Shooting 27 General Precautions 28 29 29 Accessory 1 Waterproof remot...

Page 3: ...__5A 5 2kg 100g 475 L x397 H x44 D mm CE Ip67 2 28 General Precautions 1 Do not add any parts or use any accessories not provided from the manufacturer 2 Temperature Storage 0 50 Operating 0 60 degree...

Page 4: ...tor eg If watching a video press play on the video shortly after turning on the TV or it will switch off This is not a fault of the TV For all reception problems a qualified aerial installer should be...

Page 5: ...nit STEP 4 Apply a bead of silicone to the back of the unit and screw the unit into place TOP 03 26 Cable Schematic 4 5m Speaker cable Speaker AV VIDEO 4m TV CABLE 3 5m 50cm DC jack Power extension AC...

Page 6: ...Bluetooth in MEDIA MENU Main Menu In Main Menu press UP DOWN key to choose Bluetooth option and then Press OK key once to enter Bluetooth Bluetooth Open your bluetooth option from the Mobile phone Mp...

Page 7: ...er FM Radio Player in MEDIA MENU Main Menu Digital TV FM Radio Player Bluetooth Games Version FM Radio Player FM Init Success RED Auto Scan Main Menu In Main Menu press UP DOWN key to choose FM Radio...

Page 8: ...ress key EPG on the remote control to enter into the EPG page to know more about the programs to be played As shown in the figure below Enter into EPG menu default enter Daily Mode menu under this mod...

Page 9: ...rease volume CHANNEL change channels sequentially up or down in viewing mode 22 Factory use only Version Available Games Box Man There are six function selection menus on the left of the interface for...

Page 10: ...nts Timer Mode set time mode Wakeup Mode set wakeup mode Wakeup Messag set wakeup message Wakeup Channel set wakeup channel name Wakeup Date set wakeup date On Time set wakeup time Duration set durati...

Page 11: ...und effect can be set as Standard Classic Rock Jazz POP Surround To set stage effect can be set as OFF Concert Church Passive Live Area To set scanning area and choose area to download preset channel...

Page 12: ...EQ 100 100 100 100 100 SOUND FUNCTION MAIN MENU PICTURE TV ADJUST BACK MENU MOVE MAIN MENU MAIN MENU 19 TV TV setup provides convenient TV input mode you can via menu MENU Digital TV Configuration TV...

Page 13: ...riers option Press OK key then the system will hint with Delete all Carriers dialogue box press LEFT RIGHT key to choose Yes or No press OK key to confirm Configuration OSD Configuration provides indi...

Page 14: ...em will hint with Update succeeds and return to Edit Channel menu 6 Press EXIT key to return to Edit Channel page 4 Press the yellow 3D key of the remote controller to enter Rename Channel menu The op...

Page 15: ...and save the program at the same time return to the installation menu and to play them in vpp window automatically 4 Press UP DOWN key choose Type Press LEFT RIGHT key to set Sorting Parameters 5 Aft...

Page 16: ...WN key to choose the line where Favorite Channel is then press the 4 color key on the remote controller press the red ZOOM key to set and cancel Favorite Channel the green A B key to set or cancel Del...

Reviews: