background image

9

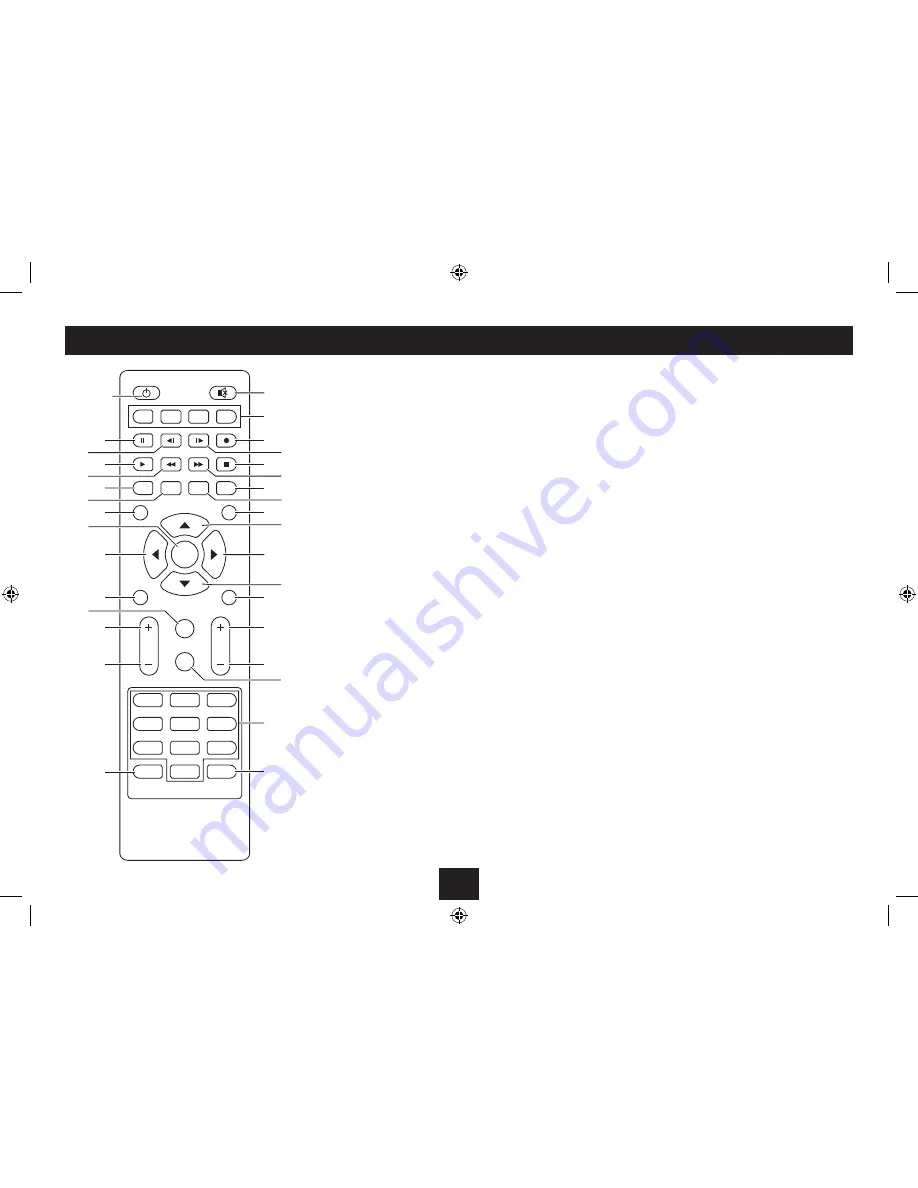
REMOTE CONTROL

Mute button - mutes the sound.

1. 

Red/Green/Yellow/Blue colour buttons.

2. 

Record button - Starts a recording to a docked USB 

3. 

memory device.
Step forward.

4. 

Stop button - Stop playback or recording.

5. 

Fast  forward  button  -  Searches  forward  at  high 

6. 

speed.
Opens the list of saved favourite channels.

7. 

TV/Radio button - Switches between TV and Radio 

8. 

channels.
EPG Guide button - Opens the channel guide.

9. 

Cursor up button.

10. 

Cursor right button.

11. 

Cursor down button.

12. 

Exit button - Exit from menu screens etc.

13. 

Next channel button - selects the next channel.

14. 

Previous  channel  button  -  selects  the  previous 

15. 

channel.
Menu button - Opens the Main menu.

16. 

Numeric keypad.

17. 

Sub button - Opens the subtitle menu.

18. 

Audio setup button - opens the audio menu.

19. 

Volume down button.

20. 

Volume up button.

21. 

Zoom button - sets the aspect ratio or zoom level.

22. 

Back button.

23. 

Cursor left button.

24. 

OK button - Selects an option.

25. 

Info button - display program information.

26. 

Teletext button.

27. 

Mix button.

28. 

Fast reverse button - Searches back at high speed.

29. 

Play button - Selects play for music, movies etc.

30. 

Step back.

31. 

Pause button - Pauses playback or recording.

32. 

Standby button - Switch on or set to Standby.

33. 

1

2

3
6

5

4
7

8

9

0

AUDIO

SUB

TTX

TV/R

FAV

OK

CH

MIX

EPG

INFO

BACK

EXIT

VOL

ZOOM

MENU

ABC

JKL

TUV

DEF

MNO

WXYZ

GHI

PQRS

c

d

a

ef

1!

1#
1$

1^

1(

1&

2)

1*

2!

2#

2@

2$

2^

2%

1%

1@

2(2*

3#

3@

i1)

g

3)

3!

b

h

2&

Summary of Contents for TKSTB14

Page 1: ...Owner s Handbook TKSTB14 Freeview HD receiver EXCLUSIVELY FROM ...

Page 2: ...rmation 19 Setup menu display menu 20 SCART mode 20 Aspect ratio 20 Resolution 20 Setup menu display menu 21 Menu timeout 21 Menu opacity 21 Setup menu sound menu 22 Balance 22 Audio description 22 Digital audio 23 SPDIF delay 23 Setup menu time menu 24 Clock setting auto turn off on 24 Auto standby 25 Setup menu option 26 Language settings 26 Hearing impaired 26 Restore factory default 26 Network...

Page 3: ...of the unit The means of disconnecting this appliance from the mains supply is the mains plug This should be unobstructed and readily operable at all times Batteries a battery pack or installed batteries shall not be subject to excessive heat such as sunshine fire or the like Refer all servicing to qualified service personnel Servicing is required when the apparatus has been damaged in any way suc...

Page 4: ...having regard to any recycling regulations in your area The TKSTB14 is a full featured HD DVB T set top box thataddsHDdigitalTVreceptiontoaTVthathasHDMI connection The unit can display OTT content enabled via a wired connection to a computer network which has access to the Internet All functions of the TKSTB14 may be controlled from the supplied remote control A USB flash drive may be docked to th...

Page 5: ...deo out 5 CONTROLSANDCONNECTIONS Standby On button 1 Power indicator 2 Display area 3 Remote control command receiver 4 Coaxial digital audio 6 USB port 7 HDMI out 8 SCART out 9 Power cable 10 FRONTVIEW BACKVIEW IR d c a b ANT IN NETWORK LOOP OUT R S PDIF USB HDMI CVBS L TV SCART g a b c d e f h 1 i ...

Page 6: ...pplier to have it checked ALWAYS DISCONNECT POWER FROM ALL ELECTRONIC COMPONENTSWHEN MAKING OR CHANGING CONNECTIONS 2 CONNECTING RF OUT This connection is optional and connects an aerial feed to yourTV Usinganantennaplug socketcable notsupplied connectLOOPOUTtotheaerial socket on yourTV When this connection is made you can continue to select programs directly on your TV whenyouarenotusingyourHDset...

Page 7: ... has an HDMI digital connector Connect an HDMI cable not supplied between the HDMI outlet and a spare HDMI connector on yourTV ALWAYS DISCONNECT POWER FROM ALL ELECTRONIC COMPONENTSWHEN MAKING OR CHANGING CONNECTIONS ANT IN NETWORK LOOP OUT R S PDIF USB HDMI CVBS L TV SCART ...

Page 8: ...e CVBS video yellow left audio white and right audio red connections on your set top box Connect the plugs at the other end of the cable to a free AV input on theTV CONNECTINGANALOGUEVIDEOANDAUDIO ANT IN NETWORK LOOP OUT R S PDIF USB HDMI CVBS L TV SCART Connecting to aTV SCART input Connect a SCART cable not supplied to the TV SCART connection on your set top box Connect the other end of the cabl...

Page 9: ...connection must be wired There is no wireless networking built in To make this connection your homenetworkwillrequirean alwayson connectionto the Internet so you will need access to a spare port on the network modem router The illustration shows the connection arrangements found on a typical modem router Connect a CAT5 Ethernet cable of suitable length not supplied to the NETWORK port on the back ...

Page 10: ...cts the previous 15 channel Menu button Opens the Main menu 16 Numeric keypad 17 Sub button Opens the subtitle menu 18 Audio setup button opens the audio menu 19 Volume down button 20 Volume up button 21 Zoom button sets the aspect ratio or zoom level 22 Back button 23 Cursor left button 24 OK button Selects an option 25 Info button display program information 26 Teletext button 27 Mix button 28 F...

Page 11: ...m into water the general rubbish or in a fire Weak batteries can leak and damage the remote control Replace them in good time Fit 2 x AAA batteries observing 3 polarityasshown Whenreplacing the battery use only the same type batteries REMOTECONTROLBATTERIES GETTINGSTARTED TVSETTINGS FIRSTTIMEUSE Before switching on for the first time ensure that you have connected aTV and an aerial When you switch...

Page 12: ...t you can browse To display the Channel List Press BACK while viewing a station TheChannelListwillbedisplayed Radio Channel list Press or to switch between the TV channel list and the radio channel list When radio channels are displayed you can browse and selectradiochannelsinthesamewayasTVchannels Customising the Channel List You can customise the channels listed to suit your preferences by press...

Page 13: ...ceiver remote control Check that the TV volume control is set to at least 50 of the maximum setting Press VOL or VOL to increase or decrease the volume level Avolumebargraphisdisplayed If you want to set the volume from theTV Check that the volume control on the Digital Receiver is set to at least 50 of the maximum setting Set the volume level with theTV remote control Muting the sound Press repea...

Page 14: ...ion Toturnthesubtitlesoff selectthe OFF optionfromthe Subtitle menu SUBTITLES SCREENFORMAT ZOOM WithaUSBdrivedockedtotheUSBportyoucanpause and timeshift live TV also make timed recordings that will be saved to the drive for later viewing Drive size and format USB drives must be FAT32 or NTFS formatted FAT32 drives are limited to a maximum 4GB capacity NTFS formatted drives are unlimited exFAT form...

Page 15: ...background Thecontroltoolbarwillbedisplayed To select a function from the segment toolbar Press or to highlight the navigation control you want to use Press OK to select that control or Press the corresponding button on the remote control While the still frame is displayed when paused you can Select to return to play The program segment will continue to play from the pause time Press tostopthesegm...

Page 16: ...ave the program in the recording schedule The recording schedule will be displayed updated with theprogramyouentered When the recording time arrives The unit will switch on set to the recording channel and the recording will start TIMERRECORDINGFROMTHEGUIDE Press to navigate the guide screen and highlight the program you want to record Press or if you need to skip forwards or backwards by 24 hours...

Page 17: ...enu Choose from the options Channel Display Sound Time Option Lock Applications To select an option from the one of the menus Step to one of the Setup menus Press or to move up or down the menu options Press OK to select the menu option highlighted The next sections describe in more detail each menu and sub menu of the setup options available To exit the Setup menu Press EXIT TheSetupmenuwillclose...

Page 18: ...o scan for channels Open the CHANNEL setup menu Select the AutoTuning option Channel tuning will begin This may take some minutes to complete while the bands in yourareaarescanned The Channel Tuning display shows a progress bar and indicates how many TV radio and datachannelshavebeenfound TV channels Radio channels Data channels Whenthescaniscompleted Follow the on screen menus to complete the pro...

Page 19: ...pen Press or to step through the channels available Information about the channel will be displayed The signal strength of the channel is alsoshown ThefunctionsavailablethroughtheProgramEditmenuarethesameasthoseavailable by pressing BACK on the remote control Refer to the CHANNEL LIST section on page 11 for more details of editing the channel list Tosearchforstationsonthechannel displayed press OK...

Page 20: ...ignal Information option TheSignalInformationpanewillopen The pane will display information about the channel you are watching including signal quality and signal strength bargraphs If the signal strength display is low your aerial may not be delivering enough signal A local aerial supplier should be able to recommend a solution to increase the signal available Signal quality Signal strength ...

Page 21: ...ange the setting Step to the setting you want Asyouchangethesettings theaspectratioofthepicture willupdate RESOLUTION The Resolution option enables you to change the resolution to match the performance of yourTV NOTE This setting only affects the resolution of the digital HDMI output of your receiver not the analogue CVBSoutput Theanalogueoutputresolutionisfixedat 576i PAL or 480i NTSC To check th...

Page 22: ...save the setting and exit NOTE Ifyouchoosethe Off settingthemenuwillremainpermanentlyon screenonce opened To close the menu press EXIT SETUPMENU DISPLAYMENU MENUOPACITY The Menu Opacity setting enables you to set the transparency of the menus over the picture on screen To check the current setting Open the DISPLAY setup menu Step to the Menu Opacity option Thecurrentsettingwillbeshown To change th...

Page 23: ...lopen Press or to change the setting Thesoundbalancewillshifttotherightasthesettingincreasesortotheleftasthe setting reduces The Audio Description option enables you to change the Audio description setting To check the current setting Open the SOUND setup menu Step to the Audio Description setting The AudioDescription optionwillbehighlightedandthecurrentsettingwillbeshown To change enable disable ...

Page 24: ...ve the setting Thesettingwillbesavedandthetextwillchangetoblack DIGITALAUDIO The DigitalAudio optionenablesyoutosetupthedigitalaudiooutputfromtheSPDIF connection To check the current setting Open the SOUND setup menu Step to the Digital Audio setting The DigitalAudio optionwillbehighlightedandthecurrentsettingwillbeshown To change the setting Press OK repeatedly Threesettingsareavailable Off PCMor...

Page 25: ... the TIME setup menu Step to the Auto turn off setting Thecurrentsettingwillbedisplayed IfnoOffTimeisset Off willbedisplayed To set an Auto turn off time Press OK Thesettingpanewillopen Checking and setting an Auto turn on time To set an Auto turn on time follow the same procedure but select On Time from the TIME setup menu More options are available for On Time setting In addition to switch on ti...

Page 26: ...at will automatically set your receiver to Standby when there has been no signal for ten minutes To enable or disable Auto Standby Open the TIME setup menu Step to the Auto Standby setting Thecurrentsettingwillbedisplayed Press OK repeatedly to step between on and off settings ...

Page 27: ...n To change the setting Press OK Thesettingwillchange RESTOREFACTORYDEFAULT You can choose this option to restore all user menu settings to the factory default This will clear all user settings and the password and return them to factory original Stored stations and favourites will also be cleared No changes will be made to a docked USB drive Open the OPTION setup menu Select the Restore Factory D...

Page 28: ...s on your network A valid Subnet Mask number for your network The IP address of your network gateway Primary and secondary DNS settings for your network If you have the above data Open the OPTION setup menu Step to the Network Configuration option TheWiredNetworkmenuappears Select the Configuration option YouwillnowseetheNetworkConfigurationscreen Thecurrentsettingwillbedisplayed Thiswilleitherbe ...

Page 29: ...ation may be required by a service engineer SOFTWAREUPDATE NETWORK Your receiver can automatically search for software updates through the internet NOTE The receiver must be connected to a computer network with access to the Internet for this feature to function correctly Open the OPTION menu Select the Software Update Network option Follow the screen prompts to search for upgraded software SOFTWA...

Page 30: ...enu Open the LOCK setup menu Select the Lock System option Thepasswordentrypanewillappear Enter the password The LOCK menuitemswillnowbeaccessible To enable disable the lock system Press OK The Lock System status will change When the Lock System is set to On Parental Control settings and menu security will be applied Thisoptionmaybeusedtochangethesystempassword Open the LOCK setup menu Select the ...

Page 31: ...st Highlight the channel you want to unblock Press the GREEN button Enter the password Thelocksymbolwillberemoved This option may be used to block programs according to their age rating A password will be required to view any programs that have been blocked To block channels Open the LOCK setup menu Press OK Thepasswordentrypanewillappear Enter the password The LOCK menuitemswillnowbeaccessible Se...

Page 32: ...the Application menu Starting the Media Player Open the APPLICATION setup menu Press OK to select the Media Player option TheMediaPlayermenuwillopen Choosing which media to play Press or to highlight the type of media you want to play ChoosefromMovies Music PhotosorPVR recordings Press OK to confirm your selection Ifyouchosemovies musicorphotos afilebrowserwillopen IfyouchosePVR skiptopage34formor...

Page 33: ... has been used to create three folders on the USB drive to contain music photos and movies The media files are then organised within these and can be stored in sub folders if required A folder arrangement of this kind is recommended to help you organise your media NOTE The folder _MSTPVR will always be created automatically by your receiver Press or to highlight the folder containing the media you...

Page 34: ...the playback control keys on the remote control to pause search or change tracks photos etc You can also choose functions from the on screen menu toolbar to control music and movie playback or photo slideshows Press MENU to switch the menu bar on or off A background display will always remain on screen to show playback status File management toolbar The File Management Toolbar enables you to navig...

Page 35: ...am information will update Continue to navigate until you reach the recording you want to play Press OK to play the recording Therecordingwillplay Atoolbarwillbedisplayedinitiallytodisplaythelengthoftherecordingetc Playback control While the recording is playing you can use the playback control keys on the remote control to pause search or skip forward backward Recording list Recording preview Rec...

Page 36: ...e the navigation keys indicated on screen to navigate to the news broadcast or weather report you want Displaying OTT content Open the APPLICATION setup menu Select the OTT option TheOTThomepagewillopen SETUPMENU APPLICATIONS OTT news page The OTT news page is an index of the latest news headlines From here you can use the navigation keys to select and read news items Eachnewsitemmayhavesubpages F...

Page 37: ...ucanseethecityyouwantinthelist selectthe x symbolatthetop right of the keyboard Thekeyboardwillclose Select the city from the list Thecitywillbeaddedtoyourcitylist OTT monitor When this function is enabled alerts will be displayed when OTT news is updated You can then press OK to jump to the OTT news page Open the APPLICATION setup menu Step to the OTT Monitor option Thesettingforthemonitorwillbed...

Page 38: ...nect the power and re check If there is still no picture check that theTV is set to the correct AV input No picture after changing the resolution setting You may have selected a resolution setting not supported by your TV Refer to the Setup Menu Picture Resolution section for instructions to restore the setting No channels found when scanning Check the aerial connection Check that digitalTV is ava...

Page 39: ......

Page 40: ...Herts EN8 9SL TKSTB214V0 2 Technika Helplines Landlines 0800 323 4060 Freephone from a BT landline Mobiles 0330 123 4060 Calls cost no more than calls to geographic numbers eg 01 or02 and are included in inclusive minutes and discount schemes ...

Reviews: