background image

11.

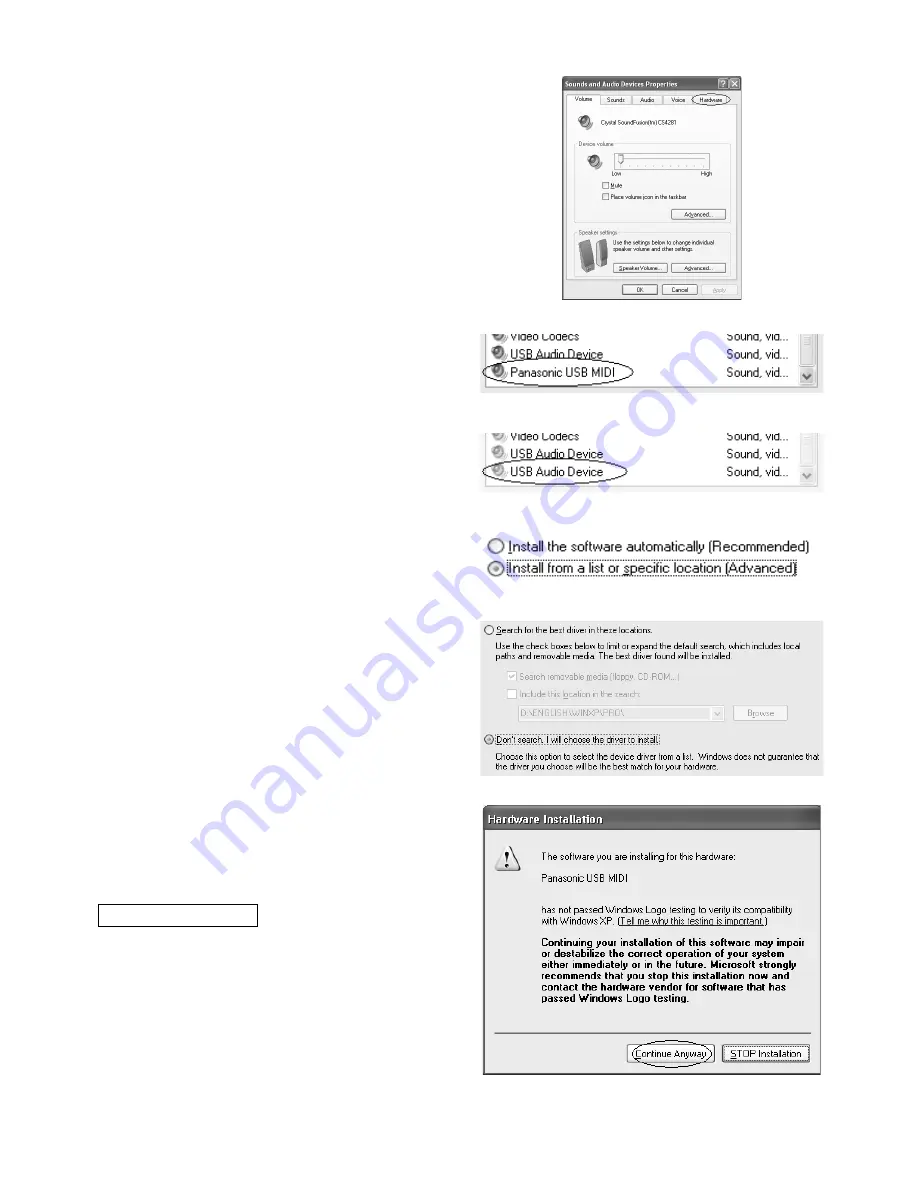
Select the [Hardware] tab.

12.

If [Panasonic USB MIDI] does not appear in the
device box, perform the following procedure.

If [Panasonic USB MIDI] appears, the installation is
finished, so the following procedure does not need
to be performed.

13.

Two [USB Audio Device] will appear, so select
the one on the bottom and press the
[Properties] button.

14.

Select the [Driver] tab and press the [Update
Driver] button.

15.

Select [

o

 Install from a list or specific location

(Advanced)].

16.

Confirm that the indication has changed to [

Install from a list or specific location
(Advanced)] and then press [Next].

17.

Select [

o

 don’t search. I will choose the driver

to install].

18.

Confirm that the indication has changed to [

don’t search. I will choose the driver to install]
and press [Next].

19.

Select [Panasonic USB MIDI] from the [Model]
list.

If multiple [Panasonic USB MIDI] are displayed,
select the one with the most recent date.

20.

Press [Next].

If a message regarding the Microsoft digital signa-
ture or Windows Logo testing appears, press the
[Continue] button.

21.

When the installation completed message
appears, press the [Finish] button.

22.

Close the [Panasonic USB MIDI properties]
window.

23.

When restarting is required, restart the
computer.

This completes the installation.

Usage Precautions

When turning off the power to the instrument or un-
plugging the USB cable, first press the tasktray
bar’s “Disconnect” icon and then select [Safety re-
move Panasonic USB MIDI]. 

If an application is using the Panasonic USB MIDI,
it cannot be disconnected, so first exit the applica-
tion before disconnecting the instrument.

When turning the power to the instrument on or off,
or when connecting or disconnecting the USB
cable, make sure at least 10 seconds passes be-
tween each action.

(11.)

(12.)

(13.)

(16.)

(18.)

(20.)

4

QQTG0678

Summary of Contents for SX-KN7000

Page 1: ...n Speicherplatz f r Installation etwa 10 MB Festplatten Speicherplatz pro Minute f r Audioaufnahme Farbtiefe von mindestens 16 Bit 65 536 Farben Display Aufl sung von mindestens 800x600 1 St rungsfrei...

Page 2: ...cessary restart the computer and then follow the procedure given below 6 Connect this instrument to the computer with a USB cable and turn the instrumnet on 7 The driver will be installed automaticall...

Page 3: ...p riph rique 2000 XP Lors de l installation connectez vous votre ordinateur en utilisant Administrateur Windows 2000 ou Gestionnaire d ordinateur Windows XP Avant de proc der l installation NE RACCOR...

Page 4: ...MIDI from the Model list If multiple Panasonic USB MIDI are displayed select the one with the most recent date 20 Press Next If a message regarding the Microsoft digital signa ture or Windows Logo tes...

Page 5: ...kann Wenn Sie den Instrument ein oder ausschalten oder das USB Kabel anschlieen oder abtrennen warten Sie mindestens 10 Sekunden zwischen den Vorg ngen 11 S lectionnez l onglet Mat riel 12 Si Panason...

Page 6: ...Hardware tab and press the Device Manager button 98 Me Select the Device Manager tab and check View device by type 4 Press the mark of the Universal Serial Bus controllers to change it to a mark 5 20...

Page 7: ...m 7 Schalten Sie das Instrument aus und trennen Sie das USB Kabel ab Damit ist die Deinstallation beendet D sinstallation du pilote de p riph rique D connectez pr alablement les autres p riph riques U...

Page 8: ...ar double click on the desktop My computer icon open the CD ROM drive index file and con tinue the procedure after the CD ROM title page display appears 3 Open the Install icon The installer is activa...

Page 9: ...lp angezeigt wird kann die Installation problemlos fortgesetzt werden Dr cken Sie die Taste OK um die Installation fortzusetzen Installation de l application Avant de proc der l installation quittez d...

Page 10: ...e CD ROM drive index file and con tinue the procedure after the CD ROM title page display appears 3 Open the Install icon The installer is activated Follow the instructions on the screen to proceed wi...

Page 11: ...ere bequeme Methode zum Starten der An wendung ist das Doppelklicken des Symbols Song Manager oder Audio Player auf dem Desktop propos du mode d emploi Vous pouvez afficher une explication relative l...

Page 12: ...ieren an und klicken Sie auf Hinzuf gen Entfernen 4 Wenn das folgende Dialogfenster erscheint berpr fen Sie den Inhalt und klicken Sie auf Ja Der Deinstallationsvorgang beginnt 5 Wenn das Fenster Hinz...

Reviews: