background image

PHYSICAL INSTALLATION

This chapter describes the physical installation of the TG650s, hereafter called “gateway”.

3.1  

3.1  

Package description

Package description

The following items should be present in the Do-It-Yourself (DiY) package:

1 Technicolor TG650s 2p gateway box containing:

1 TG650s 2p modem

1 PSU

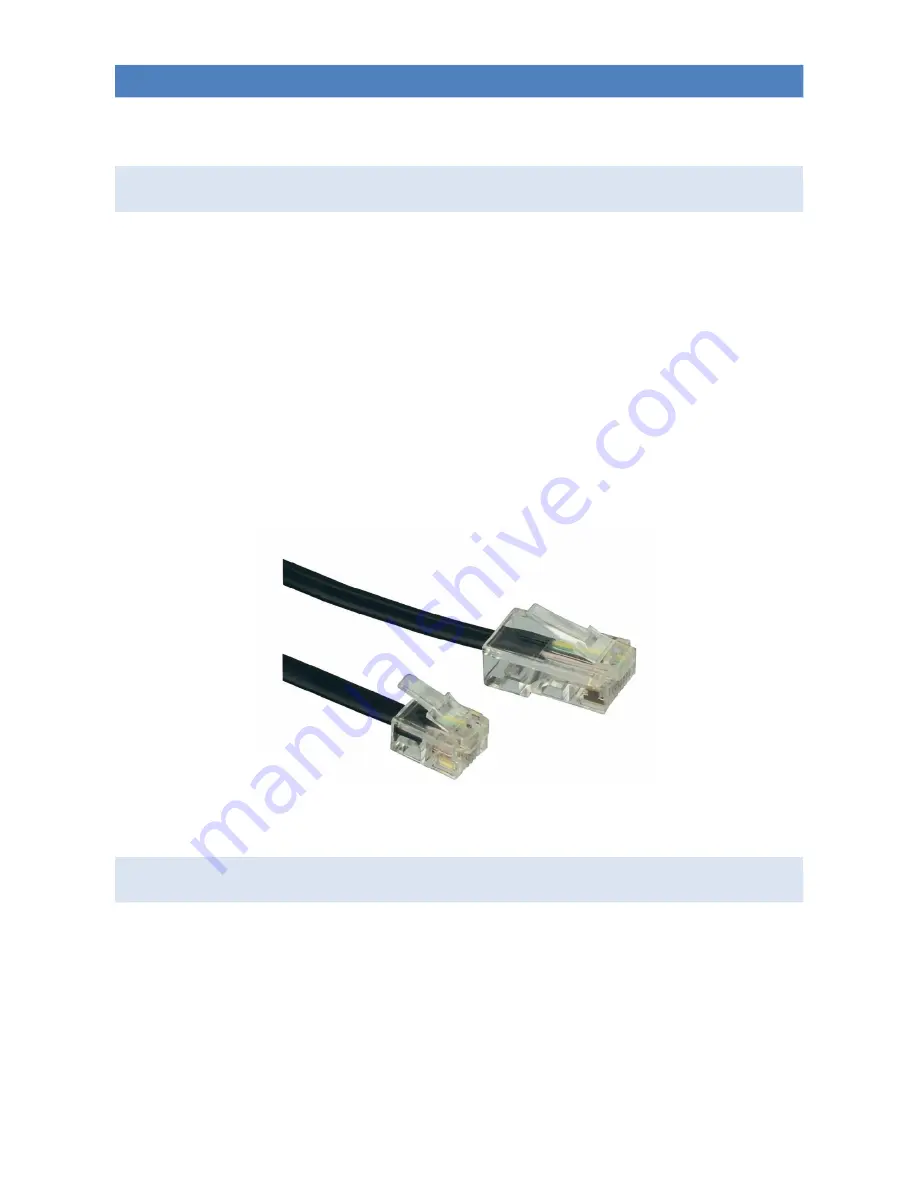
1 RJ14 cable  (the difference to RJ11 is that RJ14 supports 4 wires)

1 RJ45 Cat5e Ethernet straight cable

There is no localization supplied, as the TG650s is an SHDSL modem, and does not support 
line-sharing with Voice, hence no splitter/filter nor additional cabling is supplied.  

Examples of the RJ45 and RJ14 connectors:

3.2  

3.2  

Physical Installation Environment

Physical Installation Environment

The environment in which the gateway is being installed must have normal ventilation and 
support the following conditions:

Temperature: 0°to 40°C (32 to 105 F)

Humidity: 20% to 80%

ATT_TG650s_Quick_Install_Guide                          Page 10

Illustration 3.1: RJ14 (left) and RJ-45 (right) connector. The 
RJ-14 has 4 wires, the RJ-45 has 8 wires. 

Summary of Contents for TG650S

Page 1: ...TECHNICOLOR TG650S INSTALLATION GUIDE FOR AT T FIRMWARE VERSION 10 2 AND LATER AT T MANAGED BROADBAND Document version 1 0 April 7 2015 ...

Page 2: ...ease date 04 07 15 Previous version n a Planned revision date n a This document will be updated if appropriate after management reviews for legal or technical reasons Change history Version Changes 0 1 Draft version 1 0 Final version ATT_TG650s_Quick_Install_Guide Page 2 ...

Page 3: ...configure my gateway 19 4 2 1 Finding the gateway 19 4 2 2 Securing the gateway 22 4 2 3 Finalizing the configuration 23 5 Trouble shooting 24 5 1 Installation menu did not appear 24 5 2 Wizard did not detect the Gateway 24 5 3 LED diagnostics 26 5 4 Browsing to the Gateway 27 5 5 Troubleshooting 27 5 5 1 How to perform a hardware reset to factory defaults 27 5 5 2 Factory default service settings...

Page 4: ...country requires a country specific configuration This guides you through the setup process and provides a short problem determination flow This document does not integrate the AT T VPN Gateway or AT T Global Network Client installation guides please refer to your AT T account representative to obtain these documentation Have a good installation and enjoy quality AT T services ATT_TG650s_Quick_Ins...

Page 5: ... its physical installation its configuration how to get support and a modem problem determination flow Welcome letter Package description Modem description Physical installation Modem configuration Most common configuration problems ATT_TG650s_Quick_Install_Guide Page 5 ...

Page 6: ...e Do It Yourself installation package So following the installation guidelines included in this package you can install the xDSL modem The modem is pre configured so minimal configuration is required If you applied for AT T assisted installation the installation will be done for you at the agreed date Please note that 10 working days after we have enabled your DSL connection we will begin to charg...

Page 7: ...de Firmware 10 2 or newer 1 Gigabit Ethernet auto sensing LAN port 3 Fast Ethernet auto sensing LAN ports 2 USB ports to connect to a file server and or 3G USB stick unsupported A console port unused It is presented in a slim line box with an external power converter The TG650s modem gateway is a versatile device which can be configured as a bridge or a router or gateway AT T uses this device sole...

Page 8: ...function The LED functions The ports to connect all cables to are at the backside of the modem The layout of the ports is displayed in illustration 2 3 ATT_TG650s_Quick_Install_Guide Page 8 Illustration 2 2 LED indications overview Please notice the dual Broadband LEDs 1 per wire pair ...

Page 9: ...2 2 2 Generic firmware Generic firmware The TG650s as AT T uses it runs standard generic firmware The default user is Administrator Embedded templates Bridge mode this is the only mode used and supported by AT T 3 router mode templates unused The configuration for specific countries will be done via external template files ATT_TG650s_Quick_Install_Guide Page 9 Illustration 2 3 The port layout of t...

Page 10: ...able There is no localization supplied as the TG650s is an SHDSL modem and does not support line sharing with Voice hence no splitter filter nor additional cabling is supplied Examples of the RJ45 and RJ14 connectors 3 2 3 2 Physical Installation Environment Physical Installation Environment The environment in which the gateway is being installed must have normal ventilation and support the follow...

Page 11: ... AT T VPN Gateway or Cisco Ethernet based router is then best connected to yellow LAN port 1 as this is the Gigabit Ethernet port Now in this diagram a straight RJ14 cable is suggested An RJ14 cable supports 4 wires 2 wire pairs same as the TG650s 2P does The pin out is as follows 1 4 are wire pair 2 2 3 are wire pair 1 Usually in case a 2 pair connection is supplied that cable can be connected di...

Page 12: ...requires that the cable needs to be modified as shown below in Illustration 3 3 ATT_TG650s_Quick_Install_Guide Page 12 Illustration 3 3 RJ 14 cable pin out and Y cable when 2 wall sockets are used to support the SHDSL connection ...

Page 13: ...hed This then presents a menu panel shown below in Illustration 4 1 To configure the modem please connect your PC to one of the yellow LAN ports of the modem If this is the first time you configure the DSL device click on Initial setup If you already have configured the DSL device before and you want to change some settings select Reconfigure my gateway 4 1 4 1 Initial Setup Initial Setup When sel...

Page 14: ...he DSL device A new screen with safety instructions and regulatory notices is displayed ATT_TG650s_Quick_Install_Guide Page 14 Illustration 4 2 Start of the Setup Wizard Illustration 4 3 In the dropdown box please select the gateway you have received ...

Page 15: ...nd notices by tagging the box This will show the Next button ATT_TG650s_Quick_Install_Guide Page 15 Illustration 4 4 Safety instructions and Regulatory notices please read these carefully Illustration 4 5 Here the physical installation of your gateway starts ...

Page 16: ...Click Next Click Next ATT_TG650s_Quick_Install_Guide Page 16 Illustration 4 6 DSL line connection Illustration 4 7 This panel is not valid for the TG650s please select no ...

Page 17: ...e power supply will be connected Click Next ATT_TG650s_Quick_Install_Guide Page 17 Illustration 4 9 Connection to the power supply Illustration 4 8 Again this panel is invalid for the TG650s please click Next ...

Page 18: ...ith connection specific details so the menu will continue with the Reconfigure my gateway menu ATT_TG650s_Quick_Install_Guide Page 18 Illustration 4 11 Push Continue to launch the setup program Illustration 4 10 After this panel the configuration software for this modem will be started You will only need the country in which this modem will be installed and the user name password to locally secure...

Page 19: ...ay device connected to the PC The screen will look like this Click Next 4 2 1 4 2 1 Finding the gateway Finding the gateway ATT_TG650s_Quick_Install_Guide Page 19 Illustration 4 13 Scanning the network connection of your computer Illustration 4 12 Start of the setup program to configure the gateway ...

Page 20: ... the program will check it check it and verify it s configuration If a DSL device is found the setup wizard will try to find the type and the screen will look like Illustration 4 14 Sometimes the DSL device is protected by a password when the DSL device is used before Enter the correct user id and password to continue or perform a factory reset as described in par 5 5 1 ATT_TG650s_Quick_Install_Gu...

Page 21: ...l show a drop down menu Region to select the country and the required service ATT_TG650s_Quick_Install_Guide Page 21 Illustration 4 16 Please tick Yes if you want to configure the modem Illustration 4 17 Please select the country in which this modem will be connected and click Next ...

Page 22: ...d to prevent unauthorized access to the DSL device You can choose anything you want Please store the submitted information securely as you need it to access the device either via web browser or telnet session When you have entered the modem access credentials and the password has been confirmed click Next ATT_TG650s_Quick_Install_Guide Page 22 Illustration 4 18 This panel asks for credentials to a...

Page 23: ...cess can take some time and possibly you will see a few reboots of the gateway The configuration becomes active during this phase When all has been pushed in the next panel will appear After clocking Finish the configuration has been completed and the software will close ATT_TG650s_Quick_Install_Guide Page 23 Illustration 4 19 Pushing in the configuration Illustration 4 20 Configuration is complet...

Page 24: ...and select the correct drive and directory Go to My computer on your desktop and select the software source or directory Open the folder drive and run setup exe This will start the standard Gateway setup program 5 2 5 2 Wizard did not detect the Gateway Wizard did not detect the Gateway The Technicolor configuration software uses a multicast IP protocol to detect the gateway and determine the mode...

Page 25: ... when the AT T Global Network Firewall has been installed on your PC The Internet protocol TCP IP suite isn t installed on your computer with a valid IP address Check with your computer support The accompanying tool AT T Global Network Client Firewall settings version 6 x client or later shown in Illustration 5 3 allows you to deactivate the firewall after which the setup tool will find the modem ...

Page 26: ... 5 minutes If it keeps flashing pls request modem replacement Red solid Power on self test failed indicating device malfunction Orange solid Bootloader selftest Orange blink ing Bootloader active during upgrade Ethernet off LAN ports are down green LAN port s are up no traffic flashing green LAN port s are up there is traffic USB off this LED is not used green line has synchronized and up flashing...

Page 27: ...ateway Keep it pushed until all LEDS go out except for the power led This will take about 7 10 seconds 3 Release the reset button 4 The gateway restarts in default configuration Resetting the system to its factory defaults also involves deleting the configuration profile settings Therefore you need to reconfigure the system using the gateway Setup wizard or by uploading the relevant configuration ...

Page 28: ... then be requested from AT T 5 6 5 6 Helpdesk contact phone numbers Helpdesk contact phone numbers The AT T Help Desk can help you case of installation problems and is reachable at the normal AT T country number Australia at 0011 800 2255 4288 800 CALL 4 ATT Austria at 00 800 2255 4288 800 CALL 4 ATT Belgium at 00 800 2255 4288 800 CALL 4 ATT Canada at 1 800 268 3100 Czech Republic at 00 800 2255 ...

Page 29: ...This is the last page of this document ATT_TG650s_Quick_Install_Guide Page 29 ...

Reviews: