background image

10

2 porTS DVI SplITTer

eN

5.0  CONNECTION AND OpERATION 

1)  Connect the DVI input source and output devices into the DVI Splitter. (DVI cables are optional)
  *please refer to the connection diagram section.
2)  Insert the DC side of 5V power supply into it and then connect the AC side of the power supply into 

the wall outlet. 

3)  Turn on the power.

Attention: Insert / Extract cable gently. 

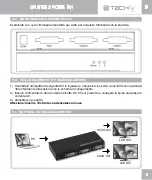
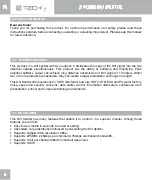
5.1  CONNECTION DIAGRAM

PC

DVI LCD

DVI LCD

DVI CABLE

DVI CABLE


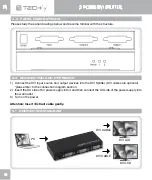
4.0  pANEL DESCRIpTIONS

Please study the panel drawings below and become familiar with the structure.

Summary of Contents for ICKV102DTY

Page 1: ...www techly com ICKV102DTY Splitter DVI 2 porte 2 port DVI Splitter Manuale d istruzione User s manual ...

Page 2: ... DVI INDICE 1 0 Introduzione 3 2 0 Specifiche 4 3 0 Contenuto della confezione 4 4 0 Descrizione apparecchio 4 5 0 Schema di collegamento e funzionamento 5 6 0 Precauzioni di sicurezza e manutenzione 6 MANUALE D ISTRUZIONE ...

Page 3: ... due o più prodotti sono in cascata possono creare una distribuzione più ampia coprendo una maggiore distanza Questo splitter DVI offre una soluzione semplice e conveniente per video DVI adatto praticamente a qualsiasi applicazione o ambiente operativo aule settore sanitario audio video professionale centri di controllo ambienti POS al dettaglio 1 1 CARATTERISTICHE Questo splitter DVI è dotato di ...

Page 4: ...e 50 60Hz Larghezza di banda video 2 25Gbps 225MHz Risoluzione HDTV Interlacciata 50 60Hz 480i 576i 1080i Progressiva 50 60Hz 480p 576p 720p 1080p Informazioni meccaniche Dimensioni L P A 155x70x23mm Peso netto 265g Informazioni ambientali Temperatura d esercizio Da 0 a 70 Umidità d esercizio Da 10 a 85 RH senza condensa Temperatura di stoccaggio Da 10 a 80 Umidità di stoccaggio Da 5 a 90 RH senza...

Page 5: ...litter la sorgente DVI in ingresso e i dispositivi in uscita I cavi DVI sono opzionali fare riferimento alla sezione con lo schema di collegamento 2 Inserire l alimentatore dal lato dello spinotto DC 5V sul prodotto e collegare la spina alla presa di corrente AC 3 Alimentare il prodotto Attezione Inserire Estrarre con delicatezza il cavo 5 1 SCHEMA DI COLLEGAMENTO PC LCD DVI LCD DVI CAVO DVI CAVO ...

Page 6: ...etto della presente apparecchiatura Manutenzione Pulire solo con un panno asciutto Non utilizzare solventi detergenti o abrasivi Garanzia Non sarà accettata alcuna garanzia o responsabilità in relazione a cambiamenti e modifiche del prodotto o a danni determinati dall uso improprio del prodotto stesso Con il marchio CE Techly garantisce che il prodotto è conforme alle norme e direttive europee ric...

Page 7: ... DVI Splitter EN TABLE OF CONTENTS 1 0 Introduction 8 2 0 Specifications 9 3 0 Package Contents 9 4 0 Panel Descriptions 10 5 0 Connection and Operation 10 6 0 Safety Precaution and Maintenance 11 USER S MANUAL ...

Page 8: ...eters When two or more products are cascaded they can create a larger distribution and longer in length This DVI Splitter offers solutions for HDTV retail and show site HDTV STB DVD and Projector factory noise space and security concerns data center control information distribution conference room presentation school and corporate training environments 1 1 FEATURES This DVI Splitter has many featu...

Page 9: ...l Frequency Range 50 60 Hz Video Amplifier Bandwidth 2 25Gbps 225MHz Resolutions HDTV Interlaced 50 60Hz 480i 576i 1080i Progressive 50 60Hz 480p 576p 720p 1080p Mechanical Size L W H 155x70x23mm Weight Net 265g Environmental Operating Temperature 0 C to 70 C Operating Humidity 10 to 85 RH no condensation Storage Temperature 10 C to 80 C Storage Humidity 5 to 95 RH no condensation Power Requiremen...

Page 10: ... the connection diagram section 2 Insert the DC side of 5V power supply into it and then connect the AC side of the power supply into the wall outlet 3 Turn on the power Attention Insert Extract cable gently 5 1 CONNECTION DIAGRAM PC DVI LCD DVI LCD dvi cable dvi cable 4 0 PANEL DESCRIPTIONS Please study the panel drawings below and become familiar with the structure ...

Page 11: ... with a dry cloth Do not use cleaning solvents or abrasives Warranty No guarantee or liability can be accepted for any changes and modifications of the product or damage caused due to incorrect use of this product With the CE sign Techly ensures that the product is conformed to the basic European standards and directives Your product is not a toy and is not meant for children because it contains s...

Page 12: ...www techly com ...
Reviews: