background image

15

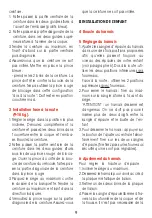
1. Thread the lap section through the

guides located at the front of the base
(blue arrows)

2. Thread the diagonal strap through the

two upper guides located on the back
of the seat shell.

3. Tighten the seat belt by pulling  first on

the lap section, then on the diagonal
one.

4. Check that there are no kinks or twists

in the seat belt. Lock the 2 sections of
the belt with the blue lock-off clip. The
lock-off should be positionned against
the buckle of the seat belt.Do not use
the red lock-off for the rearward facing
installation. Always keep the seat in the
most reclined position.

3  Forward facing (9-18kg)

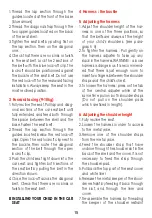
1. Fully recline the seat. Pull lap and diag-

onal sections of the car seat belt until
fully extended and feed both through
the space between the shell and the
base. Fasten the seat belt.

2. Thread the lap section through the

guides located below the red lock-off
clips. Open the red lock-off clip next to
the buckle, then route the diagonal
section of the belt through the open
lock-off clip.

3. Push the child seat right down into the

car seat, and tighten both sections of
the seat belt by pulling the belt in the
direction shown.

4. Close the lock-off across the diagonal

belt. Check that there are no kinks or
twists in the seat belt.

II

INSTALLING YOUR CHILD IN THE CAR
SEAT

4  Harness : the buckle

5  Adjusting the harness

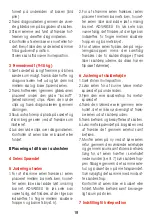
1. Adjust the shoulder height of the har-

ness in one of the three positions, so
that the belts are always at the height
of your child's shoulders. (see para-
graph  6).

2. To tighten the harness : Pull gently on

the harness adjuster to take up any
slack in the harness.WARNING : a loose
harness is dangerous: it is recommend-
ed that there is just enough room to
insert two fingers between the shoulder
straps and the child's chest.

3. To loosen the harness : press on the tab

of the central adjuster while at the
same time pull on both shoulder straps
(Do not pull on the shoulder pads
which are fixed in length).

6  Adjusting the shoulder height

1. Fully recline the seat.
2. Loosen the harness in order to access

to the metal yoke.

3. Remove one of the shoulder straps

from the metal yoke.

4. Feed the shoulder strap that have

undone through the shoulder slot in the
back of the shell and the cover. It is not
necessary to feed the strap through
the shoulder pad.

5. Pull back the top part of the seat cover

and white liner 

6. Release the metal keeper of the shoul-

der restraint by feeding it back through
the slot, and through the liner and
cover.

7. Re-assemble the harness by threading

the keeper of the shoulder restraint

Summary of Contents for V5809A

Page 1: ...roduced under license of Ferrari Spa FERRARI the PRANCING HORSE device all associated logos and distinctive designs are trademarks of Ferrari Spa Z I de Montbertrand Rue du Claret 38230 Charvieu FRANC...

Page 2: ...V5809A...

Page 3: ...2 1...

Page 4: ...2 3 1 4 2 0 10 kg 3...

Page 5: ...1 2 3 CLICK 4 3 9 18 kg 4 I...

Page 6: ...5 1 2 3 5 1 2 3 4 II...

Page 7: ...6 1 2 3 4 6 6 5...

Page 8: ...7 6 7 7...

Page 9: ...ge rabattable Si votre voiture est quip e d un si ge arri re rabat table assurez vous qu il est correctement verrouill dans la position verticale L exposition directe au soleil augmente la temp ratur...

Page 10: ...r de la banquette Tendre la ceinture au maximum en tirant dans la direction indiqu e 4 Verrouillez la pince rouge sur la partie diagonale de la ceinture Assurez vous que la ceinture ne soit pas vrill...

Page 11: ...les futurs besoins de r f rence Si vous ne respec tiez pas ces instructions la s curit de votre enfant pourrait en tre affect e 9 Entretien Toutes les parties du si ge auto peuvent tre nettoy es l aid...

Page 12: ...umklappbaren Sitz eingeklemmt ist Wenn Ihr Auto mit einem umklappbaren R cksitz ausger stet ist vergewissern Sie sich dass er korrekt in vertikaler Position verriegelt ist Direkte Sonneneinstrahlung...

Page 13: ...fest gegen die R ckenlehne des Fahrzeuges dr cken Gurt in der angezeigten Richtung straff ziehen 4 Rote Arretierungsklemme ber dem Diagonalgurt festschlie en Darauf achten dass der Gurt nicht verdreht...

Page 14: ...chter Verschmutzung einen feuchten Schwamm mit Seifenlauge oder waschen Sie den Bezug von Hand bei 30 C Verwenden Sie kein chlorhaltiges Waschmittel Nicht Waschmaschinen und Trockner geeignet 1 Dies i...

Page 15: ...he upright position Car interiors can become very hot when in direct sunlight it is therefore recommended that the child seat is covered when not in use This prevents components particularly those att...

Page 16: ...the diagonal belt Check that there are no kinks or twists in the seat belt II INSTALLING YOUR CHILD IN THE CAR SEAT 4 Harness the buckle 5 Adjusting the harness 1 Adjust the shoulder height of the har...

Page 17: ...ild detergent and warm water or hand wash at 30 Do not use chemi cal cleaners do not machine wash do not tumble dry do not iron 1 This is a Universal Child restraint It is approved to Regulation N 44...

Page 18: ...e sol lys kan bilens interi r opn en meget h j varme det anbefales derfor at autostolen altid tild kkes n r denne ikke bruges Dette forhindrer autostolens komponenter i at blive ekstremt varme og even...

Page 19: ...s ttes to fingre mellem skulders troppen og barnets bryst 6 2 For at stramme selen tr kkes i selen placeret mellem barnets ben hvoref ter selen ikke skal sidde l st omkring barnet ADVARSEL En l s sele...

Page 20: ...kendt i henhold til standard ECE 44 til almen brug i k ret jer og vil kunne bruges p de fleste men ikke alle bils der 2 En korrekt montering er sandsynlig hvis bilproducenten i instruktionsbo gen har...

Page 21: ...Primo 1 0 1 0 18 4 1 2 3 4 5 6 7 8 9 x2 10 x2 11 x2 12 x2 13 x2 14 2 0 10 1 2 3 4 3 9 18 1 2 3 4 4 5 1 6 2 3 6 1 2 3 4 5 6 7 7 8 9 30 20...

Page 22: ...21 IL R16...

Page 23: ...22 GR...

Page 24: ...23...

Page 25: ...24...

Page 26: ...entro la porta o dentro l ingranaggio di un sedile ribaltabile Se la vostra macchina munita di sedile posteriore ribaltabile verificate che lo stesso sia correttamente bloccato in posizione verticale...

Page 27: ...ei colo fare passare la parte diagonale della cintura nella pinza rossa 3 Schiacciare il seggiolino al massimo contro lo schienale dell auto Tendere la cintura il pi possibile tirando nella dire zione...

Page 28: ...prima dell utilizzo e conservatele per eventuali altre necessit in futuro Se non rispettate queste istruzioni la sicurezza del vostro bambino pu essere compro messa 9 Consigli per la manutenzione Tutt...

Page 29: ...ca nas condi es normais de utiliza o do ve culo ficarem enta lados por baixo do assento m vel ou na porta do carro N o utilizar o assento auto sem capa t xtil Substitua a capa somente por outra recome...

Page 30: ...o do autom vel Esticar o cinto no m ximo e puxar na direc o indicada 4 Fechar a pin a vermelha sobre a parte diagonal do cinto Verificar de maneira a que o cinto n o fique torcido II PARA COLOCAR A CR...

Page 31: ...u es a seguran a do seu beb crian a poder ser afectada 9 Manuten o Todas as partes desta cadeira podem ser limpas com a ajuda de produtos de limpeza suaves A forra t xtil pode ser lavada na m quina a...

Page 32: ...una parte de la misma queda atascada enganchada presionada o forzada por ninguna de las partes de su veh culo No utilizar nunca la silla de seguridad sin el tapizado Reempl celo nicamente por los reco...

Page 33: ...de las gu as situadas debajo de los clips rojos Abra el clip cierre rojo junto a la hebilla y sit e la parte diagonal del cintur n dentro del clip de seguridad abierto Apriete el asiento de seguridad...

Page 34: ...mente y guarde esta gu a de usuario para futuras consultas Una instalaci n incorrecta podr a ser peligrosa 9 Mantenimiento La tapicer a puede ser extra da del asiento En caso de mancharse pase una esp...

Page 35: ...in de deuropening van het voer tuig Als het voertuig een opklapbare achterbank heeft zorg ervoor dat deze in de juiste rechte stand staat Auto interieurs kunnen in de felle zon zeer heet worden We rad...

Page 36: ...e in de autozitting en trek de autogordel stevig vast Sluit de rode klem waar de diagonale gor del doorheen loopt Controleer of de autogordel niet gedraaid zit II INSTALLATIE VAN UW KIND IN HET AUTOZI...

Page 37: ...bewaar hem voor toekomstig gebruik Incorrect gebruik van het kinderzitje kan levensgevaarlijk zijn 9 Gebruiksvoorschrift De stoffen hoes kan van het zitje verwij derd worden In geval de hoes vuil is k...

Page 38: ...5 1 6 2 3 6 1 2 3 4 5 6 7 7 8 9 30 37...

Page 39: ...38 1 0 1 18 0 1 2 3 4 5 6 7 8 9 x2 10 11 x2 12 x2 13 x2 14 2 10 0 1 2 3 4 3 18 9 1 2 3 4 4...

Page 40: ...39 R16 UN ECE No 16 1 44 2 3 4...

Reviews: