background image

56

©2017 All rights reserved

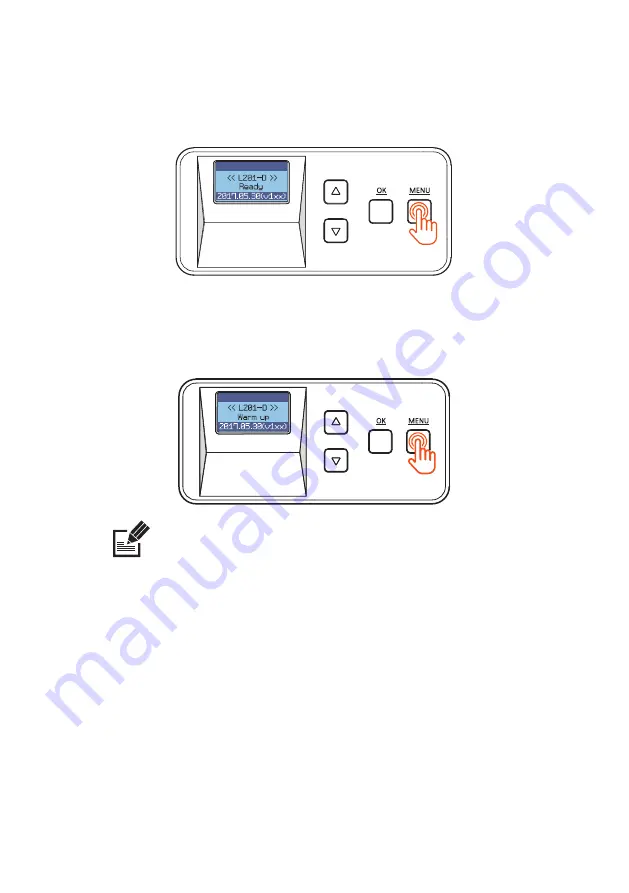
You can cancel the laminating during the 

"Warming-up" 

period.. You can't cancel the 

laminating job when the laminating is operated. 

Note

2. Press

 “MENU” 

button to cancel the laminating during the issuance.

-Card issuance and cancel

1. When you finish the setting, press 

"OK"

 button to issue the card.

Summary of Contents for L201-S

Page 1: ...All information contained in this documents is subject to change without prior notification 2017 Right reserved www teamnisca com...

Page 2: ...pper Cleaning Roller 20 Load Films to Upper Cartridge 22 Load Lower Cleaning Roller Film Load Cards 24 28 Load Lower Cleaning Roller Place Cards in the Input hopper 24 28 Load Films to Lower Cartridge...

Page 3: ...ilm Position Start POS set 44 Power Saving Mode 46 Path Sensor 48 Serial No Product_infor 51 Factory Reset Factory init 53 Maintenance Instructions 63 Supported Cards 63 63 63 63 63 Size Thickness Acc...

Page 4: ...imensions Width X Length X Height and Weight 1 L201 D Standard 2 L200 D Standard Card Stacker 3 L200 D Standard Card Input Hopper 4 L200 D Standard Card Input Hopper Card Stacker Power Supply Interfac...

Page 5: ...FireHazardandHighTemperature Checkthefollowingsymbolsusedforeasyunderstanding Note This is a note that provides more details or information that is useful for users Important Use this information to c...

Page 6: ...tact us or authorized service representative if you require any assistance If the product is exposed to rain or liquid please turn off and unplug the cable and contact an authorized service representa...

Page 7: ...odor or noise from the Laminator unplug it immediately and contact your dealer Do not disassemble repair or modify the Laminator arbitrarily Do not remove any covers or protective device that is atta...

Page 8: ...o 500 cards both single sided or dual sided Getting Started Product Overview 08 TheL201 S Dfeaturesaloadinlaminatecartridgesforsingleanddualsidedusage theL201 S Dalsofeatureslockingsystemstopreventuna...

Page 9: ...maged items then please contact your dealer for assistance Important L201 S Upper Single sided Laminate L201 S Lower Single sided Laminate 09 L201 D Dual sided Laminate Card Input Hopper AC Power Cabl...

Page 10: ...ch Turns the laminator on off Fan Vent Circulates air through the vent Card Ejector Releases the laminated cards Card Stacker Stacks the laminated cards max 150 cards LCD Display Displays the system s...

Page 11: ...Knob Rotate the knob to remove a jammed card RFID Antenna Cover Used to keep the RFID antenna in place RFID Antenna Read the RFID tag on the film Upper Film Cartridge Used to load the films in the up...

Page 12: ...Switch Turns the laminator on off Fan Vent Circulates air through the vent Card Ejector Releases the laminated cards Card Stacker Stacks the laminated cards max 150 cards LCD Display Displays the sys...

Page 13: ...emperature under control Knob Rotate the knob to remove a jammed card RFID Antenna Cover Used to keep the RFID antenna in place RFID Antenna Read the RFID tag on the film Upper Film Cartridge Used to...

Page 14: ...s the laminator on off Fan Vent Circulates air through the vent Card Ejector Releases the laminated cards Card Stacker Stacks the laminated cards max 150 cards LCD Display Displays the system status M...

Page 15: ...control Knob Rotate the knob to remove a jammed card RFID Antenna Cover Used to keep the RFID antenna in place RFID Antenna Read the RFID tag on the film Upper Film Cartridge Used to load the films i...

Page 16: ...s the laminator on off Fan Vent Circulates air through the vent Card Ejector Releases the laminated cards Card Stacker Stacks the laminated cards max 150 cards LCD Display Displays the system status M...

Page 17: ...control Knob Rotate the knob to remove a jammed card RFID Antenna Cover Used to keep the RFID antenna in place RFID Antenna Read the RFID tag on the film Lower Film Cartridge Used to load the films i...

Page 18: ...18 2017 All rights reserved Open Front Cover 1 Press the Front Cover Button 2 Once the cover opens slightly pull the cover by the handle to open it completely...

Page 19: ...is not loaded correctly as it can damage the product Cards will not be laminated properly if the Front Cover is not fully closed Make sure it is closed If the Front Cover is not closed completely the...

Page 20: ...ll the cartridge out while pressing the Cartridge Load Eject Button to remove it from the laminator Load Upper Cleaning Roller 2 Align the Cleaning Roller with its hole and push it down until it click...

Page 21: ...21 LAMINATOR L201 S D User Manual Make sure that it is fully inserted into the Cleaning Roller Hole before pushing the indicated area Caution...

Page 22: ...Upper Cartridge Place the white film core on the core guide The white film core does not fit the black film core guide Do not force the film core in as it can damage the cartridge Check the position o...

Page 23: ...23 LAMINATOR L201 S D User Manual 2 Check the position of the Upper Film Cartridge and films for rewinding and push the cartridge in until it clicks...

Page 24: ...dge out while pressing the Cartridge Load Eject Button to remove it from the laminator as shown in the image below Load Lower Cleaning Roller 2 Align the Cleaning Roller with its hole and push it up u...

Page 25: ...25 LAMINATOR L201 S D User Manual Make sure that it is fully inserted into the Cleaning Roller Hole before pushing the indicated area Caution...

Page 26: ...d Film to Lower Cartridge Place the white film core on the core guide The white film core does not fit the black film core guide Do not force the film core in as it can damage the cartridge Check the...

Page 27: ...27 LAMINATOR L201 S D User Manual 2 Check the position of the Lower Film Cartridge and film for rewinding and push the cartridge in until it clicks...

Page 28: ...l it up to remove as shown in the image Remove Cards after Taking Out Card Stacker Load UnloadCardStackertoLaminator Insert the hook on the Card Stacker and push it down in the side of the laminator M...

Page 29: ...9 LAMINATOR L201 S D User Manual Use your thumb and index finger to take out 60 or fewer cards from the Card Stacker without removing it from the laminator Remove Cards without Taking Out Card Stacker...

Page 30: ...of the laminator Connect Power Cable ConnectPower CommunicationCables The product must be used with AC power with rated label Check whether the Power Cable is plugged in before use Prohibition To down...

Page 31: ...r On Press the Power Switch to turn the laminator on Power ON OFF Power OFF ON If the product is exposed to rain or liquid please turn off and unplug the cable and contact an authorized service repres...

Page 32: ...All rights reserved TurnthekeyclockwisetolocktheFrontCover ThekeycannotbepulledoutiftheFrontCoverisnotclosed Donotforceit outasitcandamagetheFrontCover Front Cover Lock Locked Unlocked Unlocked Locked...

Page 33: ...of each module Ready Ready for lamination RibCheck Check status of card lamination film information Warmup Show Warm up sign before lamination heating roller gets set Description on Laminator Status...

Page 34: ...34 2017 All rights reserved 1 Press MENU to enter the menu mode Laminate side setting Pass Mode 2 Press OK when 1 Pass mode appears on the LCD display Function Set pass mode...

Page 35: ...ding to the way of film loading Default setting Select this option to laminate the lower side only Select this option to laminate both upper and lower sides Select this option to pass without laminati...

Page 36: ...lecting the pass mode press OK to go back to the previous step 4 Press MENU to go into the standby mode 5 If any changes have been made you will be prompted to save the changes Press OK tosavethenewse...

Page 37: ...o select 2 Temper_set and press OK Clear 1 0mil 160 175 320 347 Hologram 1 0 mil Filmtype Range of recommended temperature for dual sided lamination Range of recommended temperature for single sided l...

Page 38: ...U to go into the standby mode 6 If any changes have been made you will be prompted to save the changes Press OK tosavethenewsettingsor MENU ifyoudonotwanttosavethem 3 Use the menu navigation button to...

Page 39: ...n of inserting the card it moves back by L value and forward by R 2 Press the Menu Navigation Button to select 3 Start POS set and press OK 3 Use the Menu Navigation Button to adjust the position of t...

Page 40: ...s OK to set the position and go back to the previous step 5 Press MENU to go into the standby mode 6 If any changes have been made you will be prompted to save the changes Press OK tosavethenewsetting...

Page 41: ...t can be set between 5 and 60 minutes increments of 5 minutes 2 Press the Menu Navigation Button to select 4 Power saving and press OK 3 Use the Menu Navigation Button to set the power saving mode It...

Page 42: ...to set the power saving mode and go back to the previous step 5 Press MENU to go into the standby mode 6 If any changes have been made you will be prompted to save the changes Press OK tosavethenewse...

Page 43: ...ter the menu mode Path Sensor Function Check whether the path sensor works correctly 2 Press the Menu Navigation Button to select 5 Path sensor and press OK 3 Insert a blank card into the Card Slot Ma...

Page 44: ...nator releases the card upon completion O Card detected X No Card detected 1st sensor turns on when a card is inserted through the feeding slot 2 3 4 5 sensors are automatically turned on and off in t...

Page 45: ...45 LAMINATOR L201 S D User Manual 7 Press MENU to go back to the previous step 8 Press MENU to go into the standby mode...

Page 46: ...Product_infor Function check the serial number of the product 2 Press the menu navigation button to select 7 Product_infor and press OK 3 Check the serial number The first 4 digits indicate the year...

Page 47: ...47 LAMINATOR L201 S D User Manual 4 Press MENU to go back to the previous step 5 Press MENU to go into the standby mode...

Page 48: ...Factory init Function Reset the system to factory default settings Default Settings Pass mode Auto Temper_set 160 320 Start_POS set 0mm Power_saving 5min 2 Press the Menu Navigation Button to select...

Page 49: ...49 LAMINATOR L201 S D User Manual 4 Press OK to proceed or MENU to cancel the action You will be directed to the previous step when you press either OK or MENU 5 Press MENU to go into the standby mode...

Page 50: ...201 D 2 Press the Menu Navigation button to select 9 Hopper set and press OK Only One Single card laminate Laminate card in the card input hopper one by one All insert card Continuos cards laminate La...

Page 51: ...Manual 3 Use the Menu Navigation Button to select card input setting 4 Press OK button to set the card input type and go back to the previous step 3 1 Only One Single card laminate 3 2 All insert card...

Page 52: ...7 All rights reserved 5 Press MENU button and go back to Ready position 6 If any changes have been made you will be prompted to save the changes Press OK tosavethenewsettingsor MENU ifyoudonotwanttosa...

Page 53: ...utton 2 Press the Menu Navigation button to select 9 Hopper set and press OK SetCount Designatethenumbersofcardstobelaminated 3 Use the Menu Navigation Button to select card input setting 3 3 Set Coun...

Page 54: ...54 2017 All rights reserved 4 Press OK button on Set Count step When press OK button on Set Count menu 5 Use the Menu Navigation button to adjust quantity of card...

Page 55: ...Press OK and go back to the previous step 7 Press MENU button and go back to Ready position If any changes have been made you will be prompted to save the changes Press OK to save the new settings or...

Page 56: ...during the Warming up period You can t cancel the laminating job when the laminating is operated Note 2 Press MENU button to cancel the laminating during the issuance Card issuance and cancel 1 When...

Page 57: ...ted device Pass Mode How to operate the laminator Temperature Set the laminating temperature Start Position Set the start position of laminating Nuvia Connect Set whether connect to a card printer or...

Page 58: ...W x 85 60mm L 2 215 x 3 375 CR 79 51mm W x 83 9mm L 2 051 x 3 303 Size Standard 0 76mm 1 0mm 30mil 40mil Thickness Glossy white Free of dirt or grease Not contaminated Free of scratches or dents Comp...

Page 59: ...he menu navigation button to select 6 Path cleaning and press OK Make sure to turn off the laminator and unplug the power cable before cleaning it with a soft cloth slightly dampened with water Do not...

Page 60: ...back and forth 3 4 times while cleaning the roller 3 Insert the cleaning card in the card eject slot not card input slot Make sure to hold the card until the operation starts Fire Hazard Please be su...

Page 61: ...eleased once the cleaning process is complete 7 Press MENU to go back to the previous step 8 Press MENU to go into the standby mode Fire Hazard Please be sure to use Adhesive cleaning card Alcohol typ...

Page 62: ...can be used semi permanently since it can be washed It is recommended to clean it at least once every two weeks If more than 400 cards are laminated within a month it is recommended to clean it every...

Page 63: ...tive for assistance Jam occurs when there is no lamination process E11 Leave the laminator off for a while to cool it off Power off The temperature of the heat roller not in use is too high E13 The ca...

Page 64: ...r finished film is E22 E26 If there is no card inside the laminator or slot the system goes back to normal If the problem persists please contact the service representative for assistance Jam occurs w...

Page 65: ...201 S D User Manual Film Specifications Patch Type Film Specifications Type Clear 1 0mil 500 Prints Roll Hologram 1 0 mil 500 Prints Roll 2 Rotate the knob and remove the jammed card as shown in the i...

Page 66: ...s High level of security The front cover can be locked to protect the film inside optional feature High capacity of laminator film Up to 500 laminator film Dual sides are supported Standard Specificat...

Page 67: ...313 5mm H Weight 9 45kg 1 L201 D Standard Dimensions 216 5mm W x 443 4mm L x 313 5mm H Weight 9 65kg 2 L201 D Standard Card Stacker Dimensions 216 5mm W x 377 2mm L x 313 5mm H Weight 10kg 3 L201 D St...

Page 68: ...omer responsible for repair cost if any of the following apply The warranty has expired The product is damaged by negligence or misuse of the consumer e g impact water fire The product is damaged by a...

Page 69: ...munications However there is no guarantee that interference will not occur in a particular installation If this equipment does cause harmful interference to radio television reception which can be det...

Page 70: ...elivered directly or through any third party to you do not contain Pb Cd Hg CR 6 PBB PBDE to the best of our knowledge Thereby our products are in accordance with RoHS2 Directive Directive 2002 95 EC...

Page 71: ......

Page 72: ...The Company would be very grateful if any accidental inaccuracies could be pointed out to us as well as any other constructive criticism which might lead to a better understanding...

Reviews: