background image

OWNER'S

MANUAL

Take your time and pay close attention to detail. Keep this manual for future reference.

Carefully read through all instructions to familiarize yourself with the parts, construction
techniques, and tuning tips outlined in this manual. Being able to grasp the overall design of
your new Matt Francis
 racing truck before beginning the construction process will ensure a smooth assem-
bly.

MADE IN THE UNITED STATES OF AMERICA

P/N 800-0165

Team Losi - A division of Horizon Hobby, Inc.
4710 E Guasti Road, Ontario, CA 91761
phone: (909)390-9595

 • 

fax: (909)390-5356

w w w.TeamLosi.com 

 [email protected]

2000 & 2001

ROAR National Champion

Summary of Contents for XXX-T Matt Francis Edition

Page 1: ...nd tuning tips outlined in this manual Being able to grasp the overall design of yournewMattFrancisracingtruckbeforebeginningtheconstructionprocesswillensureasmoothassem bly MADE IN THE UNITED STATES...

Page 2: ......

Page 3: ...t the manual In some illus trations parts which have already been installed are not shown so that the current steps can be illustrated more clearly For your convenience an actual size hardware identif...

Page 4: ...termine the final drive ratio To calculate the final drive ratio first divide the spur gear size by the pinion gear size For example if you are using a 20 tooth pinion gear you would divide 86 spur ge...

Page 5: ...l the way down and then loosen it two full turns e g 360o x 2 This is a good starting point for the adjustment Once assembly is complete if you wish the servo saver can be adjusted tighter or looser S...

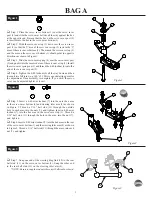
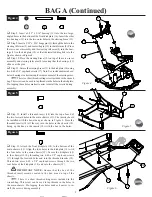
Page 6: ...d to tap threads in the holes in the main chassis Pre tapping these holes makes it easier to in stall the screws during assembly Figure4 Figure5 Figure6 16 17 18 17 Step 8 Insert a 3 32 x 3 16 bearing...

Page 7: ...n the front of the kickplate 14 and into the bulk head 20 Step 3 Insert two 4 40 x 7 8 cap head screws 23 one on each side through the second hole out in the top of the front shock tower 24 Secure the...

Page 8: ...through the spacer 36 and the top of the spindle carrier 34 Step 11 Center the hinge pin 71 and secure it with two 1 8 E clips 41 With the hinge pin 71 still centered thread a 5 40 setscrew 32 into t...

Page 9: ...les rear and the ball stud pointing forward Line up the holes in the spindle carrier 34 with the holes in the front arm 38 insert a 1 8 x 960 hinge pin 35 and attach a 1 8 E clip 41 to both sides of t...

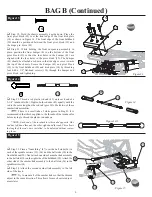
Page 10: ...lding the front suspension assembly in place position the front bumper 43 on the bottom of the front pivot block 39 so that the four holes in the bumper 43 are aligned with the four holes in the pivot...

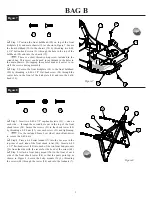
Page 11: ...djustment later Figure16 Figure16A Figure17 45 Step 25 Thread a red plastic rod end 45 onto each end of a 2 1 4 turnbuckle 46 Tighten both rod ends 45 equally until the rod is the same length as the r...

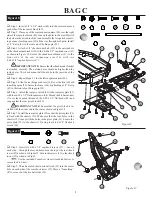
Page 12: ...the rear hinge pin brace 164 over the front of both inner hinge pins 52 Secure the brace 164 by attaching a 1 8 E clip 41 to the front of each hinge pin 52 Step 6 Attach the rear pivot block 49 to the...

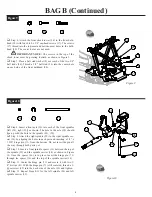
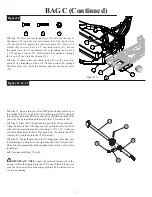
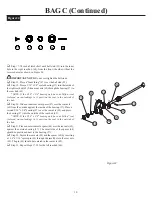
Page 13: ...e CVD yoke 60 Insert the greased CVD yoke 60 into the large hole in the CVD rear axle 62 so that the hole in the CVD yoke 60 can be seen through the slots in the CVD rear axle 62 Step 13 Place the CVD...

Page 14: ...inner rear axle spacer 67 over the rear axle 62 from the outside against the inside of the bearing 27 Place a second 3 16 x 3 8 bearing 27 over the rear axle 62 and press the bearing 27 into the outsi...

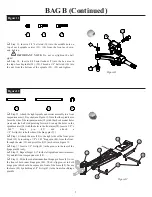
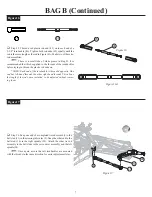
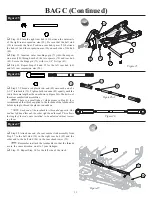
Page 15: ...kle 72 Tighten both rod ends 45 equally until the rod is the same length as the one shown in Figure 26A Make two of these rear camber link assemblies There is a small tube of white grease in Bag B It...

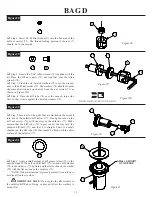
Page 16: ...all of the parts that are stacked on the wrench into one of the outdrive diff halves 77 Line up the tabs on the diff nut carrier 73 with the slots in the outdrive 77 Make certain that the diff tube 76...

Page 17: ...at the diff balls 82 and diff gear 81 rest against the diff washer 79 IMPORTANT NOTE It is a good idea to hold the diff nut carrier in place so the diff tube is not pushed into the outdrive diff half...

Page 18: ...m 83 while inserting the diff screw 84 Pull the threaded end of the diff screw 84 until the thrust bearing assembly rests against the shim 83 and bearing 80 inside of the outdrive 77 IMPORTANT NOTE En...

Page 19: ...he diff screw 84 into the 4 40 mini locknut 7 in the diff nut carrier 73 Thread the two halves together until the screw just starts to snug up NOTE If the screw will not thread into the nut make sure...

Page 20: ...late 96 so that the screw holes in the motor plate 96 line up with the screw holes in the gearbox half 97 Secure the motor plate 96 to the gearbox half 97 by threading a 4 40 x 3 8 cap head screw 17 t...

Page 21: ...h the gearbox to the rear shock tower Figure 40 Figure 41 Step 33 Slide the smaller of the two top shaft spacers 99 over the slipper shaft from the side with the setscrew and against the top gear 92 N...

Page 22: ...gn the notches on the spur gear 106 with the notches on the slipper pad 105 Step 45 Place the second slipper back plate 104 over the slipper shaft 90 so that the large flat surface of the back plate 1...

Page 23: ...the two holes in the back of the rear pivot plate 53 through the motor guard 111 and into the gearbox halves 94 97 Step 55 Place a 4 washer 58 over the 4 40 x 1 1 2 cap head screw 112 Thread the scre...

Page 24: ...the O ring 113 sits flat in the bottom of the cartridge body 114 Step 2 Insert the cartridge spacer 115 into the cartridge body 114 followed by a second O ring 113 Step 3 Once the second O ring 113 is...

Page 25: ...9 Snap a 1 8 E clip 41 into the groove closest to the cartridge on both rear longer shock shafts 119 Step 10 Before installing the E clip 41 to the front shock shafts 118 the shorter of the two length...

Page 26: ...119 in and out If there is the shock needs more fluid If the shock does not compress all the way the shock has too much fluid in it NOTE If leaking persists around the outside tighten the car tridge a...

Page 27: ...shock body 126 over the shock mount bushing 132 Secure the shock to the tower 55 by threading a 4 40 locknut 110 onto the shock mount screw 23 NOTE Before attaching the top of the shock make sure tha...

Page 28: ...anufacturers warnings on the bottle Team LosiTire Glue A 7880 orA 7881 Thin is the best glue available for gluing R C car tires This glue was produced specifically for this purpose IMPORTANT NOTE Allo...

Page 29: ...ug 144 into the large hole in the gear cover 142 2 5 Figure 54 Figure 55 Figure 55 Step 6 Using Table 55B on the following page determine which servo arm 145 is required for your servo If your particu...

Page 30: ...a 4 washer 58 over each of the four 4 40 x 3 8 cap head screws 17 and attach the servo posts 146 to the servo by threading a screw 17 through the upper and lower holes in each post 146 Do not tighten...

Page 31: ...wo screws 21 followed by the bottom two screws 21 Holding the brace 147 in place will help keep the posts 146 from moving while tightening the screws 21 NOTE The servo should be as close to centered b...

Page 32: ...post on the front chassis brace 147 Secure the strap 154 to the post with a body clip 155 Figure 60 Step 21 Cut a piece of two sided tape 156 to the same size as the bottom of the receiver not includ...

Page 33: ...ing it out along the trim lines Attach the spoiler to the rear of the body with a piece of two sided tape 156 Step 36 Install the body 159 onto the rolling chassis and secure it with body clips 155 th...

Page 34: ...rolls straight when you are not touching the steering wheel stick If the servo was installed correctly as per Tables 57A and 57B the wheels should turn equally to the left and right If this is not the...

Page 35: ...ou are working on To lower the ride height raise the spring collars Both left and right collars should be adjusted evenly You should start with the front ride height set so that the front suspension a...

Page 36: ...n an increase in steering and the truck will react quicker Moving the top of the shock to the inside hole in the tower will slow the steering response time and make the truck smoother in bumps The bot...

Page 37: ...4 40 nut A 6300 4 40HexNuts 10 26 3 8 ball stud A 6000 Ball Studs w Rod Ends 4 40 x 3 8 4 27 3 16 x 3 8 sealed bearing A 6903 3 16 x 3 8 Teflon Sealed Bearings 2 28 Left spindle A 4125 XXX T Front Spi...

Page 38: ...Seal Set 86 3mm x 8mm thrust bearing washer A 3099 Full Compliment Thrust Bearing Set 87 White thrust bearing assembly grease A 3066 Teflon Assembly Grease 88 5 64 thrust bearing balls A 3099 Full Co...

Page 39: ...ruck Wheels Red 138 Foam tire liners A 7698 Truck Foam Liners Firm 139 3 16 x 015 shim A 6230 ShimAssortment 3 32 3 16 1 4 1 2 140 10 32 locknut A 6303 10 32 Locknuts 4ea Nylon Steel 8 141 3mm x 8mm c...

Page 40: ...oving the upper mounting location inward will soften the rear suspension giving the truck more low speed traction Moving the mounting location outward gives the truck more high speed traction But movi...

Reviews: