background image

21

:: Tuning Tips

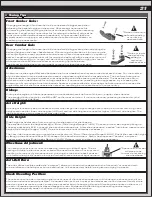
Ride Height:

Ride height is the distance from the ground to the bottom of the chassis.  

The standard front ride height setting is 19mm (Ride Height Gauge #1449).  Check the front ride height by lifting up 

the entire car about 8-12 inches off the bench and dropping it.  After the suspension “settles” into place, measure ride 

height (Ride Height Gauge #1449).  Raise or lower the shock collars as necessary.

The rear ride height setting you should use most often is 19mm (Ride Height Gauge#1449).  Check the rear ride height 

by lifting up the entire car about 8-12 inches off the bench and drop it.  After the suspension “settles” into place, 

measure ride height (Ride Height Gauge #1449).  Raise or lower the shock collars as necessary.

Wheelbase Adjustment:

You have three options for rear hub spacing; forward, middle, & back.  The kit 

setting of middle is the most neutral, and will be used most often. For improved 

handling in bumps or rhythm sections, try moving the hubs to the back position.  

Hub forward is typically used on low grip or where there are lots of tight corners.

*Spacers to the rear 

will place hubs 

forward, shortening 

   the wheelbase

!

Front Camber Links:

Changing the length of the camber link is considered a bigger step than 

adjusting the ball end height on the tower.  Shortening the camber link 

(or lowering the ball end) will give the front end less roll and quicken steering 

response.  Lengthening the camber link (or raising the ball end) will give the 

front more roll and slower steering response.  Longer camber links are 

typically used on high grip tracks and shorter links tend to work better on 

medium-grip loose tracks.

*Raise or lower the 

ball end by adding 

or removing

   washers here

!

Ackermann:

Ackermann is the angle difference between the front wheels when they are turned to steer the car.  For minimal tire 

slip, it is standard for the inside wheel to steer to a greater angle than the outside wheel.  The kit allows Ackermann 

adjustments by changing the washer thickness used behind the steering rack ballstuds.  The kit setup uses 2mm 

washers and is most common for racing conditions.  If corner entry steering is too aggressive, try increasing the 

Ackermann by removing shims from behind the steering rack ballstuds.  Increasing the Ackermann will increase the 

angle difference of the front wheels when steered, resulting in a more stable car on corner entry.

Shock Mounting Position:

The rear shocks can be mounted on the front or rear of the rear suspension arm.  Mounting the shocks on the front 

of the arm reduces rear weight bias. This causes the car to turn quicker and also steer more on-power. Usually this is 

used on high bite tracks in order to keep the car steering while applying throttle. Mounting the shocks on the rear of 

the arm increases rear weight bias and keeps the rear end planted while making the steering radius larger. 

This setting is typically easier to drive and will produce more rear traction.

Axle Height:

Axle height is used to keep roll centers similar when large ride height changes are made. As a rule of thumb, high axle 

heights are used for lower ride heights (< 20mm) and low axle heights are used for higher (> 22mm) ride heights. The 

idea is to keep the arms close to level at ride height. 

Anti-Roll Bars:

The anti-roll bar kits (also called the “swaybar”) allows you to add roll resistance to the front and /or rear end with 

minimal effect on handling over bumps and jumps.  It is an especially helpful tuning item on high-grip tracks.

Kickup:

Kickup is the angle the front suspension arm mounts at where the front of the arm is higher than the rear.  

The standard kickup angle for the B6 is 25

°

, and is most common.  If more corner entry steering is desired, try the 

included 30

° 

front bulkhead.

Rear Camber Link:

Changing the length of the camber link is considered a bigger step than adjusting the 

ball end height on the rear chassis brace.  Shortening the camber link (or lowering the 

ball end) will give the rear  end less roll and the car will tend to accelerate or “square up” 

better.  Lengthening the camber link (or raising the ball end) will give the rear more roll 

and more cornering grip.  Longer camber links are typically used on high grip tracks, 

while shorter links tend to work better on medium grip loose tracks.  

The kit setting is the best compromise of cornering grip and acceleration.

*Raise or lower 

the ball end by 

adding or 

removing

   washers here

!

Summary of Contents for RC10B6.1 Dirt Light Team Kit

Page 1: ......

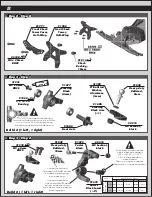
Page 2: ... piece shock bushing to make assembly easier Aluminum C and D arm mount included for large range of anti squat and toe adjustment Lightweight aluminum top shaft Factory Team upgraded ball bearing kit included now oiled instead of greased for less drag JConcepts B6 Light weight clear body and wing included Cyanoacrylate glue CA 1597 Thread locking compound 1596 Tires and Inserts Fronts and Rears Wh...

Page 3: ...0mm 91478 Button Head bhcs Ball Bearings 3x7x3mm 91475 5x8x2 5mm 31400 5x10x4mm 91560 6x13x5 91562 10x15x4 91563 3x2 5mm 31500 3x3mm 25225 3x10mm 4671 Set Screws 5 5x0 5mm 31381 5 5x1 0mm 31382 5 5x2 0mm 31383 3x8mm Washer 89218 Shims and Washers Notes 5 64 Diff Thrust Balls 6574 3 32 Carbide Diff Balls 6581 3 32 Ceramic Diff Balls 6584 Diff Balls M3 Nut 91477 M3 Alum Locknut Blue 31550 M3 Locknut...

Page 4: ... 32 Setup Sheet Kit Setup 33 Setup Sheet Blank 34 Back Cover There is a 1 1 hardware foldout page in the front of the manual To check the size of a part line up your hardware with the correct drawing until you find the exact size Each part in the foldout has a number assigned to it for ordering replacement parts Associated Electrics Inc 26021 Commercentre Dr Lake Forest CA 92630 http www RC10 com ...

Page 5: ...Heavy duty Ballstud 8mm 31382 FT Ballstud Washer Aluminum 1mm 31382 FT Ballstud Washer Aluminum 1mm x2 89202 M3 x 12mm BHCS 31283 5mm Ball Stud Long Note orientation of steering rack The steering bellcrank brace has offsets on one side They should be installed towards the bearings x2 x2 91049 Heavy duty Ballstud 10mm 31382 FT Ballstud Washer Aluminum 1mm 91766 Front Ball Stud Mount x2 25204 M3 x 1...

Page 6: ... servo horn 90 degrees 91728 Servo Horn Ring 31284 8mm Ball Stud Long 91728 Servo Horn Servo not included x2 31532 M3 x 8mm BHCS x4 x6 25202 M3 x 10mm FHCS 91652 Side Rails L R 25201 M3 x 8mm FHCS 91734 Battery Foam B6 91734 Battery Foam There are two thickness options to accomodate any battery size 91728 Servo Spacers are not required for all servos 89218 M3 x 8mm Washer 91719 Servo Mount 91728 S...

Page 7: ... the sharp edge side towards the bulkhead 25211 M3 x 10mm BHCS x2 91766 Top Plate B6 25187 M3 x 14mm BHCS x2 25211 M3 x 10mm BHCS x2 31510 M2 x 4mm BHCS 91673 Front Arms Gull Wing B6 91656 Front Hinge Pin Brace B6 x2 x2 91670 Hinge Pin front Inner 25225 M3 x 3mm Set Screw x2 x2 25204 M3 x 16mm FHCS 91685 Front Bumper x2 ...

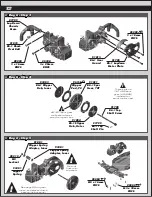
Page 8: ...cluded with your kit a 3mm and a 4mm The 4mm steering blocks are used for the kit setup 91675 Caster Block You can install an optional 31520 screw to use as a steering stop setting You can install an optional 4670 set screw to better hold the caster block inserts and hinge pin Total Caster 25 25 30 20 27 5 22 5 0 2 5 up 5 up 2 5 down 5 down 30 30 35 25 32 5 27 5 Bulkhead Orientation Caster Block I...

Page 9: ...mm BHCS 91676 Caster Hat Bushing Top 2mm Bottom 1mm x2 31510 M2 x 4mm BHCS 91675 Caster Block Spacer 91670 Hinge Pin front Outer x2 91772 Aluminum Arm Mount C 92014 Arm Mount Inserts up 0 5 x2 31541 M3 x 6mm FHCS x2 91670 Hinge Pin will be tight in the caster blocks but should rotate freely in the front arms B C D A Install the rear arm threaded insert in the same position for the left and right s...

Page 10: ...e 6591 diff lube 6591 diff lube Anti Squat Toe In 3 Kit Setup 1 Kit Setup 3 2 3 1 The 91772 C and 91688 D aluminum arm mounts allow for a large amount of setup combinations when using the 92014 0 5 and 1 arm mount inserts For a complete list of pill setup combinations please visit our website by using the link or QR code below https www teamassociated com pdf cars_and_ trucks RC10B6 B6_B6D_Pill Ch...

Page 11: ... once re check the diff setting After you have driven the car once re check the diff setting 6575 Diff cover 6575 Locking t nut 6582 Diff thrust spring Compress spring first 6591 diff lube Add a drop of Diff Lube 6591 to the teeth of the diff gear idler gear and top shaft 91792 B6 1 Diff Height Insert 91563 10x15x4 Bearing x2 x2 2 1 3 0 Diff Height Inserts The number on top is the setting Stock di...

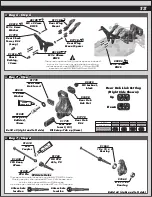
Page 12: ...r mesh and slipper clutch setting instructions 25204 M3 x 16mm FHCS x2 91801 Slipper Spring Adapter Inner 91801 Slipper Spring Adapter Inner 91801 Slipper Spring 25215 M3 Locknut 91811 spur gear walls should point away from gear box 25202 3 x 10mm FHCS 91813 B6 1 Gear Guard 91795 B6 1 Laydown Motor Plate x3 91819 B6 1 Shock Pivot Ball 91709 Lay Down Chassis Brace 89203 3 x 16mm BHCS 25188 3 x 20mm...

Page 13: ...ub Link Nut 91779 Rear Hub Link Insert 91779 Rear Hub B6 1 91049 Heavy duty Ballstud 10mm 89218 3 x 8mm Washer 91563 10 x 15 x 4 Bearing 91562 6 x 13 x 5 Bearing There is an optional wing mount spacer included in your kit If you do not use the optional wing mount spacer use 89202 3 x 12mm BHCS instead of the 25188 3x20mm BHCS 91762 HD CVA Axle V2 91438 CVA Pin 6588 black grease 91438 CVA Coupler 9...

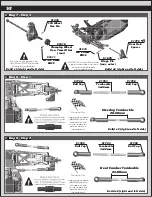
Page 14: ... of the turnbuckles for easier ball cup installation Orient the notch to the left throughout the car It indicates which end has the left hand threads Build x2 right and left side Build x2 right and left side Orient the notch to the left throughout the car It indicates which end has the left hand threads Orient the notch to the left throughout the car It indicates which end has the left hand thread...

Page 15: ...reads 91480 12x23mm V2 Shock Bodies front 91482 12x31mm V2 Shock Bodies rear 91495 V2 Shock Hat Bushing 91495 V2 Shock Spacer 91493 X Ring 31327 VCS3 Shock Bottom Cap 31327 VCS3 Shock Bottom Cap O Ring 91491 12mm Shock Cap O Ring x2 x2 1105 green slime Lightly rub shock oil on the o ring before installation There is a short and long shock eyelet Front and rear shocks use the long eyelet Racers Tip...

Page 16: ... bleed excess silicone shock fluid out the hole in the cap use rag around shock to catch excess fluid 10 Install M2x4mm button head screw until snug while shaft is fully compressed Rear Shock 30 wt 91492 M2 x 4mm BHCS 91814 12mm Shock Cap Stroke Front 20 5mm Rear 28mm Stroke Stroke Shock fluid 91304 12mm Threaded Collar 91304 12mm Threaded Collar O ring x4 x4 Threaded 91814 12mm shock spring cup F...

Page 17: ...31 Battery Strap B6 91731 Battery Strap Nut B6 See page 20 for gear mesh setting instructions Motor not included Pinion Setscrew not included 31532 M3 x 8mm BHCS x2 x2 89218 3 x 8mm Washer ESC not included 6727 Servo Tape There are two options for mounting your antenna Receiver not included 25225 M3 x 3mm Set Screw 6338 Antenna Tube Cap 91730 Battery Strap Shoulder Screw x2 31531 M3 x 6mm BHCS x2 ...

Page 18: ...nsmission and shock position you choose to run Laydown Pic 1 Laydown Transmission Cut Line A is for shocks mounted in front of arm Cut line B is for shocks mounted in rear of arm Layback Pic 2 Layback Transmission Cut Line A is for shocks mounted in front of arm Cut line B is for shocks mounted in rear of arm Standup Pic 3 3 Gear Stand Up Transmission Front of Vehicle 0 Mount under wing 3 Mount on...

Page 19: ...t Wash the INSIDE thoroughly with warm water and liquid detergent do not use any detergents with scents or added hand lotion ingredients Dry the body using a clean soft lint free cloth Use the supplied window masks to cover the windows from the INSIDE of the body RC cars get painted on the inside Using high quality masking tape apply tape to the inside of the body to create a design Spray use eith...

Page 20: ...ity are most important This gear box will change directions the quickest and generate the most steering Layback is used for most indoor clay track conditions Caster Caster describes the angle of the caster block as it leans toward the rear of the vehicle Positive caster means the kingpin leans rearward at the top The kit includes three inserts to adjust caster angle at the caster block 0 2 5 and 5...

Page 21: ...ons If corner entry steering is too aggressive try increasing the Ackermann by removing shims from behind the steering rack ballstuds Increasing the Ackermann will increase the angle difference of the front wheels when steered resulting in a more stable car on corner entry Shock Mounting Position The rear shocks can be mounted on the front or rear of the rear suspension arm Mounting the shocks on ...

Page 22: ...pring Gray 2 00lbs Rear Shock Spring Blue 2 20lbs Rear Shock Spring Yellow 2 30lbs Diff Shims Diff Thrust Washer Bolt Precision Diff Thrust Balls 5 64 Locking T Nut Diff Thrust Bolt Cover 3 32 Carbide Diff Balls Diff Thrust Spring Diff Drive Rings 2 60 1 Ball Diff Rebuild Kit Bearing 5 x 8mm Diff Gear B5 Ball Diff Outdrive B6 Ball Diff Kit B6 22 Shock Fluid 5420 5421 5422 5423 5424 5425 5426 5427 ...

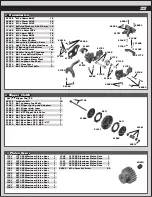
Page 23: ...minum Pinion Gear 29T 48P Aluminum Pinion Gear 30T 48P Aluminum Pinion Gear 31T 48P Aluminum Pinion Gear 32T 48P Aluminum Pinion Gear 33T 48P Aluminum Pinion Gear 34T 48P Aluminum Pinion Gear 35T 48P Aluminum Pinion Gear M3 x 3mm Set Screw 25225 25225 91799 91804 91803 91801 25215 91811 9611 9611 Transmission 25188 25202 25204 31383 31448 31532 89202 89203 89218 91048 91132 91560 91709 91716 91775...

Page 24: ...id 30 000CST Silicone Diff Fluid 60 000CST Silicone Diff Fluid 80 000CST Silicone Diff Fluid 100 000CST Silicone Diff Fluid 200 000CST Silicone Diff Fluid 500 000CST Silicone Diff Fluid 1 000 000CST Turnbuckles and Servo Mounts 4671 25211 31284 31382 31532 89218 91719 91722 91723 91728 91820 6 20 6 10 6 10 2 12 2 1 1 M3 x 10mm Set Screw M3 x 10mm BHCS Ball Studs Long 8mm FT Ballstud Washer aluminu...

Page 25: ...shings B6 Steering Block Arms 1 Front Axle B6 B6 1 Caster Steering Blocks M4 Serrated Wheel Nut Steel Silver M3 x 14mm BHCS M3 Locknut Black M2 x 4mm BHCS Washer 3 X 8mm Heavy duty Ballstud 10mm Rear CVA Bones 67 mm CVA Wheel Hex Pin B5 CVA Rebuild Kit B5 FT Bearing 6 x 13 x 5 FT Bearing 10 x 15 x 4 FT Clamping Wheel Hexes 7 0mm M1 6 x 8mm SHCS Hinge Pin Set B6 Rear Hub Link Nut B6 B6 Heavy Duty R...

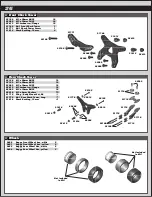
Page 26: ...w Flange B6 1 Front Shock Tower B6 1 Shock Tower Covers Shock Bushing 10mm 25188 25188 91771 91768 91815 91815 25202 25202 25202 25202 25612 25612 25188 25189 25202 25612 89202 89218 91718 91770 91816 10 10 10 10 10 10 1 1 4 M3 x 20mm BHCS M3 x 22mm BHCS M3 x 10mm FHCS M3 Locknuts w Flange M3 x 12mm BHCS M3 x 8mm Washers Wing Body Mount Set B6 B6 1 Rear Shock Tower Long Shock Bushing 12mm 10 1 1 4...

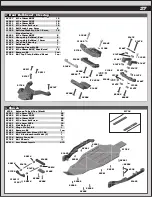
Page 27: ...CS M3 x 3mm Set Screw Ball Studs Long 5mm Ballstud Washers 5 5x1 0 mm blue aluminum M3 x 12mm BHCS Heavy duty Ballstud 8mm Heavy duty Ballstud 10mm 3x7x3 Ball Bearing Bulkhead B6 Steering Assembly B6 M3 x 20mm BHCS Shouldered Bumpers B6 B6 1 Top Plate Ballstud Mount 10 10 10 10 6 10 8 8 8 1 1 1 10 1 ea 1 ea 1 1 4 ea 91048 91048 91049 91049 91475 91475 91475 91475 91475 91475 91475 91667 91667 3128...

Page 28: ...2 2 1 1 Pr 1 1 1 2 1 1 1 2 Pr 1 1 1 1 1 1 1 FT Alum Clamping Servo Horn 23T 15 5 mm FT Alum Clamping Servo Horn 25T 15 5 mm Servo Washers black aluminum FT Clamping Wheel Hexes 6 0 mm FT 12mm Machined Shock Spacers V2 12mm V2 X Ring Rebuild Kit Factory Team Bearing Kit B5 B5M Titanium Screws 3x6mm BHCS Titanium Screws 3x8mm BHCS Titanium Screws 3x10mm BHCS Titanium Screws 3x12mm BHCS Titanium Scre...

Page 29: ...al AC DC Competition Batt Charger 1216 C2 Dual AC DC Comp Charger CHN Plug 1216 C2 Dual AC DC Comp Charger EURO Plug 1216 C2 Dual AC DC Comp Charger UK Plug Reedy ESC s 260C 261C 262C 27002 27003 27004 27005 27006 27024 27026 27027 27028 27029 27030 27031 27033 1 1 1 1 1 1 1 1 1 1 1 1 1 1 1 1 Blackbox 1000Z 540 M3 7 5 Combo Blackbox 1000Z 540 M3 7 0 Combo Blackbox 1000Z 540 M3 6 5 Combo Blackbox 8...

Page 30: ... 1 4 Hex Drive 2 5mm Tip FT 1 4 Hex Drive 5 5mm Nut Driver Tip FT 1 4 Hex Drive 7 0mm Nut Driver Tip FT 1 4 Hex Drive 8 0mm Nut Driver Tip FT 1 4 Hex Drive 2 5mm Ball End Tip FT 1 4 5 Piece Power Tool Tips Set 5 64 2 0mm 1 5mm 2 5mm 5 64 2 0mm ball 2 5mm ball FT Shock Shaft Pliers FT T Handle Ratchet Driver FT Camber Track Width Tool FT Body Scissors 12 Inch Nylon Wire Ties 6 Inch Nylon Wire Ties ...

Page 31: ...new releases setup help tips and racing info Associated Electrics Inc 26021 Commercentre Drive Lake Forest CA 92630 8853 USA http www TeamAssociated com http www RC10 com http twitter Team_Associated http www instagram com teamassociatedrc http www facebook com TeamAssociated call 949 544 7500 fax 949 544 7501 ...

Page 32: ...r Spacing Steering Plate Caster Block Spacing Steering Stop Spacing Notes Ball Stud Spacing Front Rear Piston Fluid Spring Limiters Stroke Temperature Ambient Track EPA Throttle Brake Notes Eyelet Length Cup Offset Notes None Aluminum Steel Other Servo Weights None Aluminum Steel Other Electronic Weights Differential Ball Diff Height Gear Diff Transmission Laydown 3 Gear Layback 4 Gear Stand Up Fo...

Page 33: ...Dry Damp Wet Moisture Bumpy Hard Packed Indoor Grooved Smooth Outdoor Dusty Loamy Condition Bump Steer Spacing Steering Plate Caster Block Spacing Steering Stop Spacing Notes Ball Stud Spacing Front Rear Piston Fluid Spring Limiters Stroke Temperature Ambient Track EPA Throttle Brake Notes Eyelet Length Cup Offset Notes None Aluminum Steel Other Servo Weights None Aluminum Steel Other Electronic W...

Page 34: ......

Reviews: