


9
4.Names and Functions of Parts
A
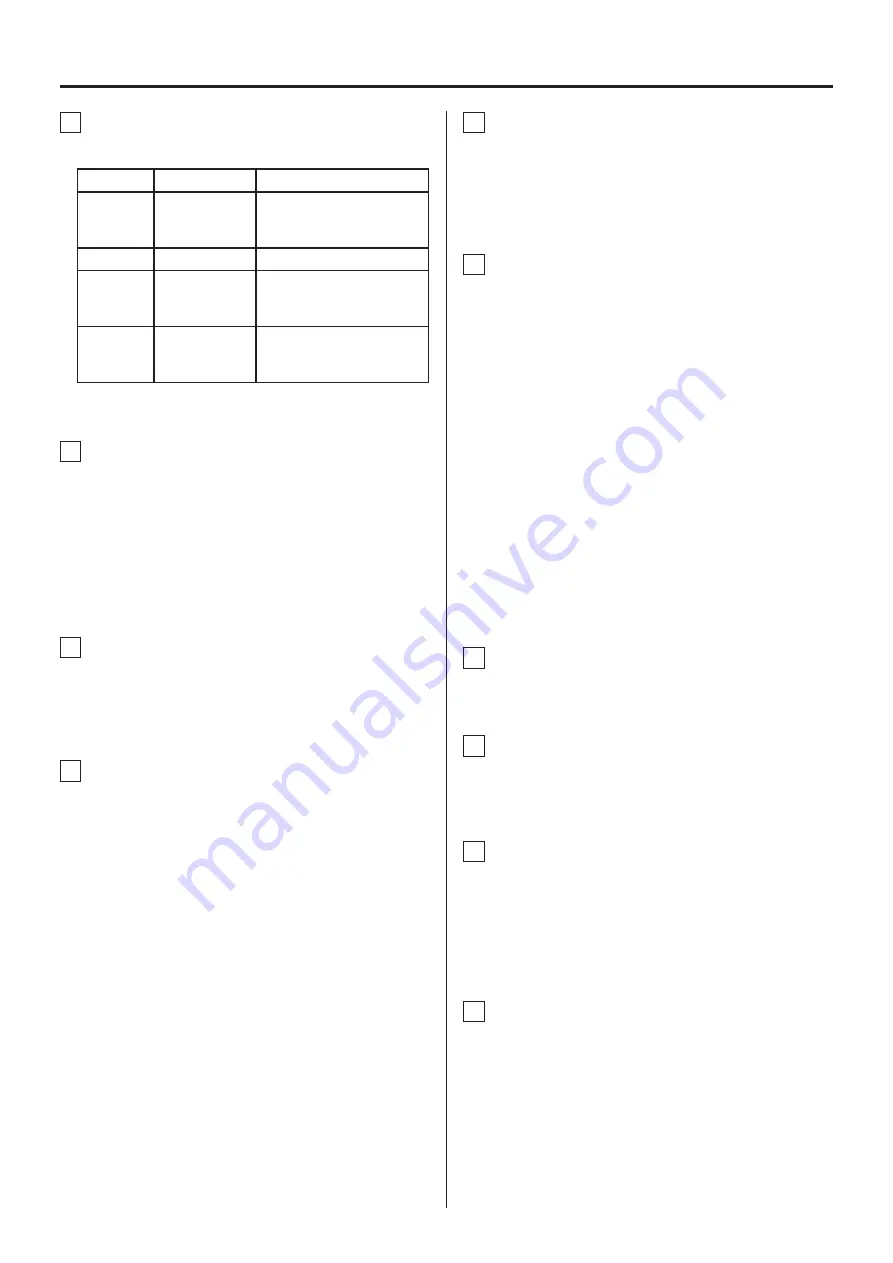
RDX indicator
This shows the RDX status as follows.
Indicator
Meaning
Explanation
Unlit
Inactive
The cartridge is not loaded
properly or the docking sta-
tion power is not on.
Lit green
Ready
The cartridge is ready for use.
Blinking
green
In use
The cartridge is being
accessed (including reading,
writing and searching).
Lit yellow
Malfunction-ing
A cartridge malfunction in
the RDX docking station has
been detected.
B
Drive cover
This is the drive unit cover.
The SD card slot and RDX docking station are beneath the
cover.
Always keep the drive cover closed when not loading or
unloading an SDHC card or RDX cartridge. Moreover, keep it
closed when data is being recorded or played back.
C
Display
This 3.5-inch TFT color display has a 320x240 resolution and
shows various information.
D
Operation controls
CANCEL button
MENU button
HOME button
SHIFT button
VALUE knob/button
When a cursor is visible, turn this to move it. Press to input a
parameter and turn it to increase or decrease the parameter
value.
Press to use it as an ENTER button.
Up (
5
) button
Down (
b
) button
Left (
g
) button
Right (
t
) button
Use these to move the cursor.
When inputting parameters, you can also use these to increase
or decrease values.
E
STANDBY/ON (
¤
) switch
Press to turn the power on or put the unit into standby.
Press the switch up to turn the power on. Press it down to put
the unit into standby.
F
Transport buttons
Stop (
8
STOP) button
Press to stop recording and playback.
Record (
0
REC) button
Press when the unit is idle to make it record ready.
Play (
7
FWD) button
Press when the unit is idle or playback ready to start playback.
Press when the unit is record ready to start recording.
Pause (
9
PAUSE) button
Press when the unit is idle or playing back to make it playback
ready.
Press when recording to make it record ready.
Search (
m
REW/
,
F FWD) buttons
Use to search playback files.
G
Function (F1, F2, F3, F4) buttons
H
VOLUME (SPEAKER) knob
Use to adjust the playback volume of voice memos.
I
EARPHONE jack
Connect the included earphone here.
o
When an earphone is connected, sound will not be output
from the speaker built into the side of the unit.
J
MEMO IN (mic input) jack
Connect the included mic here to record voice memos.
When audio input is detected, the LED lights green.


