Teac WX-7000 Quick Start Manual Download Page 17

17

6. Recording

Recording stopping conditions 

Level trigger

Use a level change for the set channel as a trigger. 

External trigger 

When the input through the EXT TRIGGER IN connector becomes 
the H level (open or 2 V or more), recording stops.

Rec Time

Recording continues only for the set amount of time. 

Post trigger 

Even after one of the above recording stopping conditions is met, 
recording will continue for the set amount of time. 


o

When recording is stopped manually, however, the system will 
not record after the stop trigger. 

6-4-2.  Interval recording 

Example of one interval recording repetition

Recording time

Starting time
Recording starts

Recording stops

With interval recording, when the number of repetitions is set to 1, 
recording will start at the set time and stop after the set recording 
time has elapsed.

Example of three interval recording repetitions

Recording time

Recording time
Recording starts

Ready to record

Recording starts

Ready to record

Recording starts

Recording stops

Recording time

Recording time

Interval time

Interval time

When the number of repetitions is set to 2 or more, recording 
will start at the set time and stop after the set recording time has 
elapsed. Then, the system will become record ready and start record-
ing again after the set interval. After this process has repeated to 
record the set number of repetitions, recording will stop.
If the number of repetitions is set to 0, interval recording will repeat 
until the recording media is full, or recording is stopped manually. 

Start time

Recording starts at the set time. 

Recording time

Recording continues for the set amount of time. 

Interval time

If the number of repetitions is set to 2 or more recordings, this is 
the amount of time that the system stays in a record ready state 
from the time one recording ends until the next recording starts. 

Repetitions 

Sets the number of repetitions. When set to 0, interval record-
ing will repeat until the recording media is full or recording is 
stopped manually. 
The maximum number of repetitions that can be set is 65534. 


o

When set to 0, if recording is repeated until the recording 
media becomes full, the recorded data for the last recording 
might not be as long as the Rec Time setting. 

6-5.  Starting recording

Press the REC button to make the unit ready to record. 
If a starting trigger has been set, recording will start when a trigger 
condition is met. 
If no starting trigger has been set, press the FWD button to start 
recording. 

Summary of Contents for WX-7000

Page 1: ...WIDE BAND DATA RECORDER Quick start guide Z WX 7000 D01190110H...

Page 2: ...rching with the counter 18 7 5 Searching by event 18 7 6 Searching by ID 18 7 7 Searching by time 19 8 Settings 19 8 1 Menu screen item list 19 9 Troubleshooting 23 Index 1 Introduction Thank you for...

Page 3: ...rical electronic equipment correctly you will help save valuable resources and prevent any potential negative effects on human health and the environment c Improper disposal of waste electrical electr...

Page 4: ...OUT connector of the unit above with the EXPANSION IN connector of the unit below it using a connection cable o o Place the AC adaptor units away from the AU WXEPIO expansion units o o When using with...

Page 5: ...dapter to the DC IN on the 3rd AU WXEPIO unit from the top and the third adaptor to the 5th unit 3 1 5 WX 7128 Connection cable Included AC adaptor Connect one included AC adaptor to the DC IN on the...

Page 6: ...lloscope etc Hub router o o This unit s LAN connection supports 1000BASE T Ethernet Use a compatible hub or router and computer o o This unit s LAN connection is compatible with Auto MDI MDI X You can...

Page 7: ...put setting PA Input setting AC Input setting DC Piezoelectric accelerometer Electric charge output type 608 Amplifier for piezoelectric accelerometers SA 611 General pressure monitoring type Strain G...

Page 8: ...8 4 Names and Functions of Parts 4 1 Front panels WX 7000 recording unit G K J I H E F D C A B o o Drive cover open A N M O L AU WXEPIO expansion unit P Q...

Page 9: ...alue Press to use it as an ENTER button Up 5 button Down b button Left g button Right t button Use these to move the cursor When inputting parameters you can also use these to increase or decrease val...

Page 10: ...DX docking station Lit green Ready Power is being supplied to the RDX docking station and it is functioning properly Blinking green Ejecting The cartridge is being ejected from the docking station Lit...

Page 11: ...connected by four joint bars The lengths of the joint bars differ for the WX 7016 WX 7032 WX 7064 WX 7096 and WX 7128 models S Built in speaker This outputs voice memos o o When an earphone is connec...

Page 12: ...o connect the system with a computer The LED blinks when transmitting data o o Use a category 7 LAN cable D EXPANSION OUT connector Connect this to the EXPANSION IN connector of the AU WXEPIO below it...

Page 13: ...Connect the desired contact output of an uninteruptible power supply here Confirm the specifications of the connector beforehand Do not connect anything if you are not using this feature N EXPANSION...

Page 14: ...n the STANDBY ON switch to ON When the Home Screen appears on the display the system is ready for use 5 2 Stopping power to the system Before turning the power off for the recording unit WX 7000 eject...

Page 15: ...status of the system can be changed in the following manner Stopped Record ready Recording Playback ready Playing back Turn power on Waiting for button input or setting 0REC 7FWD 9PAUSE 7FWD 9PAUSE 8S...

Page 16: ...n stopped again Use a sufficient inter val time when conducting interval recording or other repeated recording in particular 6 4 1 Trigger recording Example of one trigger recording repetition Pre tri...

Page 17: ...set time and stop after the set recording time has elapsed Then the system will become record ready and start record ing again after the set interval After this process has repeated to record the set...

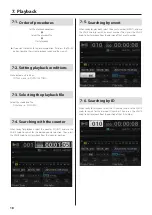
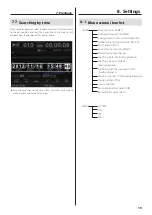
Page 18: ...g with the counter When ready for playback select the counter COUNT and use the VALUE knob to search for the desired counter position Then press the VALUE knob to start playback from that counter posi...

Page 19: ...8 Settings 8 1 Menu screen item list Sampling series SERIES Sampling frequency SAMPLE Analog digital conversion bit depth AD Number of recording channels REC CH Fan activation FAN Voice memo activatio...

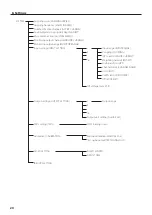
Page 20: ...NG Output settings OUTPUT SETTING TEDS setting TEDS Calibration CALIBRATION AQ VU SETTING IRIG GPS SETTING 1 2 16 ICP voltage Sens Volt Input range INPUT RANGE Coupling COUPLING ICP current SENSOR CUR...

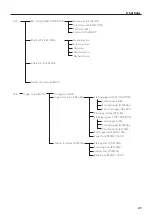
Page 21: ...de MODE No triggers NONE Trigger recording TRIGGER Interval recording INTERVAL Starting trigger START CONDITION Pre trigger setting PRE TRG Stopping trigger STOP CONDITION Post trigger setting POST TR...

Page 22: ...tialization PARAMETER Speaker output setting SPEAKER Fan activation FAN Sampling notation setting NOTATION Language setting LANGUAGE Network settings NETWORK Date and time settings TIMESET Display adj...

Page 23: ...the WX 7000 to format it When formatting media for the first time format it using the WX unit Are you using media that has been confirmed to work with the WX 7000 Cannot select the sampling frequency...

Page 24: ...anta Fe Springs California 90670 U S A Phone 1 323 726 0303 TEAC EUROPE GmbH Bahnstrasse 12 65205 Wiesbaden Erbenheim Germany Phone 49 0 611 7158 349 EU Importer TEAC SALES TRADING Room 817 Xinian Cen...

Reviews: