


16
6. Recording
6-1. Order of procedures
Set the recording conditions
c
Set the recording destination
c
Set the triggers
c
Make other settings
c
Start recording
c
Start measurement
c
Stop measurement
c
Stop recording
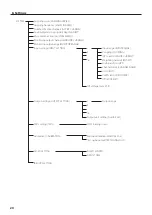
6-2. Setting recording conditions
Make settings for the sampling frequency, analog–digital conversion
bit depth, number of recording channels, voice memo activation,
input and output.
o
Calibration is conducted automatically when this system’s power
is turned on.
o
In order to record measurements with greater precision, however,
we recommend manually calibrating the system after letting it
warm-up for at least 10 minutes before beginning recording.
SYSTEM menu
w
Calibration
6-3. Setting the recording destination
Set the media, directory and file name for recording.
FILE menu
w
RECORDING FILE
w
DEVICE
w
DIRECTORY
w
FILE
w
COMMENT
o
If the recording destination media does not have open space,
format it.
FILE menu
w
Format
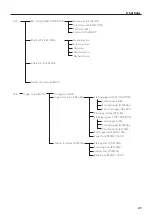
6-4. Setting triggers
In addition to manually starting and stopping recording, you can
also set the system to start and stop recording using triggers and
intervals.
o
After recording with the fan stopped, wait at least 10 minutes
before recording with the fan stopped again. Use a sufficient inter-
val time when conducting interval recording or other repeated
recording in particular.
6-4-1. Trigger recording
Example of one trigger recording repetition
Pre trigger
Recording time
Post trigger
Ready to record
Recording starting conditions
u
level trigger
u
external trigger
u
timeout trigger
Recording stopping conditions
u
level trigger
u
external trigger
u
Recording time
Recording stops
For trigger recording, you can set a combination of a starting trigger
(level, external or timeout) and a stopping trigger (level, external or
recording time).
Recording starting conditions
Level trigger
Use a level change for the set channel as a trigger.
External trigger
When the input through the EXT TRIGGER IN connector becomes
the L level (0.4 V or less), recording starts. If the L level has already
been reached, when the system becomes record ready, recording
starts immediately.
Timeout
If the conditions set to start recording are not met within a specified
time, recording will be forced to start automatically.
Pre trigger
By default, the system saves data from the time between when a
recording starting condition occurs and when a recording stopping
condition occurs.
When a pre-trigger interval is set, data is recorded before a recording
starting condition occurs, but only after the system is made record
ready.
o
You cannot record voice memos during this time.


