background image

- 12 - 

System Connections                                         


• 

Do not connect the power cord until all other connections have been made. 

• 

Ensure that you observe the color cables when connecting audio and video cables. 

• 

Before connecting, open the cover on the right side of the unit’s rear panel. 


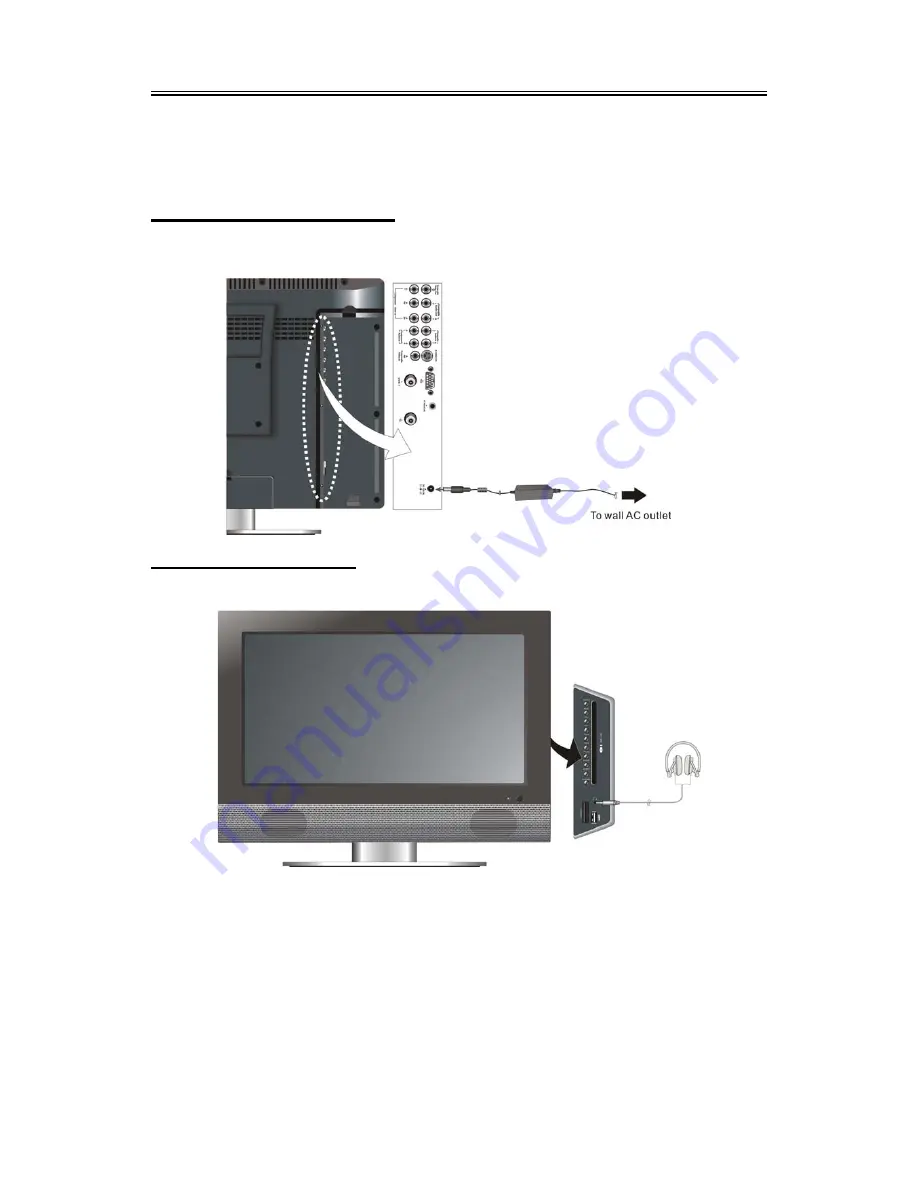
Connecting Power Supply 

Power is supplied through the provided power adapter. Connect one end of the adaptor to the unit’s 
power jack on the jack panel of the unit and the other end to the wall AC outlet. 


Connecting Earphone 

Connect earphone (headphone) to earphone jack on the rear panel of the unit for listening.   


After connecting earphone, the internal speaker output will turn off automatically. 

Note:

 Excessively loud volume could damage your hearing. So turn down the volume before 

connecting earphone, and then raise the volume to comfortable level.


Summary of Contents for LCDV1950SD

Page 1: ......

Page 2: ...rised Service Centre Where in home service is not available the purchaser is required to send the product to the nearest TEAC Authorised Service Centre for repair In this event a copy of this warranty card and a copy of your receipt of purchase must be enclosed to be a valid warranty Such equipment or part must be sent freight prepaid to your nearest TEAC Authorised Service Centre After the repair...

Page 3: ...se any obligation on it in connection with the sale of any equipment other than as stated in this warranty and outlined above 11 In no event will TEAC be responsible or liable for indirect or consequential damages from interrupted operations or other causes 12 Warranty is not transferable to any subsequent purchaser if the product is sold during the warranty period Extended promotional warranty ma...

Page 4: ...d Service Centre 3 Please have your purchase receipt as your proof of purchase and the following details completed for a valid Warranty Owner s Name Owner s Address Postcode Model Name No Serial No Dealer s Name Dealer s Address Postcode 4 Please ensure that your product is packed appropriately upon return to the service centre If you have any other queries regarding service or warranty please con...

Page 5: ...gnal Source 13 Connecting External AV Signal Source YPbPr 13 Connecting External AV Device AV Output 14 Connecting DVB T Antenna 14 Connecting PC 15 Connecting TV Antenna 16 TV Function 17 Preparations 17 Image Setting 17 Audio Setting 20 Setup Setting 21 NICAM Function 24 DVD Playback Operation 25 USB and SD MS MMC Card Function 30 DVD System Setup 31 DVB System Setup 38 Troubleshooting 46 Specif...

Page 6: ...y for the damage caused by any substitutions and modifications of the product without authorization from the manufacturer or authorized unit WARNING The apparatus shall not be exposed to dripping or splashing and that no objects filled with liquids such as vases shall be placed on the apparatus The images in this manual are only for reference and they may be different from the actual ones The ligh...

Page 7: ...cified by the manufacturer or sold with the apparatus When a cart is used use caution when moving the cart apparatus combination to avoid injury from tip over 15 Unplug the apparatus during lightning storms or when unused for long periods of time 16 Refer all servicing to qualified service personnel Servicing is required when the apparatus has been damaged in any way such as power supply cord or p...

Page 8: ...osition of the menu display from time to time 4 Always power down the LCD TV when you are finished using it 5 Lower the brightness and contrast levels as much as possible without impairing image readability 6 Display an image with many colour and colour gradations i e photographic or photorealistic images 7 Create image content with minimal contrast between light and dark areas for example white c...

Page 9: ...ecified by the software maker Please refer to the instructions accompanying the disc Disc Terms Titles A DVD disc is often divided into TITLES A title can be a separate item or a segment of a film On many discs the ROOT menu and the TITLE menu are the same Chapters Each TITLE is subdivided into CHAPTERS and each chapter is numbered for easy searching So by knowing the right command you can play th...

Page 10: ...on system setup menu the same function as direction buttons 6 PLAY button Press to play the disc in DVD mode 7 STOP button Press to stop disc playback 8 Eject button Press to eject the disc out 9 Power button Press to enter or exit the standby mode 10 SD MS MMC Card Port Insert the SD MS or MMC card into the port 11 Disc Tray Slot Used to load disc 12 Earphone Jack When connected to earphone the i...

Page 11: ... in COMPONENT mode 3 Composite Audio Video Output Jack Output the Audio Video signals in the Composite mode 4 L R Audio Input Jacks for COMPOSITE and S VIDEO Connect L R audio signal source in Composite or S VIDEO mode 5 VGA Input Jack Connect VGA signal source 6 DVB T Input Jack Input the DVB signal in the DVB mode 7 PC AUDIO Input Jack Connect VGA audio signal source 8 TV Signal Input Jack Conne...

Page 12: ...URCE button Press to select TV Composite S VIDEO COMPONENT VGA DVD and DVB 13 PC button Press to shift to VGA mode 14 DISPLAY button Press to display the reference information of the current program 15 SET FAV button Press to set the current channel as the favorite channel 16 10 buttons When in TV mode press to select numbers more than 10 or to return to the channel previously viewed 17 FAV button...

Page 13: ...mal playback 10 FB FF button Press to search backward or forward when in DVD mode Under teletext mode it s the teletext color button 11 TITLE button When a DVD is playing press the TITLE button to go to the title menu and display disc contents Under TV S VIDEO or Composite mode press to display close the teletext 12 MENU button under DVD mode Press to enter disc menu when in DVD mode Under teletex...

Page 14: ...o select various camera angles if the DVD supports multiple camera angles when in DVD mode Under teletext mode press the button first time to double the size of teletext letters in the upper half of the screen second to double the size of teletext letters in the lower half of the screen and third to resume normal status 22 CARD button Press to shift among disc playback USB playback and SD MS MMC p...

Page 15: ...G button Press to display or close EPG Electronic Program Guide in DVB mode 8 FAV button Press to shift to the favorite channel 9 SETUP button Press to enter or exit setup menu in DVB mode 10 EXIT button Press to exit from the setup menu 11 NEXT BLUE button In DVB mode press the button to select the blue page 12 PREV YELLOW button In DVB mode press the button to select the yellow page 13 INFO butt...

Page 16: ...remote is not in use for a long time Using of Remote control Point the remote control unit from no more than about 7m from the remote control sensor and within about 60 degrees of the front of the unit The operating distance may vary depending to the brightness around Notes Do not point bright lights directly at the remote control sensor Do not place objects between the remote control unit and the...

Page 17: ...ugh the provided power adapter Connect one end of the adaptor to the unit s power jack on the jack panel of the unit and the other end to the wall AC outlet Connecting Earphone Connect earphone headphone to earphone jack on the rear panel of the unit for listening After connecting earphone the internal speaker output will turn off automatically Note Excessively loud volume could damage your hearin...

Page 18: ... After connection turn on the unit and the external AV signal source and press the SOURCE button to shift to Composite or S VIDEO mode Note The L R audio input jacks can be used in the both Composite and S VIDEO modes Connecting External AV Signal Source YPbPr Use the AV cables to connect external AV signal source to the Y Pb Cb Pr Cr input jacks on the jack panel of the unit After connection turn...

Page 19: ...TV Composite or S VIDEO signals After connection turn on the unit and external AV device and press the SOURCE button to shift to corresponding mode Connecting DVB T Antenna Use the DVB T antenna to connect the DVB T input Jacks on the rear panel of the unit to the external AV signal source After connection turn on the unit and external DVB T device and press the SOURCE button to shift to DVB mode ...

Page 20: ...A input jack on the rear panel of the unit and the other end to the PC 2 Connect one end of the audio cables to the PC audio input jack on the rear panel of the unit and the other end to the PC audio output jack 3 Set the PC s resolution at 1024 768 60Hz After connection turn on the unit and the PC and then press the SOURCE button to shift to VGA mode ...

Page 21: ...lect the channel after a few seconds the selected channel will display or Press the number button to select the channel and then press the 10 button to go to the selected channel immediately or Press 0 followed by the channel number to go to the selected channel immediately 2 Channel Numbers 10 99 Press the number button to select channel XX after a few seconds the selected channel will display or...

Page 22: ...he button to select Image and press the ENTER button to enter the menu shown on the right In the Image setup menu press the button to select the desired item Press the EXIT button to exit the menu Scheme Setup Press the button to select Scheme and press the ENTER button to enter Press the button to select the desired item and press the ENTER button to confirm your selection Press the MENU button t...

Page 23: ...e previous menu Note This item is only available under NTSC TV signal mode Saturation Setup Press the button to select Saturation and press the button to adjust the value Press the MENU button to return to the previous menu Sharpness Setup Press the button to select Sharpness and press the button to adjust the value Press the MENU button to return to the previous menu Advanced Setup Press the butt...

Page 24: ...button to enter its menu Within the menu press the button to move the image Press the MENU button to return to the previous menu Phase Press the button to select Phase and press the button to adjust the value Press the MENU button to return to the previous menu Clock Press the button to select Clock and press the ENTER button to enter its menu Press the button to adjust the value Press the MENU bu...

Page 25: ...u Treble Setup Press the button to select Treble and press the button to adjust the level Press the MENU button to return to the previous menu Balance Setup Press the button to select Balance and press the button to adjust the level Press the MENU button to return to the previous menu Auto Volume Setup Press the button to select Auto Volume and press the ENTER button to access the menu Press the b...

Page 26: ...tton to select the desired item Press the MENU button to return to the previous menu Country Press the button to select the Country and press the ENTER button to enter the menu shown on the right Press the button to select the desired item Press the MENU button to return to the previous menu Auto Scan Press the button to select the Auto Scan and press the ENTER button to start auto scan The screen...

Page 27: ...o the previous menu Skip Press the button to select Skip and press the ENTER button to activate or cancel this function Press the MENU button to return to the previous menu Swap Press the button to select Swap from Ch and press the ENTER button to enter Press the number buttons to select program number Repeat the above operations to Swap To Ch Then Press the button to select Perform Swap and press...

Page 28: ...to the previous menu CH NO Press the button to select CH NO and press the ENTER button to enter Press the number buttons to enter the channel number Press the MENU button to return to the previous menu Store Press the button to select Store and press the ENTER button to store the above operations Note The CH NO and Store items only function when the program is searched out Language Press the butto...

Page 29: ...dio signals press the STEREO AUDIO button on the remote control repeatedly to shift the sound tracks between Nicam Mono and Mono and the screen will appear corresponding display as shown below Under A2 TV broadcast 1 When receiving stereo audio signals press the STEREO AUDIO button on the remote control repeatedly to shift the sound tracks between Stereo and Mono and the screen will appear corresp...

Page 30: ...odes don t match the disc cannot be played This player s default code is region 4 Play After loading a DVD disc disc menu will appear on the screen if the disc includes the menu Press the PLAY button to start playback Stop During playback press the STOP button once to stop playback and press the PLAY button to resume normal playback Press this button twice repeatedly to stop playback completely Pa...

Page 31: ...sc includes multi audio languages Subtitle The DVD player can support multiple kinds of subtitles When you play a multi subtitle disc you can press the SUBTITLE button on the remote control to select different subtitles GOTO During DVD disc playback press the GOTO button on the remote control once there will be a menu displayed on the screen You can set or select items for your preference Use the ...

Page 32: ...ous track Press the button to play from the beginning of the next track Fast Playback During playback press the button to activate fast forward playback press the button to activate fast backward playback During fast playback press the PLAY button to resume normal playback GOTO Press the GOTO button to select desired playback time or track Press this button repeatedly to select Disc Go To Track Go...

Page 33: ...tures Press the PLAY button to resume normal playback Pause During playback press the PAUSE button to pause playback and press the PAUSE button again or PLAY button to resume playback Repeat During playback press the REPEAT button repeatedly and the repeat modes are Shuffle Random Single Repeat One Repeat All and Repeat Off Previous and Next During playback press the button to select picture Menu ...

Page 34: ...During playback press the button to go the previous file press the button to play the next file Fast Playback During playback press the button to activate fast forward playback press the button to activate fast backward playback During fast playback press the PLAY button to resume normal playback SLOW button During playback press the SLOW button to activate slow playback During slow playback press...

Page 35: ...ss the CARD button to shift among disc playback USB playback and SD MS MMC playback The default state is disk playback Please see the below figure 6 Press the buttons to select the folder and press the ENTER button to enter 7 Press the buttons to select the desired track Then press the PLAY button to start playback 8 Press the STOP button to stop playback Press the button to return to the folder m...

Page 36: ...nu Use the direction buttons to select the desired item Press the ENTER button to enter the item Press the button to return 1 Press the direction buttons to select TV Display 2 Press the ENTER button to enter the setup 3 Use the direction buttons to select items 4 Press the ENTER button again to confirm selection and return 1 Press the direction buttons to select Angle Mark 2 Press the ENTER butto...

Page 37: ... Press the ENTER button to enter the setup 3 Use the direction buttons to select On or Off 4 Press the ENTER button again to confirm selection and to return 1 Press the direction buttons to select Last Memory 2 Press the ENTER button to enter the setup 3 Use the direction buttons to select On or Off 4 Press the ENTER button again to confirm selection and return 1 Press the direction buttons to sel...

Page 38: ... Press the ENTER button to enter the setup the screen will display as left 3 In the menu use the direction buttons to select items 4 Press the ENTER button to enter the setup Press the button to return 1 Press the direction buttons to select Dual Mono 2 Press the ENTER button to enter the setup 3 Use the direction buttons to select items 4 Press the ENTER button again to confirm selection and retu...

Page 39: ...s to select Dynamic 2 Press the ENTER button to enter the setup the screen will display as left 3 Press the ENTER button to enter 4 Use the direction buttons to adjust 5 Press the ENTER button again to confirm setting and return 6 Press the button to return 1 In the menu press the ENTER button to enter the setup 2 Use the direction buttons to select items 3 Press the ENTER button again to confirm ...

Page 40: ... direction buttons to select High Medium or Low 4 Press the ENTER button again to confirm selection and return 1 Press the direction buttons to select Brightness 2 Press the ENTER button to enter the setup the screen will display as left 3 Use the direction buttons to adjust the level 4 Press the ENTER button again to confirm setting and return 1 Press the direction buttons to select Contrast 2 Pr...

Page 41: ...uttons to select Audio 2 Press the ENTER button to enter the setup see the left figure 3 Press the direction buttons to select audio language 4 Press the ENTER button again to confirm setting and return 1 Press the direction buttons to select Subtitle 2 Press the ENTER button to enter the setup see the left figure 3 Press the direction buttons to select Subtitle language 4 Press the ENTER button a...

Page 42: ... 37 DVD System Setup Default 1 2 1 Press the direction buttons to select Default 2 Press the ENTER button to select Reset 3 Press the ENTER button all the settings will return to the default status ...

Page 43: ...o enter the item Press the EXIT button to return to the previous menu DVB T Setup Preparation 1 In DVB mode press the SETUP button to open DVB setup menu 2 Press the button to select setup menu 3 Press the SETUP button again to exit DVB setup menu Main Menu Press the SETUP button the screen will display as below System Setting Press the direction buttons to select System Setting Press the ENTER bu...

Page 44: ...ction and return During setting press the EXIT button to return Language Setting You can set the menu or audio language Press the button to select Language Setting press the ENTER button to enter the Language Setting menu the screen will display as below 1 Menu Language Select Menu Language press the button to enter the item and then press the button to select different menu language then press th...

Page 45: ...etting press the ENTER button to enter the screen will display as below When input the PIN code press the ENTER button to enter the menu shown on the below In the menu use the number buttons to input the pin code press the ENTER button to confirm The default code is 888888 In the menu press the button to select desired item Press the EXIT button to return This item is used to set the audio and vid...

Page 46: ...NTER button to clear all the channels or press the EXIT button to cancel and return Channel Setting Select the Channel Setting press the ENTER button to confirm and enter the channel setting menu as shown below Channel Search Use the direction buttons to select Channel Search press the ENTER button to confirm the screen will display as below In the menu according to the indication to input the pin...

Page 47: ...hen the Search Type is set to Auto Search 4 BandWidth Select the BandWidth press the button to enter then press the direction buttons to select items press ENTER button to confirm press the EXIT or button to return 5 Encrypted Service Select the Encrypted Service press the button to enter and then press the direction buttons to select FTA or ALL press ENTER button to confirm press the EXIT or butt...

Page 48: ...to input or press the YELLOW button to enter the character and number list In the list press the direction buttons to select character or number press the button to delete the incorrect input press the ENTER button to confirm input press the EXIT button to return Repeat the above procedure you can set many programs In the channel list the set program will be displayed with the name and Index You c...

Page 49: ...he channel list and add the channel into the favorites list You can also delete the channel from the favorites list Press the direction button to enter and then use the direction buttons to select channels press the ENTER button to add press the EXIT button to return EPG Select EPG press the ENTER button to enter the screen will display as below Use the button to select channel press the ENTER but...

Page 50: ...tion buttons to select the desired item press the ENTER button to enter Press the EXIT button to return to the previous menu DVB T Setup System Info Select System Info press the ENTER button to enter the screen will display as below ...

Page 51: ...it can t play discs Make sure disc is loaded in correctly Make sure disc is not dirty or warped Make sure the region code is the same as region code of DVD disc Make sure water condensation has not occurred If it occurs take out the disc and leave the unit on for at least one hour The unit does not continue to play discs or plays the same section repeatedly Make sure disc is not dirty or damaged M...

Page 52: ...60Hz 10 80I 50 1080I 60Hz Audio in RCA Stereo audio input OTHERS DVD Player DVD RW DVD R CD CD R CD RW JPEG DivX 3 11 4 x 5 x 6 x Multi Media USB Card Reader MS SD MMC 3 in 1 Card reader and USB compatible Max Volume up to 512MB VGA 15 Pin Analog RGB signal 0 7Vp p 75Ωinput VGA SVGA XGA WXGA computer signal compatibility 1024 768 60Hz 800 600 60Hz 640 480 60Hz Teletext 10 pages Audio in RCA Stereo...

Page 53: ...reet COFFS HARBOUR 2450 02 66 51 7366 02 66 50 0152 Coogee Electronic Service 261 Arden Street COOGEE 2034 02 93 15 8566 02 66 50 0152 Electronics 2000 Shop 3 190 Sharp Street COOMA 2630 02 64 52 4179 02 64 52 4179 Lachlan Valley TV 49 Vaux Street COWRA 2794 02 63 42 2189 02 63 42 2189 Greg s TV 2 Bingalong Street DALMENY 2546 02 44 76 7544 02 44 76 7544 Deniliquin Hi Tech 44 Hardinge Street DENIL...

Page 54: ...lectronics 2 199 Adelaide Street RAYMOND TERRACE 2324 02 49 87 7032 02 49 87 6194 QQ Electronics Pty Ltd Unit 5 14 38 Bellona Avenue REGENTS PARK 2143 1300 883 229 02 97 38 1311 Quickfix Repairs Shop 17 West Market Street RICHMOND 2754 02 45 78 2111 02 45 78 2021 Tech 1 Electronic Repairs Shop1 12 Sunset Ave WARILLA 2528 02 42 97 5397 02 42 97 5398 Cherries Electronics Unit 3 8 Walter Street SINGL...

Page 55: ...hop 3 1 Mellefont Street GLADSTONE 4680 07 49 72 9495 07 49 72 9495 Lloyd Lawrence Electronics Shop 8 9 5 Torquay Road HERVEY BAY 4655 07 41 24 3787 07 41 24 3787 Professional VCR Sales Service 90 Mourilyan Road INNISFAIL 4860 07 40 61 4720 07 40 61 4720 Dunstans SBTV 37 Kingaroy Street KINGAROY 4619 07 41 62 1547 07 41 62 2343 Nev Robert Electronics 31 Hart Street MACKAY 4740 07 49 57 6498 07 49 ...

Page 56: ...Main Street CLARE 5453 08 88 42 2144 08 88 42 3942 Peter s Electronics 25 Lorna Street LOXTON 5333 08 85 84 6920 08 85 84 6920 Gambier Sound Vision Repairs 16 18 Watson Tce MT GAMBIER 5290 08 87 23 3955 08 87 23 3855 Portside Technologies 28 Hallet Place PORT LINCOLN 5606 08 86 82 1500 Pirie Antenna TV 283B Senate Road PORT PIRIE 5540 08 86 32 2565 08 86 33 0091 Riverland Electronics Services 113 ...

Page 57: ...oorabool Street GEELONG 3200 03 52 22 1418 03 52 22 1418 RTD Services Pty Ltd 25 29 Fairlie Street GEELONG NORTH 3215 03 52 78 9766 03 52 78 3545 Linke Electrical Repairs 82 Londsdale Street HAMILTON 3300 03 55 72 5788 03 55 72 4090 Frank Ritchie Electrical P L 9 Victoria Street KERANG 3579 03 54 52 2908 03 54 52 2908 Harold Hurren 26 Fitzroy Street KILMORE 3764 03 57 82 1327 03 57 82 1487 Soundwa...

Page 58: ...77 08 99 64 2776 Oz West Electronics 6 200 Winton Road JOONDALUP 6027 08 93 00 1066 Printek Electronics 1 Lesueur Drive JURIEN BAY 6516 08 96 52 1664 08 96 52 1664 Kalgoorlie Electronics 395 Hannan Street KALGOORLIE 6430 08 90 21 1420 08 90 21 1420 J P Electronics 3 88 Albany Hwy KOJONUP 6395 08 98 31 1991 08 98 31 1991 Tuckerbox Retravision White Gum Street P O BOX 941 KUNUNNURRA 6743 08 91 68 11...

Page 59: ...TEAC CUSTOMER CARE CENTRE TCCC Free call 1800 656 700 Between Monday to Friday EST 9AM to 5PM ...

Reviews: