background image

22

Protect the Disc

Protect the Disc

Protect the Disc

Protect the Disc

Protect the Disc

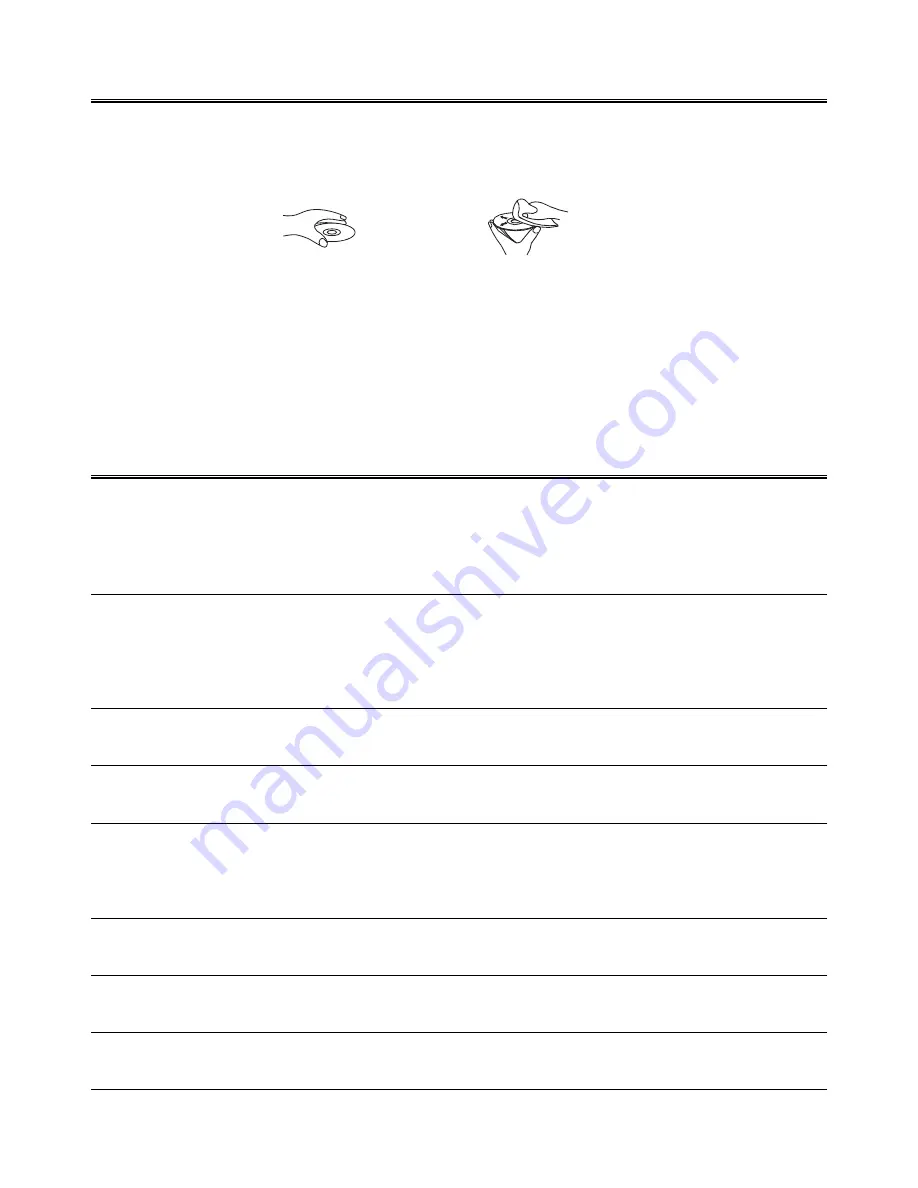
1. To keep the disc clean, please do not touch the disc’s surface when you are holding it. You should hold the

edge.

2. If the disc is dirty, it will affect the sound quality. Please use the clean and soft cloth to wipe the disc from

inside to outside. Do not wipe the disc in circular motion.

3. Do not stick paper on the disc.
4. Do not place discs in direct sunlight or near or on heat sources.
5. After you have finished with the disc, please place it back in its original case. To avoid warping or damage,

do not stack discs.

6. Do not play the disc which has flaw or deformation, in case of damaging this player.
7. Clean your discs using only a soft dry cloth. Do not use any chemicals such as benzine, thinner, antistatic

or record sprays as these can damage the disc surface.

Symptom

Symptom

Symptom

Symptom

Symptom

No sound is heard

No picture

Bad sound quality

The disc does not play

Poor radio reception

Unable to operate
the remote control

Operations are disabled

Possible Cause

Possible Cause

Possible Cause

Possible Cause

Possible Cause

Connections are incorrect, or loose

TV or power amplifier operates wrong
The amplifier’s receiving signal
position is wrong
Volume setting to minimum
Connect wrong or loose
TV Operation and setting is wrong

Audio connect wrong
Audio output mode setting wrong

No disc in the tray
The disc is upside down
The disc is dirty or scratched
The unit is foggy inside

The antenna is disconnected
The FM antenna is not properly
extended and positioned
The path between the remote control
and the sensor on the unit is blocked
The batteries have lost their charge
The built-in microprocessor has
malfunctioned due to external
electrical interference

Action

Action

Action

Action

Action

Check all connections and make
corrections
Check whether the operation is right
Check the position of receive signal

Adjust volume
Check all connection and correct it
Check whether operation and setting is
right
Check whether audio connection is right
Check whether audio output setting is
right
Place a disc
Place the disc in with the printed side up
Clean or replace the disc
Take out the disc, turn on the unit for
about an hour
Reconnect the antenna securely
Extend FM wire antenna to the best
reception position
Remove the obstruction

Replace the batteries
Unplug the system then plug it back in

T

T

T

T

Troubleshooting

roubleshooting

roubleshooting

roubleshooting

roubleshooting

If you are having a problem with your system, check this list for a possible solution before calling for service.
If you can not solve the problem from the hints give here, or the system has been physically damaged, call a
qualified person, such as your dealer, for service.

Summary of Contents for DRHN200

Page 1: ...USER MANUAL IMPORTANT WARRANTY INFORMATION INSIDE PLEASE READ www teac com au TEAC DRHN200 2 1CHANNEL DVD HI FI SYSTEM...

Page 2: ...ised Service Centre Where in home service is not available the purchaser is required to send the product to the nearest TEAC Authorised Service Centre for repair In this event a copy of this warranty...

Page 3: ...e any obligation on it in connection with the sale of any equipment other than as stated in this warranty and outlined above 11 In no event will TEAC be responsible or liable for indirect or consequen...

Page 4: ...Service Centre 3 Please have your purchase receipt as your proof of purchase and the following details completed for a valid Warranty Owner s Name Owner s Address Postcode Model Name No Serial No Dea...

Page 5: ...the AC Power Cord 7 Installation of Batteries in the Remote Control 7 Control Section 8 9 DVD Player main set 8 Sub Woofer 8 Remote Control 9 Normal playing 10 15 Use the Discs 10 Playing Picture CD d...

Page 6: ...t matches your household power CAUTION TO REDUCE THE RISK OF ELECTRIC SHOCK DO NOT REMOVE COVER NO USER SERVICEABLE PARTS INSIDE REFER SERVICING TO QUALIFIED SERVICE PERSONNEL CAUTION RISK OF ELECTRIC...

Page 7: ...unit turned on for about an hour until the moisture evaporates 12 Should any solid object or liquid fall into the unit unplug the system and have it checked by qualified personnel before operating it...

Page 8: ...screws ensuring the locking pin hole is facing upwards Then screw the second part of the bracket in place using the two screws ensuring the locking pin hole is facing upwards Finally slide the unit on...

Page 9: ...component output terminal By doing so the picture will be more clear 3 To avoid affecting the picture output do not connect video component HDMI at the same time Connecting to a TV with HDMI jack Con...

Page 10: ...ecting Control Cable Connecting Control Cable Connecting Control Cable Connect signal line between the main set and the sub woofer back board Connecting AUX Connecting AUX Connecting AUX Connecting AU...

Page 11: ...d Insert the AC power cord into a wall outlet and your system is at your command Caution Caution Caution Caution Caution Be sure to unplug the power cord from the outlet when going away or the system...

Page 12: ...iew Back View 1 AC Power Cord 2 Power Control Cable Socket 3 FM Antenna 4 AUX Input Terminal 5 L R Speaker Output Terminals 1 Play Pause BF Tuning Forward 2 Stop L L L L L Tuning Backward 3 Next G G G...

Page 13: ...on G Previous Button H 12 Stop Button L 13 Fast Backward Button D 14 Mode Button 15 Number Button 16 Mute Button 17 USB Function Button 18 AUX Function Button 19 Loudness Button 20 Super Bass Button 2...

Page 14: ...on from standby mode Caution Caution Caution Caution Caution When turning the system on the system will continue in the mode it was in when it was turned off last time T T T T Turning the System Of u...

Page 15: ...lso operate the key H on the panel of the unit 12 Press the stop button L to stop playing the unit will store the last playing time in the memory automatically then press the play pause button BF the...

Page 16: ...ode press the USB function button USB USB USB USB USB to select USB function 18 In power mode press the AUX function button AUX AUX AUX AUX AUX to select AUX function 19 This unit has a loudness funct...

Page 17: ...the volume down button to decrease the volume You can also operate the keys VOL VOL VOL VOL VOL VOL VOL VOL VOL VOL on the panel of the unit 26 In stop mode press the play pause button BF to start pla...

Page 18: ...NU MENU MENU MENU to display the program list then press program button PROGRAM PROGRAM PROGRAM PROGRAM PROGRAM to delete unwanted files from the program list 30 Press the goto button until the time o...

Page 19: ...CTION FUNCTION FUNCTION FUNCTION FUNCTION button on unit or the USB USB USB USB USB button on remote control to select the USB function 3 Display shows the word USB 4 MP3 music or the pictures will be...

Page 20: ...program button PROGRAM PROGRAM PROGRAM PROGRAM PROGRAM on the remote You can preset up to 16 FM stations Tune in the desired station then press the program button PROGRAM PROGRAM PROGRAM PROGRAM PROGR...

Page 21: ...imer imer In standby mode with the clock time having been set you can use the daily timer setting to turn the unit on automatically at a certain time everyday under standby mode When the setting time...

Page 22: ...es shown on the VFD in this sequence If you change the sleep timer each time you press the sleep button SLEEP SLEEP SLEEP SLEEP SLEEP it changes the number of minutes shown on the VFD in this sequence...

Page 23: ...neral Setup Page TV Display TV Display TV Display TV Display TV Display This menu allows the user to select the aspect ratio of the TV to be connected OSD Language OSD Language OSD Language OSD Langua...

Page 24: ...CAN video output mode when Ypbpr is selected Note Note Note Note Note This setting is available only when the Pr Cr Pb Cb Y is selected and HDMI SETUP is set to OFF Quality Quality Quality Quality Qua...

Page 25: ...arental Parental Parental Parental Setup this system when playing disc which had age control Region Region Region Region Region This menu allows the user to select the region Default Default Default D...

Page 26: ...t wrong or loose TV Operation and setting is wrong Audio connect wrong Audio output mode setting wrong No disc in the tray The disc is upside down The disc is dirty or scratched The unit is foggy insi...

Page 27: ...osite Video Output Output Level 1 0 2Vp p 75 S Video Output S Video Output S Video Output S Video Output S Video Output Output Level 0 7 0 14Vp p 75 Component Video Output Y Cb Pb Cr Pr Component Vide...

Page 28: ...Distance 6m Angle 30O Accessories Accessories Accessories Accessories Accessories FM antenna 1 Video cable 1 RGB cable 1 Wall bracket 2 Remote control 1 Instruction manual 1 Stand 1 Features and spec...

Page 29: ...Lachlan Valley TV 49 Vaux Street COWRA 2794 02 63 42 2189 02 63 42 2189 Greg s TV 2 Bingalong Street DALMENY 2546 02 44 76 7544 02 44 76 7544 Deniliquin Hi Tech 44 Hardinge Street DENILIQUIN 2710 03 5...

Page 30: ...33 23 2730 Nielsons Radio TV Service 68 Gavin Street BUNDABERG 4670 07 41 53 1377 07 41 53 1534 A1 Sound TV Service 14 Gloucester Road BUDERIM 4556 07 54 45 4777 07 54 45 1311 Caboolture Video Microw...

Page 31: ...ronics 78A Garsead Street BENDIGO 3550 03 54 42 7000 03 54 41 7502 Jav Electronics 65 Mackie Road BENTLEIGH EAST 3165 03 95 70 4911 03 95 63 8722 Inpulse Electronics 3 Sloane Street MARIBYRNONG 3032 0...

Page 32: ...7 08 99 64 2776 Oz West Electronics 6 200 Winton Road JOONDALUP 6027 08 93 00 1066 Printek Electronics 1 Lesueur Drive JURIEN BAY 6516 08 96 52 1664 08 96 52 1664 Kalgoorlie Electronics 395 Hannan Str...

Page 33: ...TEAC CUSTOMER CARE CENTRE TCCC Free call 1800 656 700 Between Monday to Friday EST 9AM to 5PM...

Reviews: