background image

12

Connecting antennas

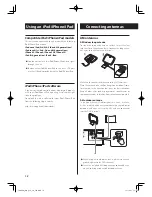
AM antennas

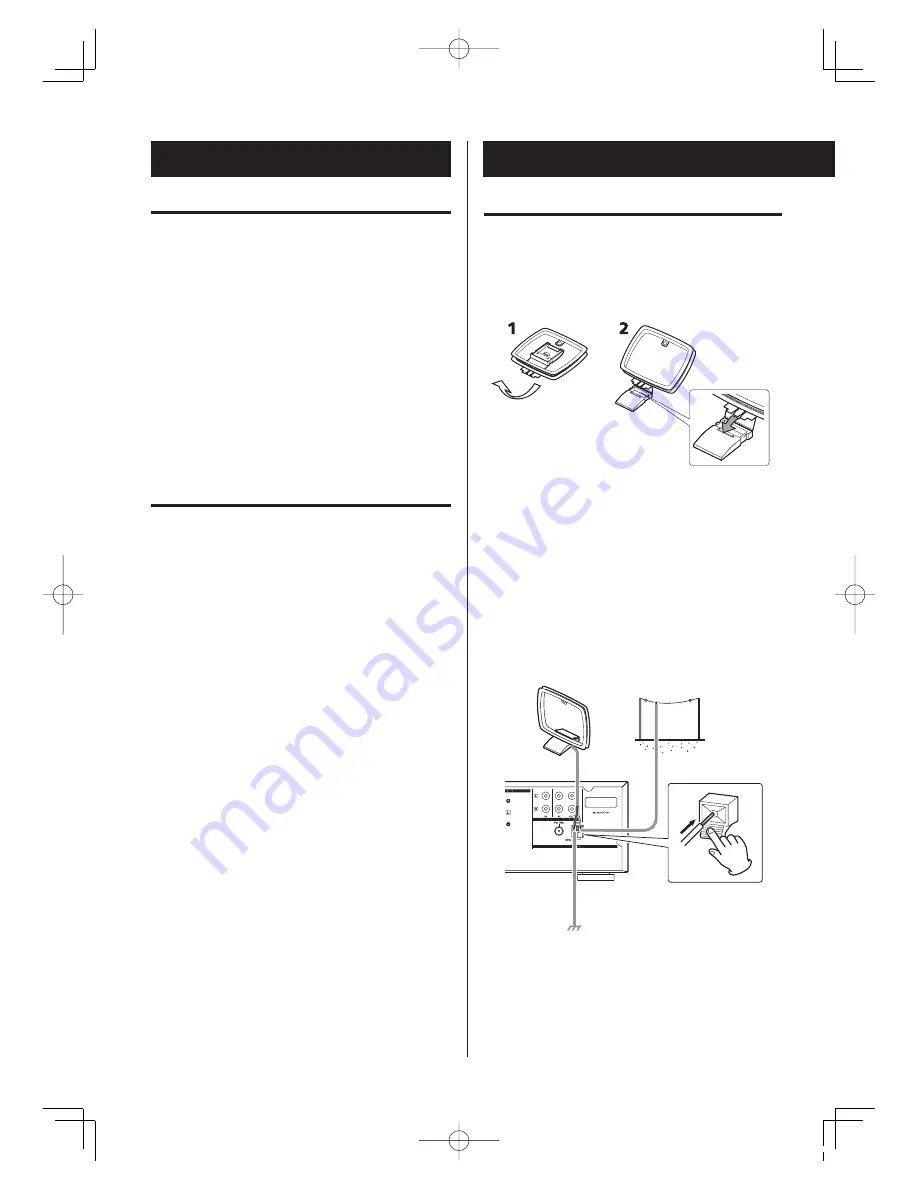
AM indoor loop antenna

To stand the loop antenna on a surface, insert the claw 
into the slot in the antenna base. Connect the loop anten-
na’s wires to the AM antenna terminals.

Make sure to connect the black wire to the GND terminal.
Place the antenna on a shelf or hang it on a window frame, 
for example, in the direction that gives the best reception. 
Keep all other wires such as power cords, speaker wires or 
interconnect cables as far away from the antenna as possible.

AM outdoor antenna

In an area where AM radio signals are weak, stretch a 
6–15m insulated antenna wire horizontally by a window or 
outdoors, and connect it to the AM antenna connector 
(not the GND terminal).

p

When using an outdoor antenna, always connect a 
grounding wire to the GND terminal.

p

Leave the included AM loop antenna connected even 
when also using a connected outdoor antenna.

Using an iPod/iPhone/iPad

Compatible iPod/iPhone/iPad models

This unit can be connected to and used with the following 
iPod/iPhone/iPad models.

iPod nano (2nd, 3rd, 4th, 5th and 6th generations)
iPod touch (1st, 2nd, 3rd and 4th generations)
iPhone 4S, iPhone 4, iPhone 3GS, iPhone 3G
iPad (3rd generation), iPad 2, iPad

p

You cannot transmit the iPod/iPhone/iPad video signal 
through this unit.

p

To connect an iPod/iPhone/iPad to this unit's USB port, 
use the USB cable provided with the iPod/iPhone/iPad.

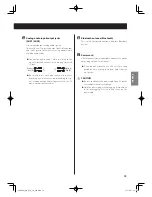
iPod/iPhone/iPad software

If the unit or remote control buttons do not work properly 
with your iPod/iPhone/iPad, updating its software might 
solve the problem.
Download the latest software for your iPod/iPhone/iPad 
from the following Apple website.

http://www.apple.com/downloads/

CR-H260i_OM_EFS_vA_CS6.indb   12

12/10/11   12:02

Summary of Contents for CR-H260i

Page 1: ...ENGLISH CR H260i Z 7202 023800200 CD Receiver OWNER S MANUAL MODE D EMPLOI MANUAL DEL USUARIO FRAN AIS ESPA OL CR H260i_OM_EFS_vA_CS6 indb 1 12 10 11 12 01...

Page 2: ...nergy and if not installed and used in accordance with the instructions may cause harmful interference to radio communications However there is no guarantee that interference will not occur in a parti...

Page 3: ...to rupture or leak leading to fire injury or the staining of nearby things Please read and observe the following precautions carefully o Be sure to insert the batteries with correct positive and negat...

Page 4: ...ken when using earphones or headphones with the product because excessive sound pressure volume from earphones or headphones can cause hearing loss CAUTION o Do not expose this apparatus to drips or s...

Page 5: ...equipment Disposal of batteries and or accumulators a Waste batteries and or accumulators should be disposed of separately from the municipal waste stream via collection facilities designated by the...

Page 6: ...a connected device 41 RDS only for Europe 41 PTY search only for Europe 42 Setting the clock 45 Using the timer 46 Troubleshooting 49 Restoring factory default settings 51 Specifications 52 Contents...

Page 7: ...t in damage to the circuitry or cause electric shock If a for eign object should get into the unit contact your dealer or TEAC service company p When removing the power plug from the wall outlet alway...

Page 8: ...IO logo 12 cm 4 7 CD R and CD RW discs that have been correctly recorded in the audio CD format and finalized as well as finalized CD R and CD RW discs that con tain MP3 or WMA files can be played by...

Page 9: ...p While printable CD R and CD RW discs utilizing modern printing technologies are generally acceptable older systems that use adhesives to attach paper type labels to the disc surface are not recommen...

Page 10: ...t can play back mono and stereo MP3 files that are in the MPEG 1 Audio Layer 3 format with a sampling rate of 44 1 or 48 kHz and a bit rate of 320 kbps or less p This unit can play back WMA files with...

Page 11: ...t is operated near other devices that generate infrared rays or if other remote control devices using infrared rays are used near the unit it might operate incorrectly The other devices might also ope...

Page 12: ...ect a grounding wire to the GND terminal p Leave the included AM loop antenna connected even when also using a connected outdoor antenna Using an iPod iPhone iPad Compatible iPod iPhone iPad models Th...

Page 13: ...ition that improves reception the most FM outdoor antenna In an area where FM radio signals are weak use a three ele ment outdoor antenna commercially available and use a 75 coaxial cable to connect i...

Page 14: ...Read the owner s manuals of all devices that will be connected and follow their instructions p Do not bundle connecting cables with power cords Doing so could cause noise Making connections 1 DVD pla...

Page 15: ...bundling the sig nal interconnection cables together with the AC power cord or speaker cables B Bluetooth antenna Bluetooth This is used for communication with other Bluetooth devices C Power cord Af...

Page 16: ...oth trans mitter and enter energy saving mode p To try connecting again press and hold the STOP H button for at least 2 seconds Connecting Bluetooth devices You can use this unit to listen wirelessly...

Page 17: ...to loosen it 2 Insert the wire into the terminal and turn the terminal cap clockwise to securely connect it 3 Make sure it is fastened firmly by pulling the cable lightly Connecting speakers using ban...

Page 18: ...18 Names and functions of parts main unit A B C D G H I J K M P O N L E F CR H260i_OM_EFS_vA_CS6 indb 18 12 10 11 12 02...

Page 19: ...e p In iPod mode no sound is output from the PHONES jack I USB port Connect an iPod iPhone iPad or USB flash drive here J SD memory card slot Insert an SD memory card here K SOURCE button Use this but...

Page 20: ...n a track file or song In TUNER mode press and hold either of the buttons to start auto tuning e STOP button 8 In CD USB SD mode use this button to stop playback To enter Bluetooth pairing mode press...

Page 21: ...on again to switch between TUNER AM and TUNER FM l DIMMER button Use this button to change the brightness of the display page 24 m SLEEP button Use this button to set the sleep timer page 25 n TIMER b...

Page 22: ...change the information shown on the display during playback u TIME MODE button Use this button with the Scroll buttons k j to set the timer page 46 v Scroll buttons k j In CD USB SD mode use these but...

Page 23: ...omatic standby In order to reduce power consumption if there is no play back signal from the selected input source and this unit is not operated for 30 minutes this unit will enter standby mode The un...

Page 24: ...balance of the volume level between the left and right speakers The level can be set between L 16 and R 16 BALANCE CENTER Dimmer You can dim the brightness of the display When the dimmer is turned on...

Page 25: ...is dimmed when the sleep timer is active p Press the SLEEP button once to check the remaining time The remaining time will be shown for 3 seconds then the display will return to normal Connecting head...

Page 26: ...his unit s USB port p The iPod s battery will be recharged when it is con nected and this unit is turned on Charging will stop once the iPod is fully charged It will not be charged when this unit is i...

Page 27: ...1 ALL button to cycle through the iPod s repeat modes as follows Repeat one track file REPEAT 1 Normal playback Repeat all tracks files REPEAT ALL p If the iPod is set to repeat one song the icon app...

Page 28: ...ot to let any of your fingers get pinched by the tray p Loading a disc takes a few seconds p During loading no buttons will work Wait until the total track number and total playback time of the disc a...

Page 29: ...played back Example CD Play AM09 00 T001 00 13 Current track number Current track elapsed time When an MP3 or WMA disc is played back Example CD Play AM09 00 T001 00 13 MP3 Current file Elapsed time...

Page 30: ...nce page 16 1 Press the SOURCE button repeatedly to select Bluetooth You can also select Bluetooth by pressing the remote control s Bluetooth button If the unit does not detect the Bluetooth device No...

Page 31: ...RW Default display current file number and the elapsed time of the file x Current file name x Title artist name and album name x Current folder number and track number For file names and ID3 tag infor...

Page 32: ...nning of the part you want p No sound is output while searching General playback CD USB SD Suspending playback temporarily Press the Play Pause button G J during playback to pause playback at the curr...

Page 33: ...earching for the desired track file During playback turn the MULTI JOG knob until you find the desired track file The selected track file will be played from the beginning When stopped or paused turn...

Page 34: ...dia only contains 60 tracks T060 which is the highest track number will appear and 060 will blink Programmed Playback CD USB SD 2 4 Repeat steps 2 and 3 to program more tracks files p If you make a mi...

Page 35: ...want to change appears on the display p If you want to add a track file to the end of the pro gram press the ENTER button repeatedly until T_ _ _ appears on the display 2 Use the Number buttons to sel...

Page 36: ...rom track 2 To select track number 12 Press 0 1 and 2 or press 1 2 and the PLAY PAUSE button 7 9 p If you press 1 and 2 and wait for a few seconds play back will start from track 12 To select track nu...

Page 37: ...ot select this mode if the media has no folders Repeat all tracks files RPT ALL All tracks files will be played repeatedly p During programmed playback all the programmed tracks files will be played r...

Page 38: ...rican model AM 9 kHz Automatic tune Turn the MULTI JOG knob to start automatic tuning When a station is found the unit tunes in to the station automatically Press and hold one of the scroll k j button...

Page 39: ...verted to mono If reception of an FM broadcast is poor this mode will make the signal mono but it will also reduce noise and make it easier to listen to You can store presets for up to 30 FM and 15 AM...

Page 40: ...the ENTER button p If you do not press the ENTER button within 20 sec onds of selecting the channel the selection will be cancelled p If you store a new station to a preset channel the station previou...

Page 41: ...allows stations to send additional information along with the regular radio program signal RDS works on the FM frequency band in Europe only 1 Tune in to an FM RDS station see page 38 2 Press the RDS...

Page 42: ...formation provided by the station When you select RDS Clock time RDS CLOCK TIME will blink for about 3 seconds and then the provided clock time will be displayed This unit s clock setting will be auto...

Page 43: ...ing 5 Turn the MULTI JOG knob The unit starts searching p You can also start searching by pressing a Cursor button l or on the remote control unit p When the programme type that you have selected is f...

Page 44: ...icians EASY M Popular music usually lasting for less than 5 minutes LIGHT M Classical music instrumental music chorus and light music favored by general audiences CLASSICS Orchestral music including g...

Page 45: ...2 seconds CLOCK SETTING appears on the display p The European model of this unit uses 24 hour mili tary time The North American model of this unit uses the 12 hour clock p If no action is taken for 20...

Page 46: ...e unit can be programmed to turn on and off at spec ified times p Adjust the clock before setting the timer p If no action is taken for 20 seconds timer setting will end automatically p Use the cursor...

Page 47: ...can select from TU FM FM tuner TU AM AM tuner CD USB iPod or USB or SD SD memory card p You cannot select Bluetooth The volume level blinks 21 86 2 92 Playback source Volume level Start time Stop tim...

Page 48: ...ation 3 Press the STANDBY ON button to put the unit into standby The standby indicator lights The unit will turn on and off at the specified times every day The unit must be in standby for the timer t...

Page 49: ...the unit on e If the batteries are exhausted change the batteries e Point the remote control at the front panel of the unit from a distance of less than about 5 m 16 ft e Clear obstacles between the r...

Page 50: ...ailable pages 12 and 13 Bluetooth The sound breaks up or there is noise e If there is a device that generates electromagnetic waves in the 2 4 GHz band such as a microwave oven or wire less LAN equipm...

Page 51: ...unit is ON 2 Press the SKIP button on the remote control p The main unit s MULTI JOG knob cannot be used to restore the factory default settings 3 Press and hold the Stop button 8 for at least 2 seco...

Page 52: ...roximate and the surround ing environment and other electromagnetic waves might affect it Supported profiles A2DP AVRCP Playable files MP3 Format MPEG 1 Audio Layer 3 Sampling rate 44 1 or 48 kHz Bit...

Reviews: