background image


December

 2009 9 of 54


5.2


How to receive the programs? 

Scan the possible frequency and bandwidth to receive the programs. 

(1)

 Press <menu> button to enter 

Main Menu

(2)

 Press <Left/Right> button to select 

SETUP

 option. 

(3)

 Press <Up/Down> button to select 

Installation

 option. 

(4)

 Press <OK> button to enter 

Installation

 page. 

(5)

 Press <Up/Down> button to select 

Country Setting

 option. 

(6)

 Press <Left/Right> button to set 

Country Setting

(7)

 Press <RED/GREEN> button to 

Auto Scan

 or 

Manual Scan

See Figure 1, 2. If there is no database in the STB, it will start at step 

(5)

 when booting. 


5.2.1


Auto Scan 

Auto Scan

 will erase the database first, and scans default frequency and bandwidth by 

Country 

Setting

. Follow the steps 

(1)

 ~ 

(6)

 at section 

1.2.

(7)

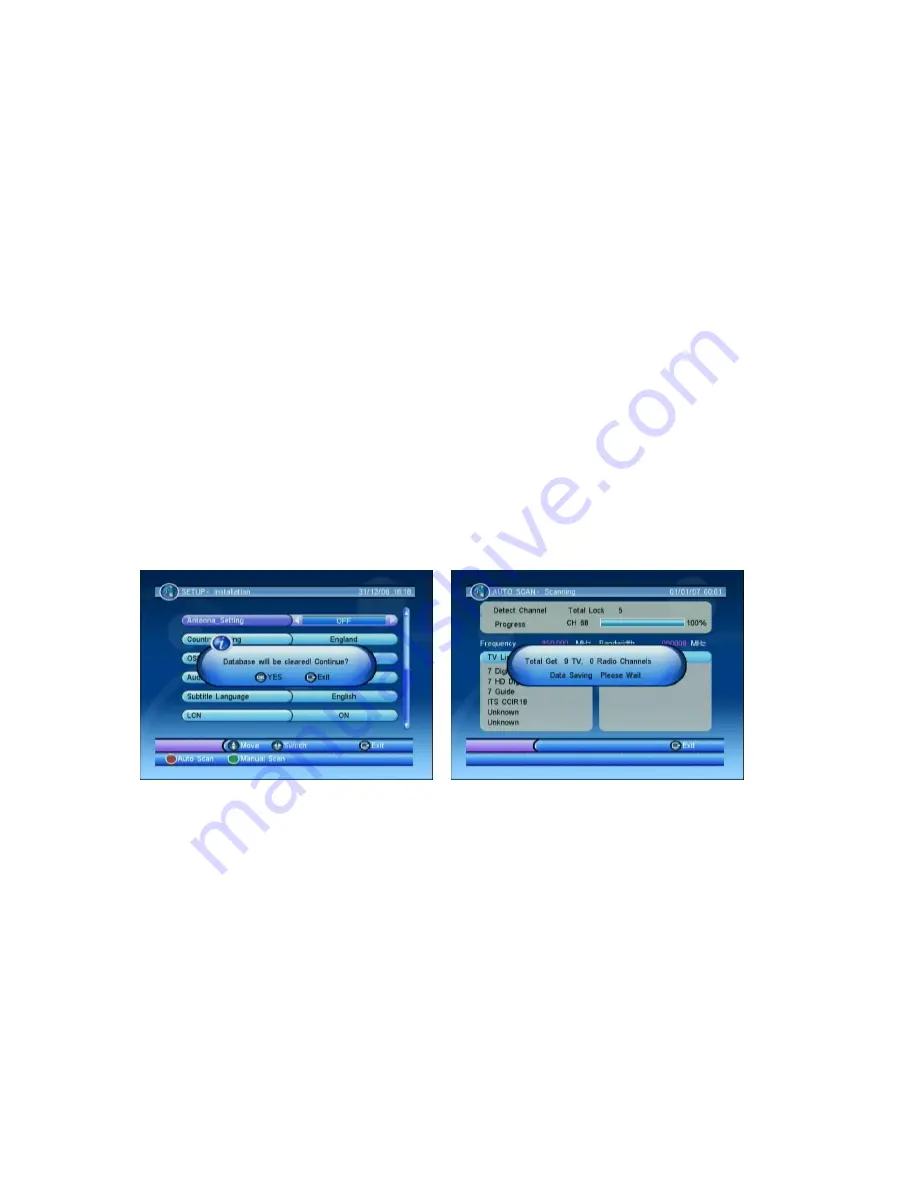
 Press <RED> button to be confirmed to clear the database. 

(8)

 Press <OK> button to confirm the database will be cleared and start 

Auto Scan

It costs time to do 

Auto Scan

, user can press <exit> to exit at anytime. See Figure 3, 4. 


Figure 3. Clear database message 

Figure 4. Auto Scan Page 

Summary of Contents for DTR 3002CU PVR

Page 1: ...December 2009 1 of 54 DTR 3002CU PVR User Manual...

Page 2: ...age 12 6 2 1 4 Audio Language 12 6 2 1 5 Subtitle Language 13 6 2 1 6 Time Zone 13 6 2 1 7 Auto Scan 13 6 2 1 8 Manual Scan 13 6 2 2 TV Setup 14 6 2 2 1 TV Format 14 6 2 2 2 TV Mode 14 6 2 2 3 OSD Tra...

Page 3: ...ng Preference 40 6 5 GAME 40 6 5 1 Gomoku 41 6 5 2 Calendar 41 6 5 3 Calculator 42 6 6 Normal Play 43 6 6 1 Information 43 6 6 2 Switch Program 44 6 6 3 Program List 44 6 6 4 Volume 45 6 6 5 Pause 45...

Page 4: ...Rev 1 0 December 2009 4 of 54 1 Installation...

Page 5: ...Rev 1 0 December 2009 5 of 54 2 Remote Control...

Page 6: ...nt shows the correct way to install the batteries Using the Remote Control To use the remote control point it towards the front of the digital set top box The remote control has a range of up to 7 met...

Page 7: ...g with the receiver To prevent the risk of electric shock do not open the cover or the back of the receiver Note When connecting the receiver to other equipment e g TV VCR and amplifier make sure to r...

Page 8: ...ress Left Right button to select SETUP option 3 Press Up Down button to select Installation option 4 Press OK button to enter Installation page 5 Press Up Down button to select OSD Language option 6 P...

Page 9: ...o set Country Setting 7 Press RED GREEN button to Auto Scan or Manual Scan See Figure 1 2 If there is no database in the STB it will start at step 5 when booting 5 2 1 Auto Scan Auto Scan will erase t...

Page 10: ...hen once the programs will be duplicated Follow the steps 1 6 at section 1 2 7 Press GREEN button to enter Manual Scan Page 8 Press Up Down button to select Frequency option 9 Press 0 9 button to inpu...

Page 11: ...cribe how to operate the STB 6 1 Main Menu Main Menu for operating a lot of functions 1 Press menu button to enter Main Menu 2 Press info button to display the version information of STB See Figure 7...

Page 12: ...the country for Auto Scan Manual Scan and Time Zone Change the Country Setting will automatically change the default Time Zone value Country Setting also has default Frequency and Bandwidth for Auto...

Page 13: ...on to select Time Zone option 2 Press Left Right button to set the Time Zone value 6 2 1 7 Auto Scan Auto Scan erases the database first and scans default frequency and bandwidth by Country Setting Pl...

Page 14: ...d be matched with user s TV 1 Press Up Down button to select TV Mode option 2 Press Left Right button to set mode 6 2 2 3 OSD Transparency Set the On Screen Display transparency 1 is the most diaphano...

Page 15: ...set the method 6 2 2 6 Video Enhancement Set the Video Enhancement 1 Press Up Down button to select Video Enhancement option 2 Press Left Right button to set Video Enhancement 3 Press Up Down button...

Page 16: ...ock the program by password and censorship threshold The censorship info is in program content Under the censorship rating user has to enter the password for watching program 1 Press Up Down button to...

Page 17: ...Rev 1 0 December 2009 17 of 54 Figure 15 Enter Old Password Figure 16 Enter New Password Figure 17 Confirm New Password Figure 18 PIN Code Changed Figure 19 PIN Code Error...

Page 18: ...ram s by date time and frequency When setting date and start time is up STB will automatically switch to program user sets Setting here the start time and end time depend on current system time Please...

Page 19: ...tton to set Mode value 3 Press OK button to start transfer 6 2 5 1 System Software Update Update application and tsbootl by build in card reader or USB port See Figure 21 24 1 Press BLUE button to ent...

Page 20: ...20 of 54 6 2 6 Set Default Reset STB to factory default All settings by user has been operated will be reset default and database will be erased at same time See Figure 25 26 Figure 25 Set Default Fig...

Page 21: ...re 29 30 1 Press Left Right button to select Tool operation 2 Press Up Down button to select the program 3 Press RED GREEN YELLOW 1 8 button to operate Buttons depend on operation 6 3 1 1 Delete Delet...

Page 22: ...by channel up down when watching program 1 Press Left Right button to select Skip option 2 Press Up Down button to select the program 3 Press RED button to set skip status 4 Press YELLOW button to co...

Page 23: ...m 3 Press RED button to set lock status 4 Press YELLOW button to confirm the operation and save the result Program status is changed after operating And press Left Right button will confirm and save S...

Page 24: ...Left Right OK button to select the character 6 Press RED OK button on Save button to return program info page 7 Press RED button to save the editing and return to List If press exit button at step 7...

Page 25: ...operation and save the result Program status is changed after operating And press Left Right button will confirm and save See Figure 45 46 6 3 1 6 Search User can search the program name by partial ke...

Page 26: ...Rev 1 0 December 2009 26 of 54 See Figure 47 50 Figure 47 Search Figure 48 Search character U Figure 49 Search Result Figure 50 Search Next...

Page 27: ...sets by date and time It is the same with Main Menu SETUP Advance Timer please check the section 2 2 4 for more detail When editing in Book the Start Time and End Time are depended on selected event...

Page 28: ...or other event it displays conflict message If the date and time in the event are up STB will automatically switch to setting program in event Press any key except Vol Vol mute button STB asks user t...

Page 29: ...Rev 1 0 December 2009 29 of 54 Figure 58 Book Conflict Figure 59 Abort...

Page 30: ...s Initializing when just inserting device or Device is not ready without device See Figure 60 61 6 4 1 My Album My Album can display JPG photo and operate it Remove device when playing photo it displa...

Page 31: ...d photo Press YELLOW button to do slide show at current folder Press BLUE button to browse folders and files photos 6 4 1 2 Folder If there is no photo in device root folder it will start at Folder mo...

Page 32: ...ton to zoom in the photo Press BULE button to zoom out the photo Press Up Down button to display next or previous photo Press exit button to return Thumbnail mode User can zoom the photo with 25 50 10...

Page 33: ...e photo will be rotated right Press YELLOW button the photo will be flipped horizontal Press BLUE button the photo will be flipped vertical Press exit button to return Thumbnail mode After rotating or...

Page 34: ...Press RED button to play the slide show when pausing Press GREEN button to pause the slide show when playing Press YELLOW button to set repeating or once Figure 72 Edit Rotate left Figure 73 Edit Rot...

Page 35: ...between current and next photo Press Up Down button to next or previous photo right away See Figure 77 83 Figure 77 Slide Show Play Figure 78 Slide Show Pause Figure 79 Slide Show Repeat once Figure 8...

Page 36: ...Rev 1 0 December 2009 36 of 54 Figure 83 Slide Show Slow...

Page 37: ...MP3 file Press RED button to play or stop MP3 file Press GREEN button to pause MP3 file Press YELLOW button to repeat selected MP3 file only Press BLUE button to random play MP3 file in current folder...

Page 38: ...Rev 1 0 December 2009 38 of 54 Figure 88 Repeating Figure 87 Pause Figure 89 Random Figure 90 Play and Volume Figure 91 Mute with volume Figure 92 Mute...

Page 39: ...he movie 6 4 4 My Recorder My record can play the recorded programs and set functions See Figure 13 Remove device when playing it will display Device is removed Message 6 4 4 1 Recording List Recordin...

Page 40: ...not by man made setting 6 4 4 3 2Time Shift There are three types of time shift AUTO Pause OFF Please see section 3 12 for details 6 4 4 3 3One Button Recording Enter Normal Play select ON press to b...

Page 41: ...play mode and difficult Press OK button to start play Gomoku Press Up Down Left Right button to select the position Press OK button to place the piece 6 5 2 Calendar Calendar displays the year month a...

Page 42: ...ss INFO button to select Press OK button to calculate the answer Press RED button to do plus funtion Press GREEN button to do sub funtion Press YELLOW button to do multiply function Press BLUE button...

Page 43: ...am No favorite setting current time program name current and next event lock scramble subtitle and teletext info More detail info displays about tuner info See Figure 103 104 Press info button to disp...

Page 44: ...nput program number doesn t exist STB will ignore the input See Figure 105 6 6 3 Program List Display Program List with No name and state And user can switch program at here See Figure 106 Press OK bu...

Page 45: ...ute mute will be canceled See Figure 107 108 Press Vol Vol button to adjust the volume Press mute button to mute 6 6 5 Pause Pause video and audio But it will be canceled by any input See Figure 109 P...

Page 46: ...ton to select Channel or Sound Mode option Press Left Right button to set the value Press exit button to exit the audio setting page 6 6 7 Favorites User can switch the same favorite program by favori...

Page 47: ...13 114 Press text button to display the teletext setting page Press Up Down button to select the teletext language if the program has teletext Press OK exit button to exit the teletext setting page Pr...

Page 48: ...title setting page 6 6 10 Teletext Subtitle Display subtitle by teletext the style of the teletext subtitle may be different by content provider See Figure 117 118 Press text subtitle button to displa...

Page 49: ...s snapshot See Figure 119 Press YELLOW button to display digest Press Up Down Left Right button to browse program Press OK button to switch program and watch Press exit button to return the last watch...

Page 50: ...o Service Program doesn t have any content to play See Figure 121 6 6 15 3 Service Scrambled Program is scrambled for payment contact the content provider to know how to descramble it See Figure 122 F...

Page 51: ...Overload The power of antenna is overload See Figure 123 6 6 15 5 HDTV not support This STB doesn t support HDTV If the program content is HDTV STB will display this message See Figure 124 Figure 122...

Page 52: ...etting lock please check the section 2 3 1 3 and turning on password setting please check the section 2 2 3 1 User must input correct password to watch program See Figure 125 126 Figure 125 Lock by pa...

Page 53: ...nother channel Mosaic blocks in picture or picture freezes Aerial may not be compatible Check aerial Scrambled channel message Channel is scrambled Select an alternative channel Forgotten channel lock...

Page 54: ...max Display Decoder Module PAL NTSC Resolution 720 X 576 PAL 720 X 480 NTSC Aspect Ratio 4 3 Letterbox Pan Scan 16 9 Decoding Video MPEG2 Transport MP ML Audio MPEG2 Audio Layer I II Others Complianc...

Reviews: