background image

Initial setup

Welcome to use the Wizard for Initial Setup !!

Please press [OK] to start the wizard.

Welcome

General Operation

Initial set-up involves selecting all the settings required to 
be able to search for and store all the channels you can 
receive. Make sure that the television is switched on and 
follow all the steps in turn specified hereafter. 

The first time you switch the set on, the 

Initial setup


wizard opens, which guides you through the initial setup 
process. Press 

OK

 to start your initial setup.


Initial


Set-up

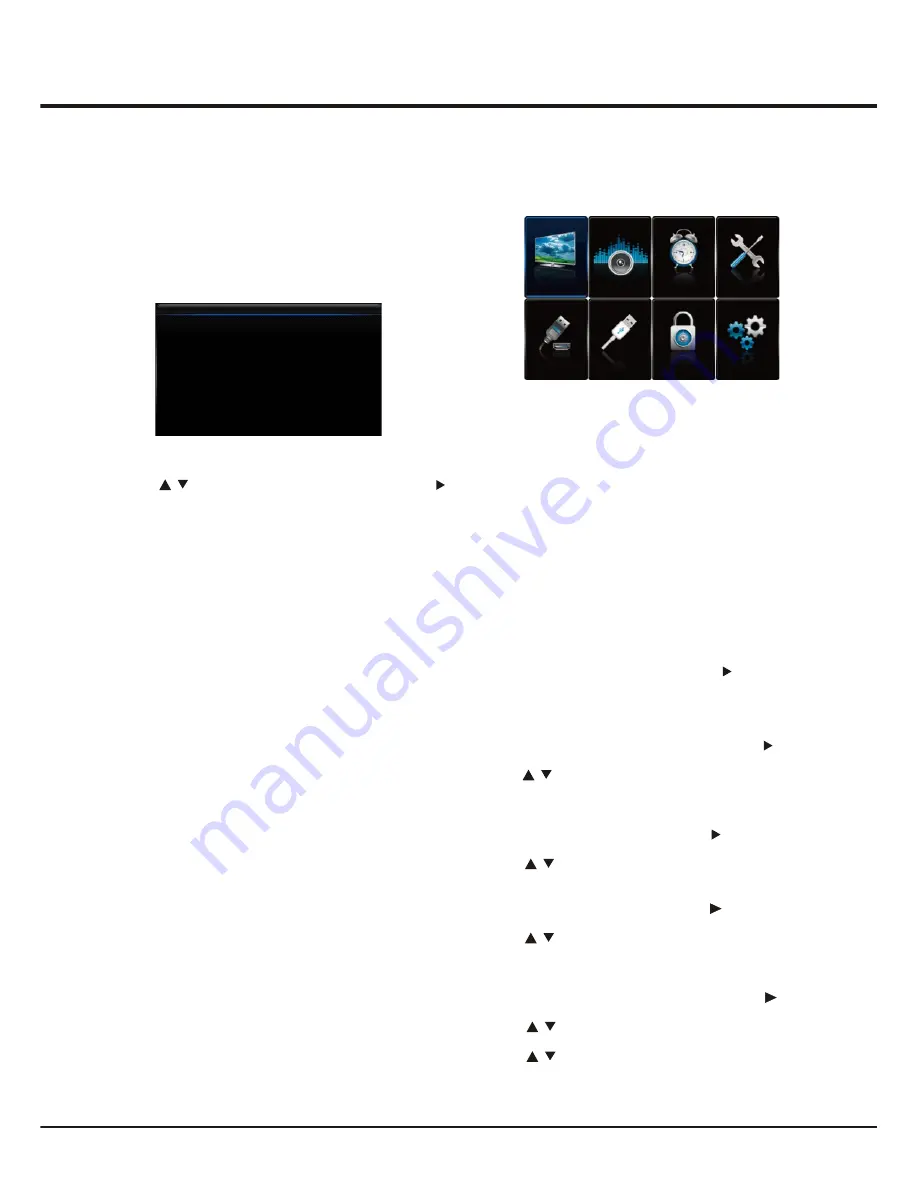
To access the menu system: 

1. Press the 

Menu

 button to display the main menu.

2. Press the up/down/left/right direction buttons to select
    the desired item, then press the 

OK

 button to open the 

    corresponding submenu.  
3. In submenus, use the up or down direction button to 
    select menu options, use the left or right direction button 
    to set functions or change values. Use the 

OK

 button 

    to activate a setting. Use the 

OK

 or right direction button 

    to open the corresponding submenu. 
4. Press 

Menu

 to return to the previous menu or press 


Exit

 to close the menu. 


Organizing Channels

This section describes how to organize channels.
Instructions are for both analogue and digital channels.
(Note: this option is not available for certain models.)
Select Setup > Organiser and press OK/  to enter.

Skipping channels

: If a channel was stored twice

or its reception is poor, you can simply skip it. The
skipped channels can not be selected by pressing
the CHANNEL UP /DOWN button.

 Select the Channel skip option and press OK/ 

to display Channel skip menu.

 Press 

/

 to select a channel and press the OK

button to check the box.

Sorting channels:


Channel insert

: insert one channel in front of another. 

  Select Channel insert and press OK/   to display 

channels. 

  press 

/

 to select one channel and select another

one. The later one is inserted in front of the former one.

Channel swap

: swaps two channels' position.

  Select Channel swap and press OK/   to display 

channels.  

  press 

/

 to select a channel, and press OK to

confirm. Select another channel and press OK to confirm.
The two channels' positions were swaped.

Editing channels:

  Select the Channel edit option and press OK/ 

to display Channel edit menu.

  Press 

/

 to select a channel you want to edit,

then press the OK button to enter.

  Press 

/

 to select Channel number or

Channel name, using the digit keys to edit the
channel number or channel name, and then
press OK to confirm.


Using


Menu


System

This section explores the menus of your TV. Each menu 
is outlined and detailed to help you get the most from 
your TV.


9

Picture

Sound

Timer

Options

Source

Media

Lock

Setup

1.  Press 

/

 to select your language, then press OK/ 

     to enter the next step.(Note: this step is not necessary 
     for some models.)

2.  Press the up or down direction button to select 

Scan


     and press the 

OK

 or right direction button to start the 

     search automatically. All available TV programmes 
     are stored. This operation takes a few minutes. 
     The display shows the progress of the search and the 
     number of programs found.  


Note:

 to prevent the channel setup process from being 

    interrupted, wait for the message indicating that the 
    setup is complete. 

    In this step, you can also select 

Skip Scan

 to skip the 

    channel search progress. But when you turn the TV on 
    next time, the prompt on the screen will remind you to 
    do the channel scan first.

3. During the setup, user can follow the hints available at 
    the bottom of the screen to return to the last step by 
    pressing the left direction button. Or press 

Exit

 to exit 

    or interrupt the search halfway.

4. Once the automatic search ends, the set enters the 
    next step automatically. You can press the up or down 
    direction button to select your location 

Shop

 or 

Home

    Press the 

OK

 or right direction button to confirm your 

    selection and enter the last step.


Note: 

the 

Shop 

mode does not satisfy the MEPS 

    certification, suggest selecting 

Home

.

 
5.  - In this step, you can press 

OK

 to exit the initial setup. 

       The channels are arranged in a preset order. If you 
       wish to skip channels, modify the preset order or 
       rename channels, select 

Setup > Organiser

 for these 

        operations.      
    -  In this step, you can also press the left direction 
       button to return to the previous step.

Summary of Contents for LED32S4690

Page 1: ...4690F MT31SR IR 1 72 MT31LA EAUAZ H7 55S46AU IRCB0AA ELK116427M 2014 08 13 HZ2014 08 106R TEL 0752 3270 552 136 9287 4671 说明书 LCD http pdm tcl com 9080 index jsp LED55S4690 TCL IRAN 请印黑色在白色 说明书内容 72 MT31LA EAU1A R6 pdf 80G哑粉纸上 ...

Page 2: ...LED32S4690 LED40S4690 LED48S4690 LED55S4690 OPERATION MANUAL LED TV ...

Page 3: ... Cleaning Hanging the TV Set on the Wall Sockets Remote Control Functions Important Information Buttons on the TV Switching on Switching off Using Menu System Organizing Channels Automatic Channel Set up Automatic Update Clean Channel List Initial Set up Analogue Manual Scan Antenna Manual Installation Adjusting the Picture Adjusting the Sound Selecting a Signal Source Setting the Timer Using the ...

Page 4: ...d and the signal cable to moisture Do not place the set on an unstable cart stand or table Use Environment Place the set on a place that allows good ventilation Do not use the set near damp and cold areas Protect the set from overheating Keep the set away from direct sunlight The set shall not be exposed to dripps or splashes and no objects filled with liquids such as vases shall be placed on the ...

Page 5: ...through the program Note In all signal sources press it to increase the volume while in TV mode press first then press to scan up through the program when program info appears on the screen 2 PROGRAM VOLUME DOWN button Decreases the volume or scans down through the program Note In all signal sources press it to decrease the volume while in TV mode press first then press to scan down through the pr...

Page 6: ... TV is in standby mode In the menu system press and release it within 2 seconds it acts like OK button on the remote to confirm your selection Press and hold it for more than 2 seconds it acts like BACK button on the remote which makes you go back to the previous menu interface TV Controller is a multi directional button that helps navigate without remote control For some models there s only one T...

Page 7: ...nd IN adapter IN adapter R L R L AUDIO IN AUDIO AV RCA audio video sockets input Note T AV IN sockets share the Y and AUDIO IN sockets of he COMPONENT IN L AUDIO VIDEO AV IN R Headphone socket output This socket can be used to connect headphones or stereo earphones Warning excessive sound pressure from earphones and headphones can cause hearing loss HEADPHONE or USB socket input These sockets can ...

Page 8: ...or decreases the TV s volume Returns you to the previous channel In USB function returns to the previous menu LIST Displays channel list Toggles teletext between on and off left and right direction buttons Highlights different items in the menu system and adjusts the menu controls The right direction button can Selects the picture format also be used to open the corresponding submenu To switch to ...

Page 9: ...d on the TV will be turned on directly or be in standby mode If the TV set is in standby mode press the button on the remote control or on the TV set to turn on the TV Figure 2 Figure 1 2 For models powered by AC supply Your TV set should only be connected to anAC supply It must not be connected to a DC supply If the plug is detached from the cable do not under any circumstances connect it to a ma...

Page 10: ... press OK to confirm Select another channel and press OK to confirm The two channels positions were swaped Editing channels Select the Channel edit option and press OK to display Channel edit menu Press to select a channel you want to edit then press the OK button to enter Press to select Channel number or Channel name using the digit keys to edit the channel number or channel name and then press ...

Page 11: ...name finally press OK to confirm This allows you to update all available channels without altering the sorting of existing channels 1 Display the Channel install menu press the up or down direction button to highlight Automatic update option 2 Press the OK or right direction button to start to update the channels To stop the update process press the Menu button 3 When the search is completed press...

Page 12: ... reduction this setting reduces picture static or any type of interference This feature is especially useful for providing a clearer picture in weak analog signal conditions Press the left or right direction button to choose between these options Low High Auto Off Middle Note some options may appear in the next page of Picture menu you can press the up or down direction button to switch Display th...

Page 13: ...the remote control to switch the source then press OK to confirm direction button to display Input lock menu then press the up or down direction button to select a certain external source you want to Lock and press the OK button to lock To unlock use the same operation Note when the current input is locked you can press OK and enter the password to enter Front panel lock this option allows you to ...

Page 14: ...button to display its submenus Subtitle press the left or right direction button to turn On or off the subtitles Subtitle type press the left or right direction button to select a subtitle type You can select Hearing impaired to display the hearing impaired subtitle with your selected language SPDIF type connect to an audio device through the SPDIF output Select Options SPDIF type Select a proper ...

Page 15: ...next time the Picture preset will restore to Dynamic mode and a prompt about Shop mode will appear Decoding page language press Menu on the remote control and select Options Decoding page language Select a proper type of language in which Teletext will display Customising the input settings You can configure your TV according to the equipment you connect to it 1 Select Setup Input settings 2 Press...

Page 16: ...HL Function MobileHigh definition Link You can use the following functions by connecting the TV HDMIport identified with MHL and the USB port of mobile phone or similar device with an MHL cable Charge your mobile phones from the TV Two way remoteoperation between TVand mobile phone Video Audio output fromyour mobile phone Notes These functions may not be available depending on the connected equipm...

Page 17: ...n Music To playback music if available 1 Select Media center Music then press OK to enter the main file content browser To enter the Media center manually press Menu on the remote control and select Media 2 Use the left right up down buttons to select a song in either main or sub file content browser in the same way as in photo display function press Menu to display the music menu in the folder mo...

Page 18: ...st resolution or other standard resolutions of the Windows system Snowy dots and interference If the antenna is located in the fringe area of a television signal where the signal is weak the picture may be marred by dots When the signal is extremely weak it may be necessary to install a special antenna to improve the reception 1 Adjust the position and orientation of the indoor outdoor antenna 2 C...

Reviews: