TCL LE50FHDE5510C User Manual Download Page 14

 13


Connections and Setup

Initial Setup

Initial setup involves selecting all the settings required to 

be able to search for and store all the channels you can 

receive. Make sure that the television is switched on and 

follow all the steps in turn specified hereafter. 
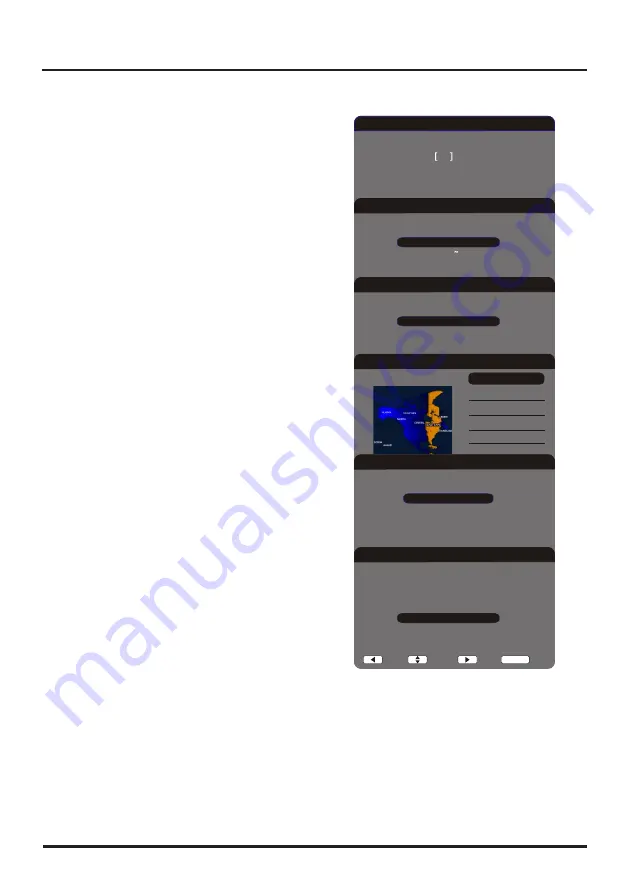
The first time you switch the set on, the Initial setup 

wizard opens, which guides you through the initial setup 

process. Press 

OK

 to start your initial setup. 

1.  Press ▲/▼ to select your language, then press  


OK

/► to enter the next screen.

2  A menu screen asks you to set the TV Location.
  •  Choosing “

Home

” for the TV Location assigns  

    the optimal picture settings for most home  
    environments.  
  •  Choosing “

Retail

,” which is not Energy Star  

    compliant, sets the unit up with predefined  
    settings for retail displays. In this setting, the  
    power consumption may exceed the requirements  
    of the Energy Star® qualification.
Use ▲/▼to select the desired location setting (

Home/

Retail

); then press 

OK

/► to continue to the next screen.

3. Use ▲/▼ to select the current local time zone. Press  


OK

/► to continue to the next screen.

4. On the 

Tuner

 screen, select either 

Antenna

 or


 Cable.

 Press 

OK

/► to continue to the next  screen. 


Note:

 If you are using a satellite or cable set-top box,


  you do not have to complete the Channel Scan

.

5. The 

Channel Scan

 screen is now displayed. The  

  default choice is to scan. Press 

OK

/► to begin the  

  channel scan for available channels to be stored in  
  the TV’s memory.


Note:

 If you do not want to scan for channels at this  

  time, press the 

CANCEL

 button to stop the scanning  

  process.

6. The screen will change to show the progress of the  
  scanning process.
7. When the scanning is finished, the unit has  ompleted  
  the Initial Setup.
8. Press 

CANCLE

 to exit the Wizard and begin watching  

  TV.

Welcome to use the Wizard for Initial Setup!!

Initial Setup

Welcome

Please press  OK  to start the wizard.

Please select your language:

English
Espanol

Initial Setup

Language

Back

Select

Next

Exit

CANCEL

Please select your TV Location:

Home
Retail

Initial Setup

TV Location

Back

Select

Next

Exit

CANCEL

Initial Setup

Time Zone

Please select your time zone:

Eastern

Central

Mountain

Pacific
Alaska
Hawaii

Back

Select

Next

Exit

CANCEL

Please select your tuner mode:

Antenna

Cable/Sat

Initial Setup

Tuner

Back

Select

Next

Exit

CANCEL

Initial Setup

Channel Scan

First, please connect Cable/Sat or  Antenna. Scan now? If you skip this step,

Scan

Skip Scan

 the Channel Scan could be performed in Setup menu later. 

Back

Select

Next

Exit

CANCEL

This mode is Energy Star compliant.

Summary of Contents for LE50FHDE5510C

Page 1: ...1 877 300 8837 for mainland 48 States or 1 877 800 1269 for AK HI and Puerto Rico For use with models LE50FHDE5510C LE55FHDE5510C LE50FHDE5510CTA LE55FHDE5510CTA Figures and illustrations in this Use...

Page 2: ...the disconnect device shall remain readily operable Therefore you should ensure that the TV is installed in a manner that allows you to disconnect the power cord when desired Product Registration Plea...

Page 3: ...e personnel Service is required when the component is damaged in any way such as power supply cord or plug damage liquid spilled on or objects falling onto the component rain or moisture exposure abno...

Page 4: ...ntrast 15 Tint 15 Color 15 Sharpness 15 Color Temperature 15 Advanced Settings 15 Sound Menu 15 Sound Mode 15 Balance 15 Sound Surround 15 Speaker 15 SPDIF Type 15 Auto volume control 15 MTS 15 Defaul...

Page 5: ...or amplifier place it on the top shelf so the heated air from it won t harm other components Avoid Audio Interference Position cables properly insert each cable firmly into the designated jack If you...

Page 6: ...avoid scratching the screen Then follow the steps below Connections and Setup Mounting Your TV to the Wall The VESA number is the horizontal and vertical measurement of the mounting holes For example...

Page 7: ...2 IN adapter Lets you connect a component that has composite video jacks such as a VCR or DVD player Note that you must connect an Audio Video adpter cable with three color jacks to this adapter jack...

Page 8: ...Interface Digital Visual Interface Provides an uncompressed digital connection that carries both video and audio data by way of an integrated mini plug cable Since HDMI technology is based on Digital...

Page 9: ...DIO IN HDMI 1 DVI IN PC Connection HDMI DVI Connection HDMI DVI conversion cable HDMI cable Same connnection to HDMI 1 IN HDMI 3 IN and HDMI 4 IN Audio video adapter cable VGA cable Audio cable Audio...

Page 10: ...to the TV follow the steps below to configuire your TV to be connected to the network Press MENU to display the main menu select Connection Settings Configuration press OK to display its options Inter...

Page 11: ...e and make sure this code is installed to the AP for the procedures refer to your router manual then press OK again to setup the connection PBC If your router has a PBC push button select PBC then pre...

Page 12: ...BACK Returns you to the previously viewed channel CANCEL Exits the menu INFO If no menus are currently active press the INFO button to display the Channel Banner USB Goes to the Media menu TV Goes to...

Page 13: ...Follow the instructions on this page on how to switch on your TV set and use the remote control before going on to following pages describing how to use the channel scan procedure 1 Insert two AAA ba...

Page 14: ...ote If you are using a satellite or cable set top box you do not have to complete the Channel Scan 5 The Channel Scan screen is now displayed The default choice is to scan Press OK to begin the channe...

Page 15: ...cel TV Signal Type Antenn a Channel Scan Channel Skip Back Select Cancel Time Setup Time Zone Time Daylig ht Saving Auto Back Select Cancel Enter OK Parental Control Channel Block Program Block InputB...

Page 16: ...lt Audio Language choose the language you prefer for dialog on digital channels If the preferred language is not broadcasted with the program then the Using Menu System This section explores the menus...

Page 17: ...if your setup has changed you can do this from the TV menu Signal Type chooses the type of signal Cable Sat or Antenna depending upon which equipment you have connected to the ANT CABLE SAT IN Channel...

Page 18: ...same operation as Photo Music or Video in Media Menu Settings Configuration this option helps to connect your TV to internet For details please see Network Connection Network Setup Time Menu Time Zon...

Page 19: ...e functions shown on the function bar at the bottom of the TV screen 7 Press Cancel to exit and go back to the previous menu Music To playback music if available 1 Select Media Music icon then press O...

Page 20: ...override any existing password Channel Block To block a specific channel follow these steps 1 Select Parental Control Channel Block press OK to enter the next screen with channnel list on 2 Press to s...

Page 21: ...x opens then press to select then press OK to reset the downloadable rating data if present Input Block 1 Select Parental Control Input Block press OK to display the Input source list screen 2 Press s...

Page 22: ...tal CCFont Selects a character design for the digital closed caption text A font is a complete assortment of letters numbers punctuation marks etc in a given design You can choose from a variety of fo...

Page 23: ...creen It depends on how the station or device connected to your TV is formatting the video If there are bars on the screen press the ZOOM button to try a different format that may eliminate the bars S...

Page 24: ...a black and white picture from a component you ve connected to your TV you might have your video cables connected to the wrong jacks A yellow video cable connects to the yellow VIDEO INPUT jack on the...

Page 25: ...ponent and reconnect it Reset the power by unplugging the power cord and plugging it back in If you are tuned to the HDMI 1 or other HDMI INPUT and you re receiving Unusable Signal message screen pres...

Page 26: ...our TV Note that after a reboot you may need to run your TV through the setup process again To do a reboot unplug the power cord from the wall outlet or power strip Keep your TV unplugged for about 5...

Page 27: ...nels VHF2 13 UHF14 69 CATV 14 36 A W 37 59 AA WW 60 85 AAA ZZZ 86 94 86 94 95 99 A 5 A 1 100 135 100 135 01 4A Tuner type Frequency synthesized Operating Temperature 5 C to 35 C 41 F to 95 F Operating...

Page 28: ...ice location will be at the sole discretion of TTE based upon the TTE Limited Warranty Statement At the sole discretion of TTE television screen sizes 32 and smaller will either be repaired at an Auth...

Page 29: ...ODUCT OR ARISING OUT OF ANY BREACH OF ANY EXPRESS OR IMPLIED WARRANTY ON THIS PRODUCT THIS DISCLAIMER OF WARRANTIES AND LIMITED WARRANTY ARE GOVERNED BY THE LAWS OF THE STATE OF CALIFORNIA EXCEPT TO T...

Page 30: ...und to comply with the limits for a Class B digital device pursuant to Part 15 of the FCC Rules These limits are designed to provide reasonable protection against harmful interference in a residential...

Reviews: